Using an inexpensive Chinese ST-LINK and OpenOCD for Windows, I was able to repair the XIAO bootloader. Here is a summary of the procedure. I hope it will be helpful.
Copy the file C:/OpenOCD/share/openocd/script/target/at91samdXX.cfg and rename it XIAO_at91samdXX.cfg and modify the following:
set _CPUTAPID 0x4ba00477 ----> set _CPUTAPID 0x0bc11477
Create the directory C:/XIAO_bootloader.
Copy the openocd.cfg from the adafruit article “Create OpenOCD config” to C:/XIAO_bootloader and rename it XIAO_openocd.cfg and modify the following four parts.
source [find interface/raspberrypi2-native.cfg]
----> source [find interface/stlink.cfg]
transport select swd
----> transport select hla_swd
source [find target/at91samdXX.cfg]
----> source [find target/XIAO_at91samdXX.cfg]
program samd21_sam_ba verify
----> program bootloader-XIAO_m0-v3.7.0-33-g90ff611-dirty.bin verify
Download the bootloader file bootloader-XIAO_m0-v3.7.0-33-g90ff611-dirty.bin to C:/XIAO_bootloader.
At the command prompt C:/>cd XIAO_bootloader C:/XIAO_bootloader>C:/openocd/bin/openocd -f XIAO_openocd.cfg
Do not press the Enter key yet.
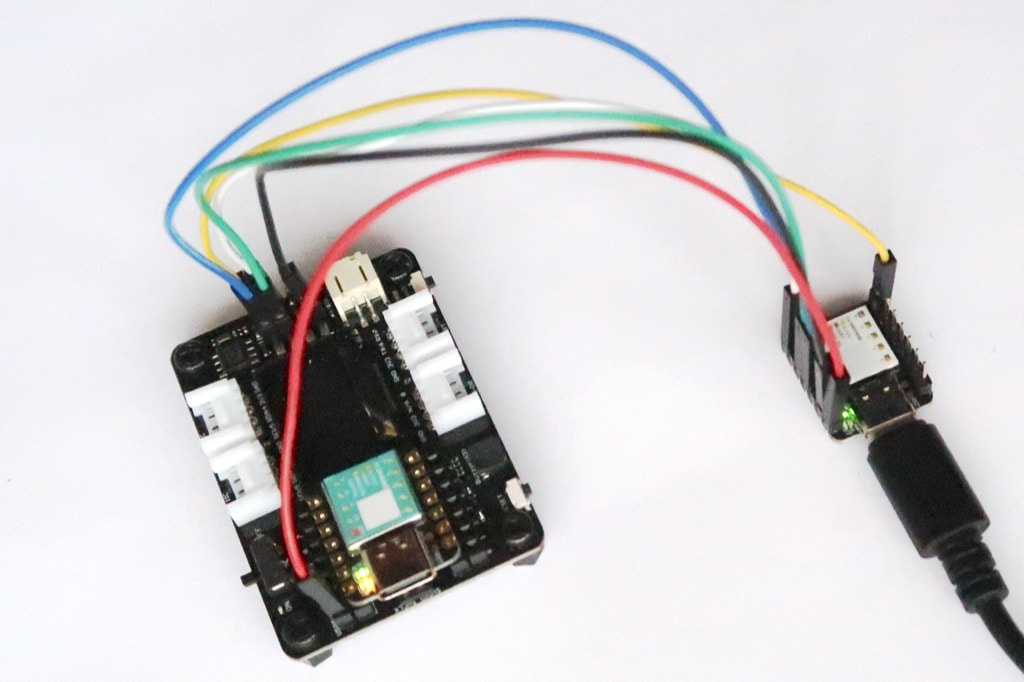
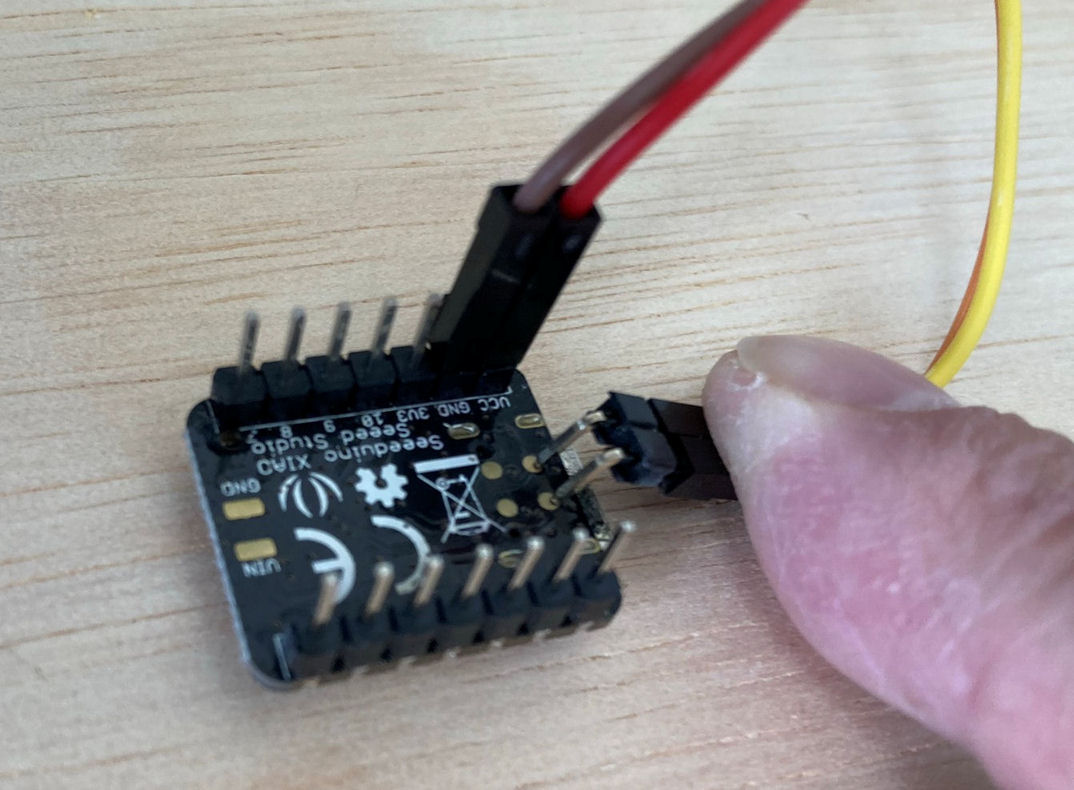
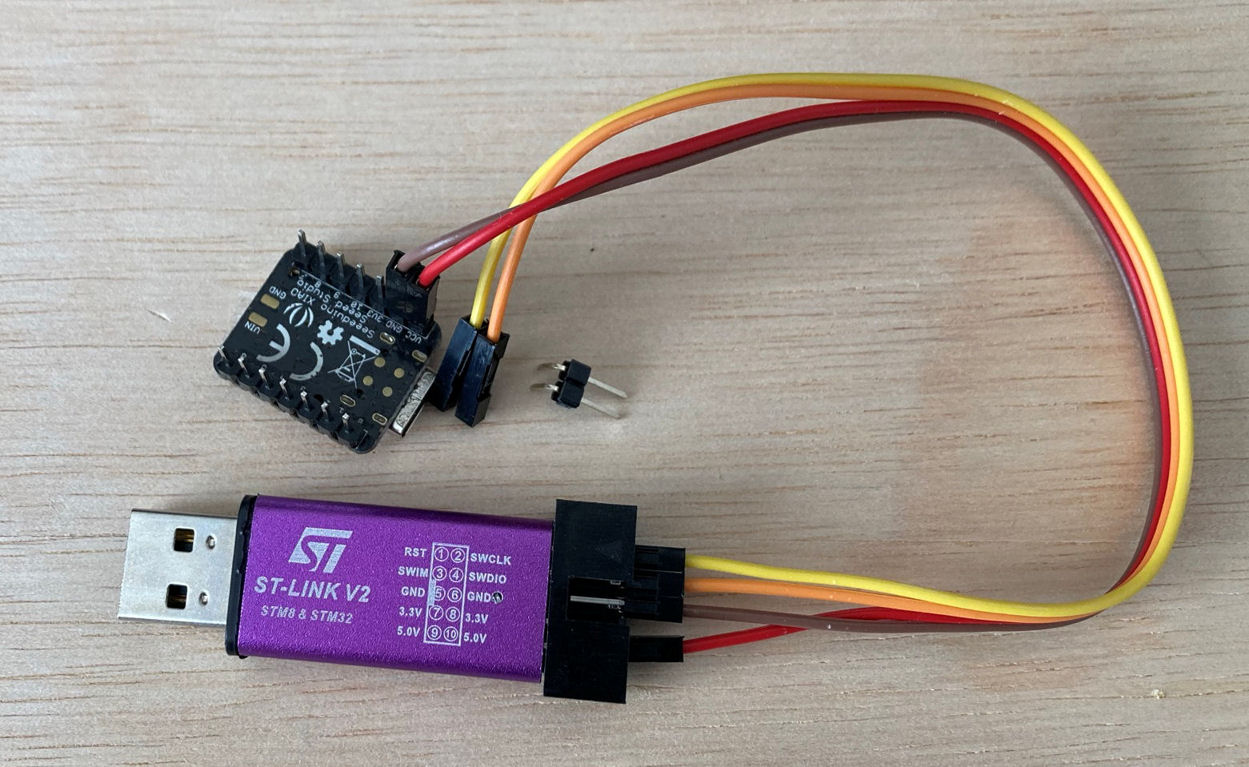
As shown in the photo, connect the power supply to the XIAO, keeping the pin header pressed against the pads, finally insert the ST-LINK into the USB port.
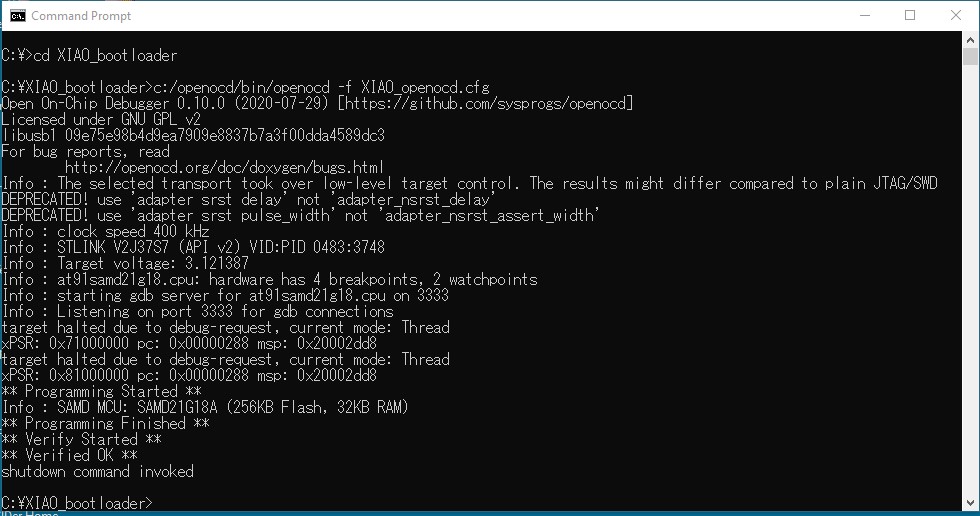
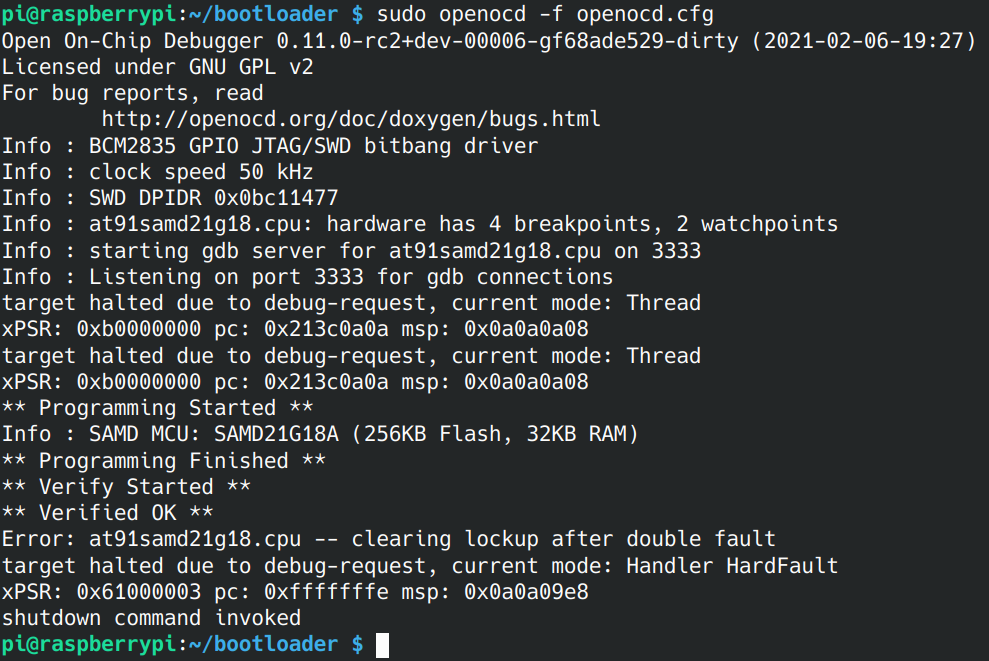
P ress Enter to execute. If it is successful, the following message will appear.
Programming Started
Info : SAMD MCU SAMD21G18A (256KB Flash, 32KB RAM)
Programming Finished
Verify Started
Verified OK Verified OK
shutdown command invoked
The write time is very short, 2-3 seconds, so by pressing the pin header to the pads I was able to write and did not have to do any difficult soldering to the pads.
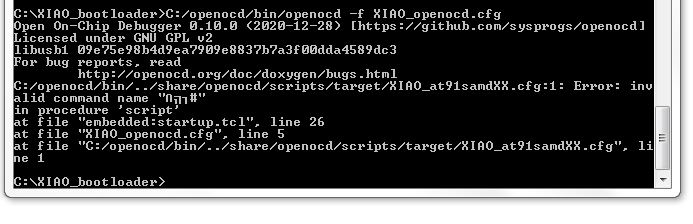
If you get an message Error: init mode failed (unable to connect to the target) and cannot write, unplug the ST-LINK once and repeat steps (6) through (8). If you still get an Error message, you will have to solder the pads.
Hi, @msfujino could you provide the “openocd.cfg” you used to unbrick XIAO using ST-LINK + OpenOCD? I had a look at Raspberry example but the file seams to be different as expected and it is not clear to me what to edit and what to leave unchanged…
Thank you.
I have tried 3 different xiao’s and all three programmed a sketch 2 or 3 times and then BRICKED on the following tries, they are not recognized by the USB any longer. I have tried them on multiple different computers both win7 and win10 and they are not recognized now.
I searched and found this thread and I have tried the steps you list. I have tried this on ST link and raspberrypi 4 the raspberry pi4 would error with different messages which i did not record.
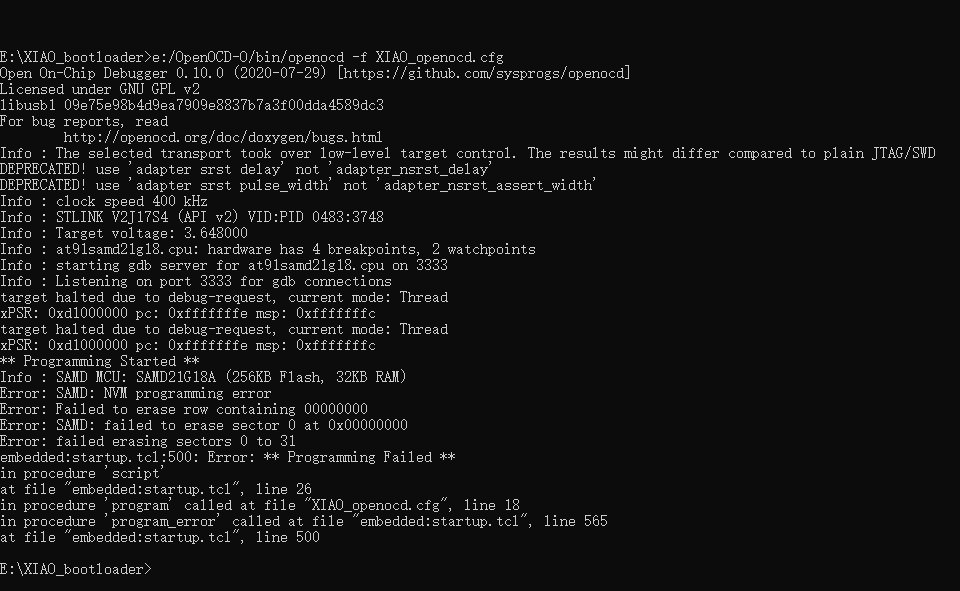
i have followed the above directions for openocd on windows 7 exactly and I cannot get it to work. I am getting an error message when trying to program. please see pic below for error message.
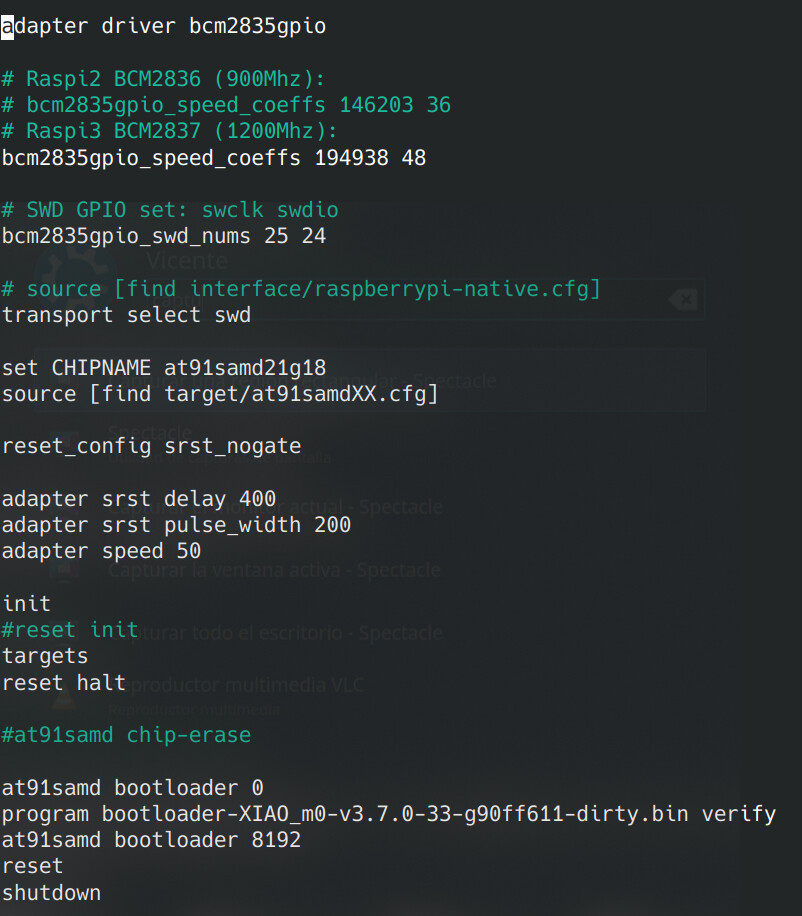
source [find interface/stlink.cfg]
transport select hla_swd

set CHIPNAME at91samd21g18
source [find target/XIAO_at91samdXX.cfg]

# did not yet manage to make a working setup using srst
#reset_config srst_only
reset_config  srst_nogate
#reset_config trst_only

adapter_nsrst_delay 100
adapter_nsrst_assert_width 100

init
targets
reset halt

at91samd bootloader 0
program bootloader-XIAO_m0-v3.7.0-33-g90ff611-dirty.bin verify
at91samd bootloader 8192
reset
shutdown
# script for Atmel SAMD, SAMR, SAML or SAMC, a Cortex-M0 chip
#

#
# samdXX devices only support SWD transports.
#
source [find target/swj-dp.tcl]

if { [info exists CHIPNAME] } {
   set _CHIPNAME $CHIPNAME
} else {
   set _CHIPNAME at91samd
}

if { [info exists ENDIAN] } {
   set _ENDIAN $ENDIAN
} else {
   set _ENDIAN little
}

# Work-area is a space in RAM used for flash programming
# By default use 2kB
if { [info exists WORKAREASIZE] } {
   set _WORKAREASIZE $WORKAREASIZE
} else {
   set _WORKAREASIZE 0x800
}

if { [info exists CPUTAPID] } {
   set _CPUTAPID $CPUTAPID
} else {
   set _CPUTAPID 0x0bc11477
}

swj_newdap $_CHIPNAME cpu -irlen 4 -expected-id $_CPUTAPID
dap create $_CHIPNAME.dap -chain-position $_CHIPNAME.cpu

set _TARGETNAME $_CHIPNAME.cpu
target create $_TARGETNAME cortex_m -endian $_ENDIAN -dap $_CHIPNAME.dap

$_TARGETNAME configure -work-area-phys 0x20000000 -work-area-size $_WORKAREASIZE -work-area-backup 0

# SAMD DSU will hold the CPU in reset if TCK is low when RESET_N
# deasserts (see datasheet Atmel-42181E–SAM-D21_Datasheet–02/2015, section 12.6.2)
#
# dsu_reset_deassert configures whether we want to run or halt out of reset,
# then instruct the DSU to let us out of reset.
$_TARGETNAME configure -event reset-deassert-post {
        at91samd dsu_reset_deassert
}

# SRST (wired to RESET_N) resets debug circuitry
# srst_pulls_trst is not configured here to avoid an error raised in reset halt
# reset_config srst_gates_jtag

# Do not use a reset button with other SWD adapter than Atmel's EDBG.
# DSU usually locks MCU in reset state until you issue a reset command
# in OpenOCD.

# SAMD runs at SYSCLK = 1 MHz divided from RC oscillator after reset.
# Other members of family usually use SYSCLK = 4 MHz after reset.
# Datasheet does not specify SYSCLK to SWD clock ratio.
# Usually used SYSCLK/6 is slow, testing shows that debugging can
# work @ SYSCLK/2 but your mileage may vary.
# This limit is most probably imposed by incorrectly handled SWD WAIT
# on some SWD adapters.

adapter speed 400

# Atmel's EDBG (on-board cmsis-dap adapter of Xplained kits) works
# without problem at maximal clock speed. Atmel recommends
# adapter speed less than 10 * CPU clock.
# adapter speed 5000

if {![using_hla]} {
   # if srst is not fitted use SYSRESETREQ to
   # perform a soft reset
   cortex_m reset_config sysresetreq
}

set _FLASHNAME $_CHIPNAME.flash
flash bank $_FLASHNAME at91samd 0x00000000 0 1 1 $_TARGETNAME
and rename it “nano.exe” copy this file into the folders that contain the files you want to edit.
within the cmd prompt you can now use the nano editor to create the .cfg files and modify others by typing “nano whateverfilename.cfg” and this will open that file and you can copy code I have listed above into it. press ctrl x to save. and all will work properly.
it will flash the .bin file now
this is probably very basic for most experts but will help the newbie like myself.
Fox95,
I’m glad you could flush the bootloader.
(I edited two config files using “notepad ++ v7.1.9”, but there was no particular problem.)
I think the bootloader .bin is the latest version.
i was just using standard notepad for windows, so whoever is reading this in the future do not use just notepad, use notepad ++ as mentioned above by msfujino or nano edit.
thank you for the help.
are there any other cool things that can be done for flashing? and tweaks or things that maybe can be modded by using the ST-link?
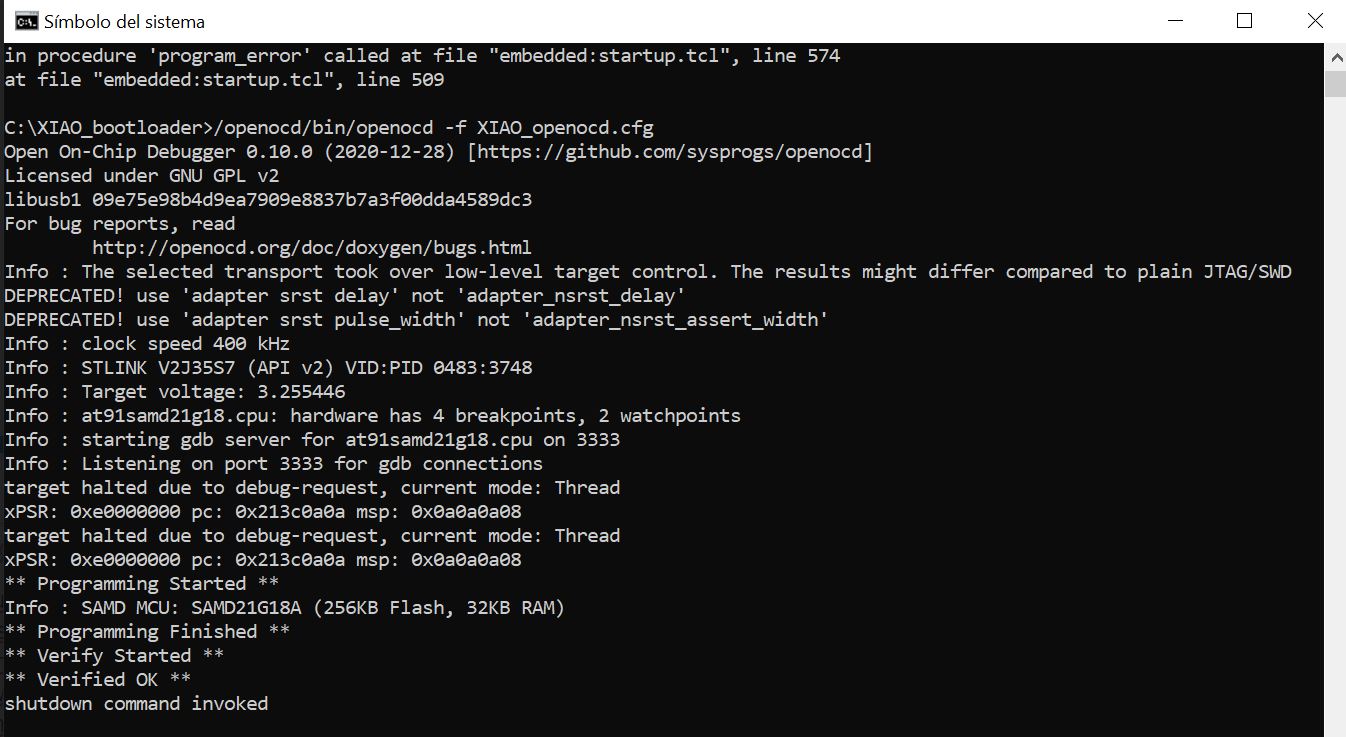
Hello, I am from Panama. Thanks for sharing your solution to the XIAO microcontroller problem. I have 3 dead cards. Two of those dead boards I have successfully loaded the bootloader using STlink, however they are still not recognized. What is going on? Two of the cards were initially damaged, however, I had one XIAO left unused and in perfect condition so I proceeded to load the bootloader on this working card to verify that everything was working fine, but in the end this card also failed. Attached is some information from the command console. I appreciate your help.
Yes, I did the reboot of the microcontroller board. I replicated the process on a raspberry pi 3b+, the following are screenshots of the openocd.cfg file and the linux console. I am getting errors, I don’t know how to fix it. I appreciate any help.
pochin2288,
Before move on to Linux and Raspberry Pi, I have question.
Judging from your screenshot, I think the bootloader is written correctly.
Did you reset twice quickly by referring to “Enter Bootloader Mode” at https://wiki.seeedstudio.com/Seeeduino-XIAO/ ?
An orange LED should blink slowly.
It’s quite difficult to reset twice quickly, so try it many times.
I tried the reboot many times. It may be as you say, I should have tried more, however I was able to resurrect the 3 XIAO boards by flashing a hex file from an arduino Zero compiled in linux. After that the XIAO boards were recognized as Arduino Zero, but using PlatformIO I flashed a sketch for XIAO and it updated the bootloader correctly. The USB ports on my computer usually give problems, so they may be complicit in the problem. Thanks for your help, without your repair guide I wouldn’t have dug deep enough until I solved the problem.

 .
.