Seeed xiao esp32c3 blekeyboard not working

Hi everybody, i am Andrea and i am a mechanical engineer.

For my job i have developed a simple bluetooth keyboard using a esp32 wroom module.

The sketch started from a modified example of the library blekeyboard.h

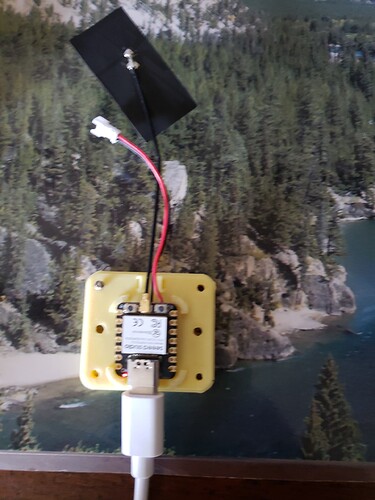
I have tried to do the porting from the wroom to the tiny seeed xiao esp32c3 in order to have a very compact keyboard.

But the result is a not working situation both in bluetooth connection and also in serial checking for debugging.

I think i am loosing something about the coding on this device. Seems that it’s necessary to do something more in the code because maybe the seeed behaves in a very different way compared to the wroom.

So the simple porting just changing the pinout it’s not correct.

Can you please help me to understand how to workaround this?

Hi there Andrea, Sounds fun LOL
Can you post the code and we can look and suggest some edits.
HTH
GL :slight_smile: PJ

Apologise for lot of italian comments :slight_smile:

//PROGRAMMA PER TASTIERA BT PER OSMAND
//LA TASTIERA è LA ACUMA P5-BT CHE HA LA SEGUENTE SPECIFICA:
//LA TASTIERA è COMPOSTA DA 4 TASTI E DA UN MINIJOYSTICK PER FARE IL PAN E CON UNO SWITCH INTERNO SE VIENE PREMUTO IL JOYSTICK
//LA SOMMA TOTALE QUINDI DELLE FUNZIONI è DI 9 (4 TASTI, 4 DIREZIONI JOYSTICK, 1 SWITCH JOYSTICK), ECCO PERCHè QUINDI LA FUNZIONE KEYBOARD è IDEALE
//LA TASTIERA DEVE POTER CONTROLLARE OSMAND E LE ALTRE APP PER NAVIGARE CON IL ROADBOOK ELETTRONICO
//QUINDI SI RENDONO NECESSARIE 2 KEYMAP CHE DOVRANNO ESSERE SELEZIONATE TRAMITE LA PRESSIONE LUNGA DI UN TASTO:
//KEYMAP 0 --> OSMAND
//KEYMAP 1 --> ROADBOOK

//KEYMAP 0 - TABELLA CIFRAvsCARATTEREvsFUNZIONE:
//SHORT PRESS / CLICK
//1 --> VOL+ --> ZOOM+
//2 --> ARROW UP --> PAN UP
//3 --> D --> CHANGE MAP ORIENTATION
//4 --> ARROW LEFT --> PAN LEFT
//5 --> C --> CENTER POSITION
//6 --> ARROW RIGHT --> PAN RIGHT
//7 --> VOL- --> ZOOM-
//8 --> ARROW DOWN --> PAN DOWN
//9 --> NULL/NIENTE
//LONG PRESS / HOLD
//1 --> VOL+ --> ZOOM+
//2 --> ARROW UP --> PAN UP
//3 --> D --> CHANGE MAP ORIENTATION
//4 --> ARROW LEFT --> PAN LEFT
//5 --> C --> CAMBIO MAPPA
//6 --> ARROW RIGHT --> PAN RIGHT
//7 --> VOL- --> ZOOM-
//8 --> ARROW DOWN --> PAN DOWN
//9 --> NULL/NIENTE


//KEYMAP 1 - TABELLA CIFRAvsCARATTEREvsFUNZIONE:
//SHORT PRESS / CLICK
//1 --> ARROW UP --> SCROLL UP
//2 --> ARROW UP --> SCROLL UP
//3 --> VOL+ --> TRIP +
//4 --> ARROW LEFT --> NULL
//5 --> C --> NULL
//6 --> ARROW RIGHT --> NULL
//7 --> ARROW DOWN --> SCROLL DOWN
//8 --> ARROW DOWN --> SCROLL DOWN
//9 --> VOL- --> TRIP-
//LONG PRESS / HOLD
//1 --> ARROW UP --> SCROLL UP
//2 --> ARROW UP --> SCROLL UP
//3 --> VOL+ --> TRIP +
//4 --> ARROW LEFT --> NULL
//5 --> C --> CAMBIO MAPPA
//6 --> ARROW RIGHT --> NULL
//7 --> ARROW DOWN --> SCROLL DOWN
//8 --> ARROW DOWN --> SCROLL DOWN
//9 --> VOL- --> TRIP-

//si utilizza la libreria keypad per gestire in maniera efficace l'impiego di una tastiera semplice (in questo caso una 3x3)
//si utilizza la libreria BleKeyboard che serve per mandare i comandi corretti a osmand
//tasti direzionali --> pan
//vol +- --> zoom
//c--> ricentra la mappa
//d --> cambia orientamento
//serve poi fare la comunicazione BT tramite una libreria apposita
//i tasti direzionali vengono comandati da un joystick che a sua volta pilota dei transistor

//NB, non si fa uso di transistor, e a causa dello schema del joystick, siamo costretti a usare una tastiera 2x5 di cui però non verrà usato il carattere A

//PER INCLUDERE LA LIBREREIA BLE SI DEVE SCRIVERE COSI
#include <BleKeyboard.h>
BleKeyboard bleKeyboard("ACUMA_P5_01", "ACUMA", 100);

//INCLUSIONE LIBRERIA KEYPAD
#include <Keypad.h>

//GESTIONE LED RGB DI STATO
/******************** definizione delle costanti **********************************/
int portarossa = D7; // porta 11 da collegare all’anodo “rosso” del modulo RGB
int portaverde = D8; // porta 10 da collegare all’anodo “verde” del modulo RGB
int portablu = D9; // porta 9 da collegare all’anodo “blu” del modulo RBG
/**********************routine di accensione del led ********************************
  nelle prossime righe viene definita la routine “colore” che, al momento del lancio, e’
  accompagnata da tre variabili (rosso, verde e blu) che contengono i valori dell’intensita’
  luminosa, di volta in volta voluta, per ogni singolo led (0 = minim0a e 255 = massima) */
void colore (unsigned char rosso, unsigned char verde, unsigned char blu)
{
  analogWrite(portarossa, rosso); //attiva il led rosso con l’intensita’ definita nella variabile rosso
  analogWrite(portablu, blu); //attiva il led blu con l’intensita’ definita nella variabile blu
  analogWrite(portaverde, verde); //attiva il led verde con l’intensita’ definita nella variabile verde
}

//dichiaro il numero di righe e colonne della tastiera
const int nR = 2;
const int nC = 5;


//mappa dei caratteri che ci serviranno come riferimento per usare il costrutto "case"
const char acumaMap[nR][nC] =
{
  { '2', '8', '4', '6', '5'},
  { '1', '7', '3', '9', 'A'}


};

//definizione dei pin connessi alla keypad, devi usare byte perchè altrimenti non funziona
byte rowPin[nR] = {D0, D1};
byte colPin[nC] = {D2, D3, D4, D5, D6};

//costruzione della tastiera, la sintassi è questa. dove acumaP5 è il nome della tastiera e viene usata la mappa dei tasti
Keypad acumaP5 = Keypad( makeKeymap(acumaMap), rowPin, colPin, nR, nC );

unsigned long hold_time = millis();

// define time for a long press (ms)
const int long_press_time = 440;
const int long_press_repeat_interval = 160;

// Variable that holds the current active keymap
int current_keymap = 0;

// How many keymaps do we have?
const int KEYMAP_COUNT = 2;

void send_short_press(KeypadEvent key) {
  switch (key) {
    case '1':
      switch (current_keymap) {
        case 0: bleKeyboard.write(KEY_MEDIA_VOLUME_UP);
          break;
        case 1: bleKeyboard.write(KEY_MEDIA_PREVIOUS_TRACK);
          break;
      }
      break;
    case '2':
      switch (current_keymap) {
        case 0: bleKeyboard.write(KEY_UP_ARROW);
          break;
        case 1: bleKeyboard.write(KEY_MEDIA_PREVIOUS_TRACK);
          break;
      }
      break;
    case '3':
      switch (current_keymap) {
        case 0: bleKeyboard.write('d');
          break;
        case 1: bleKeyboard.write(KEY_MEDIA_VOLUME_UP);
          break;
      }
      break;
    case '4':
      switch (current_keymap) {
        case 0: bleKeyboard.write(KEY_LEFT_ARROW);
          break;
        case 1: bleKeyboard.write(KEY_LEFT_ARROW);
          break;
      }
      break;
    case '5':
      switch (current_keymap) {
        case 0: bleKeyboard.write('c');
          break;
        case 1: bleKeyboard.write('c');
          break;
      }
      break;
    case '6':
      switch (current_keymap) {
        case 0: bleKeyboard.write(KEY_RIGHT_ARROW);
          break;
        case 1: bleKeyboard.write(KEY_RIGHT_ARROW);
          break;
      }
      break;
    case '7':
      switch (current_keymap) {
        case 0: bleKeyboard.write(KEY_MEDIA_VOLUME_DOWN);
          break;
        case 1: bleKeyboard.write(KEY_MEDIA_NEXT_TRACK);
          break;
      }
      break;
    case '8':
      switch (current_keymap) {
        case 0: bleKeyboard.write(KEY_DOWN_ARROW);
          break;
        case 1: bleKeyboard.write(KEY_MEDIA_NEXT_TRACK);
          break;
      }
      break;
    case '9':
      switch (current_keymap) {
        case 1: bleKeyboard.write(KEY_MEDIA_VOLUME_DOWN);
          break;
      }
      break;
  }
}

void send_long_press(KeypadEvent key) {
  Serial.println(key);

  switch (key) {
    case '1':
      switch (current_keymap) {
        case 0: send_repeating_key(KEY_MEDIA_VOLUME_UP);
          break;
        case 1: send_repeating_key(KEY_MEDIA_PREVIOUS_TRACK);
          break;
      }
      break;
    case '2':
      switch (current_keymap) {
        case 0: send_repeating_key(KEY_UP_ARROW);
          break;
        case 1: send_repeating_key(KEY_MEDIA_PREVIOUS_TRACK);
          break;
      }
      break;
    case '3':
      switch (current_keymap) {
        case 0: bleKeyboard.write('d');
          break;
        case 1: send_repeating_key(KEY_MEDIA_VOLUME_UP);
          break;
      }
      break;
    case '4':
      switch (current_keymap) {
        case 0: send_repeating_key(KEY_LEFT_ARROW);
          break;
        case 1: send_repeating_key(KEY_LEFT_ARROW);
          break;
      }
      break;
    case '5': switch_keymap();
      break;
    case '6':
      switch (current_keymap) {
        case 0: send_repeating_key(KEY_RIGHT_ARROW);
          break;
        case 1: send_repeating_key(KEY_RIGHT_ARROW);
          break;
      }
      break;
    case '7':
      switch (current_keymap) {
        case 0: send_repeating_key(KEY_MEDIA_VOLUME_DOWN);
          break;
        case 1: send_repeating_key(KEY_MEDIA_NEXT_TRACK);
          break;
      }
      break;
    case '8':
      switch (current_keymap) {
        case 0: send_repeating_key(KEY_DOWN_ARROW);
          break;
        case 1: send_repeating_key(KEY_MEDIA_NEXT_TRACK);
          break;
      }
      break;
    case '9':
      switch (current_keymap) {
        case 1: send_repeating_key(KEY_MEDIA_VOLUME_DOWN);
          break;
      }
      break;
  }
}

void send_repeating_key(uint8_t key) {
  while (acumaP5.getState() == HOLD) {
    bleKeyboard.write(key);
    delay(long_press_repeat_interval);
    acumaP5.getKey();
  }
}

void send_repeating_key(const MediaKeyReport key) {
  while (acumaP5.getState() == HOLD) {
    bleKeyboard.write(key);
    delay(long_press_repeat_interval);
    acumaP5.getKey();
  }
}

void keypad_handler(KeypadEvent key) {

  switch (acumaP5.getState()) {
    case PRESSED:
      send_short_press(key);
      break;
    case HOLD:
      send_long_press(key);
      break;
  }
}

// the setup function runs once when you press reset or power the board
void setup() {
  // initialize digital pin LED_BUILTIN as an output.
 // pinMode (12, OUTPUT);

  Serial.begin (9600);

  bleKeyboard.begin();

  acumaP5.addEventListener(keypad_handler); // Add an event listener for this keypad
  acumaP5.setHoldTime(long_press_time);
  pinMode(portarossa, OUTPUT); // dichiara la porta 11 come porta di output
  pinMode(portaverde, OUTPUT); // dichiara la porta 10 come porta di output
  pinMode(portablu, OUTPUT); // dichiara la porta 9 come porta di output
}

// the loop function runs over and over again forever
void loop() {
  acumaP5.getKey(); //key è la variabile a cui viene assegnato il numero della tastiera con l'istruzione getkey
  //delay(10);
  char key = acumaP5.getKey();
  Serial.println(key);  //se voglio stamparla sul serial monitor
  //Serial.println(acumaP5.getState());

  //gestione colori mappe
  if (bleKeyboard.isConnected()) {
    switch (current_keymap) {
      case 0: colore(0, 0, 255);
        break;
      case 1: colore(0, 255, 0);
        break;
    }
  }
  else {
    colore(255, 0, 0);
  }
}


// This function cycles the keymap and signals the new keymap via the LED
void switch_keymap() {
  // Serial.println("Switching keymap");

  // cycle to next keymap
  current_keymap++;
  if (current_keymap > KEYMAP_COUNT - 1) {
    current_keymap = 0;
  }
}

the error which came from serial monitor is this when trying to connect to the phone

Also this simpler sketch does not work. In terms of connection bluetooth. In terms of funcionality of the sketch itself, so that the keystrokes, these works properly in the serial monitor

/* @file CustomKeypad.pde
  || @version 1.0
  || @author Alexander Brevig
  || @contact [email protected]
  ||
  || @description
  || | Demonstrates changing the keypad size and key values.
  || #
*/
#include <Keypad.h>
#include <BleKeyboard.h>
BleKeyboard bleKeyboard("ACUMA_P5_01", "ACUMA", 100);

const byte ROWS = 2; //four rows
const byte COLS = 5; //four columns
//define the cymbols on the buttons of the keypads
char hexaKeys[ROWS][COLS] = {
  { '2', '8', '4', '6', '5'},
  { '1', '7', '3', '9', 'A'}
};
byte rowPins[ROWS] = {D0, D1}; //connect to the row pinouts of the keypad
byte colPins[COLS] = {D2, D3, D4, D5, D6}; //connect to the column pinouts of the keypad

//initialize an instance of class NewKeypad
Keypad customKeypad = Keypad( makeKeymap(hexaKeys), rowPins, colPins, ROWS, COLS);

void setup() {
  Serial.begin(9600);
  bleKeyboard.begin();

}

void loop() {
  char customKey = customKeypad.getKey();

  if (customKey) {
    Serial.println(customKey);
  }
}

Hi there,
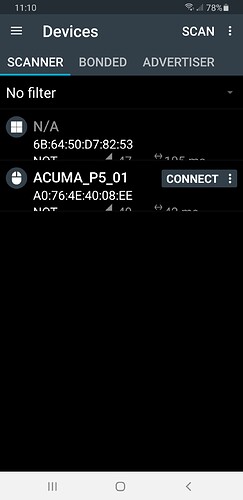
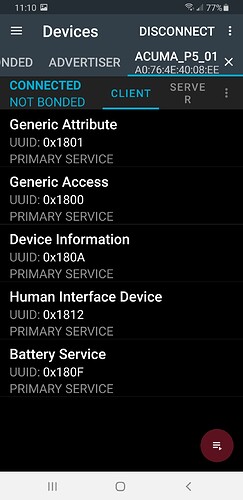
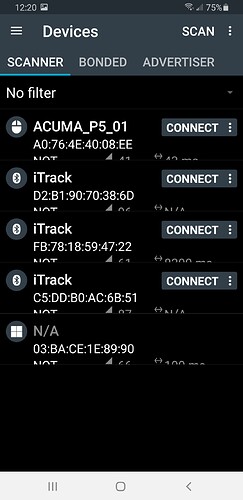
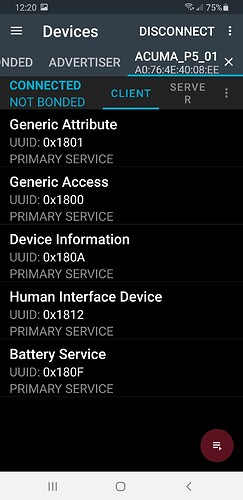
So I was able to compile and scan and connect with Nrf connect.
I used this lib:
https://github.com/T-vK/ESP32-BLE-Keyboard/releases/tag/0.3.2-beta
Both compiled and advertised as expected, I was able to connect with my Android phone.
HTH
GL :slight_smile: PJ.


Here is the compiler output log:

FQBN: esp32:esp32:XIAO_ESP32C3
Using board 'XIAO_ESP32C3' from platform in folder: C:\Users\Value Pawn\AppData\Local\Arduino15\packages\esp32\hardware\esp32\2.0.9
Using core 'esp32' from platform in folder: C:\Users\Value Pawn\AppData\Local\Arduino15\packages\esp32\hardware\esp32\2.0.9
**EDIT: for brevity"**
~
esptool.py v4.5.1
Creating esp32c3 image...
Merged 2 ELF sections
Successfully created esp32c3 image.
"C:\\Users\\Value Pawn\\AppData\\Local\\Arduino15\\packages\\esp32\\hardware\\esp32\\2.0.9/tools/gen_esp32part.exe" -q "C:\\Users\\Value Pawn\\AppData\\Local\\Temp\\arduino\\sketches\\D4618B69F3AD3C22969DD36CAAD9F475/partitions.csv" "C:\\Users\\Value Pawn\\AppData\\Local\\Temp\\arduino\\sketches\\D4618B69F3AD3C22969DD36CAAD9F475/sketch_jun19b.ino.partitions.bin"
cmd /c if exist "C:\\Users\\Value Pawn\\AppData\\Local\\Temp\\arduino\\sketches\\D4618B69F3AD3C22969DD36CAAD9F475\\libraries\\Insights" "C:\\Users\\Value Pawn\\AppData\\Local\\Arduino15\\packages\\esp32\\hardware\\esp32\\2.0.9/tools/gen_insights_package.exe" "C:\\Users\\Value" "Pawn\\AppData\\Local\\Temp\\arduino\\sketches\\D4618B69F3AD3C22969DD36CAAD9F475" sketch_jun19b.ino "C:\\Users\\Value Pawn\\AppData\\Local\\Temp\\.arduinoIDE-unsaved2023519-5524-3o5ul5.mk68\\sketch_jun19b"
cmd /c IF 0==1 COPY /y "C:\\Users\\Value Pawn\\AppData\\Local\\Arduino15\\packages\\esp32\\tools\\openocd-esp32\\v0.11.0-esp32-20221026\\share\\openocd\\scripts\\board\\esp32c3-builtin.cfg" "C:\\Users\\Value Pawn\\AppData\\Local\\Temp\\.arduinoIDE-unsaved2023519-5524-3o5ul5.mk68\\sketch_jun19b\\debug.cfg"
cmd /c IF 0==1 COPY /y "C:\\Users\\Value Pawn\\AppData\\Local\\Arduino15\\packages\\esp32\\hardware\\esp32\\2.0.9\\tools\\ide-debug\\esp32c3.json" "C:\\Users\\Value Pawn\\AppData\\Local\\Temp\\.arduinoIDE-unsaved2023519-5524-3o5ul5.mk68\\sketch_jun19b\\debug_custom.json"
cmd /c IF 0==1 COPY /y "C:\\Users\\Value 

Using library ESP32 BLE Keyboard at version 0.3.2 in folder: C:\Users\Value Pawn\Documents\Arduino\libraries\ESP32_BLE_Keyboard 
Using library ESP32 BLE Arduino at version 2.0.0 in folder: C:\Users\Value Pawn\AppData\Local\Arduino15\packages\esp32\hardware\esp32\2.0.9\libraries\BLE 
Using library Keypad at version 3.1.1 in folder: C:\Users\Value Pawn\Documents\Arduino\libraries\Keypad 
"C:\\Users\\Value Pawn\\AppData\\Local\\Arduino15\\packages\\esp32\\tools\\riscv32-esp-elf-gcc\\esp-2021r2-patch5-8.4.0/bin/riscv32-esp-elf-size" -A "C:\\Users\\Value Pawn\\AppData\\Local\\Temp\\arduino\\sketches\\D4618B69F3AD3C22969DD36CAAD9F475/sketch_jun19b.ino.elf"
Sketch uses 943110 bytes (71%) of program storage space. Maximum is 1310720 bytes.
Global variables use 39524 bytes (12%) of dynamic memory, leaving 288156 bytes for local variables. Maximum is 327680 bytes.
"C:\Users\Value Pawn\AppData\Local\Arduino15\packages\esp32\tools\esptool_py\4.5.1/esptool.exe" --chip esp32c3 --port "COM14" --baud 921600  --before default_reset --after hard_reset write_flash  -z --flash_mode dio --flash_freq 80m --flash_size 4MB 0x0 "C:\Users\Value Pawn\AppData\Local\Temp\arduino\sketches\D4618B69F3AD3C22969DD36CAAD9F475/sketch_jun19b.ino.bootloader.bin" 0x8000 "C:\Users\Value Pawn\AppData\Local\Temp\arduino\sketches\D4618B69F3AD3C22969DD36CAAD9F475/sketch_jun19b.ino.partitions.bin" 0xe000 "C:\Users\Value Pawn\AppData\Local\Arduino15\packages\esp32\hardware\esp32\2.0.9/tools/partitions/boot_app0.bin" 0x10000 "C:\Users\Value Pawn\AppData\Local\Temp\arduino\sketches\D4618B69F3AD3C22969DD36CAAD9F475/sketch_jun19b.ino.bin" 
esptool.py v4.5.1
Serial port COM14
Connecting...
Chip is ESP32-C3 (revision v0.3)
Features: WiFi, BLE
Crystal is 40MHz
MAC: a0:76:4e:40:08:ec
Uploading stub...
Running stub...
Stub running...
Changing baud rate to 921600
Changed.
Configuring flash size...
Flash will be erased from 0x00000000 to 0x00003fff...
Flash will be erased from 0x00008000 to 0x00008fff...
Flash will be erased from 0x0000e000 to 0x0000ffff...
Flash will be erased from 0x00010000 to 0x000fdfff...
Compressed 13152 bytes to 9473...
Writing at 0x00000000... (100 %)
Wrote 13152 bytes (9473 compressed) at 0x00000000 in 0.2 seconds (effective 466.2 kbit/s)...
Hash of data verified.
Compressed 3072 bytes to 146...
Writing at 0x00008000... (100 %)
Wrote 3072 bytes (146 compressed) at 0x00008000 in 0.0 seconds (effective 532.4 kbit/s)...
Hash of data verified.
Compressed 8192 bytes to 47...
Writing at 0x0000e000... (100 %)
Wrote 8192 bytes (47 compressed) at 0x0000e000 in 0.1 seconds (effective 610.9 kbit/s)...
Hash of data verified.
Compressed 973984 bytes to 532881...
Writing at 0x00010000... (3 %)
Writing at 0x0001b0c5... (6 %)
Writing at 0x00028182... (9 %)
Writing at 0x000355df... (12 %)
Writing at 0x0003ff17... (15 %)
Writing at 0x00045e35... (18 %)
Writing at 0x0004ce6b... (21 %)
Writing at 0x000532f0... (24 %)
Writing at 0x00059500... (27 %)
Writing at 0x0006089b... (30 %)
Writing at 0x000673c8... (33 %)
Writing at 0x0006df54... (36 %)
Writing at 0x00073e87... (39 %)
Writing at 0x0007a56d... (42 %)
Writing at 0x000816c8... (45 %)
Writing at 0x00087c61... (48 %)
Writing at 0x0008f5e7... (51 %)
Writing at 0x000962cc... (54 %)
Writing at 0x0009c39a... (57 %)
Writing at 0x000a3300... (60 %)
Writing at 0x000aa3be... (63 %)
Writing at 0x000b32f4... (66 %)
Writing at 0x000ba30b... (69 %)
Writing at 0x000c0a60... (72 %)
Writing at 0x000c7884... (75 %)
Writing at 0x000cdf86... (78 %)
Writing at 0x000d3d25... (81 %)
Writing at 0x000d9d5d... (84 %)
Writing at 0x000dffaf... (87 %)
Writing at 0x000e7789... (90 %)
Writing at 0x000ee786... (93 %)
Writing at 0x000f43e9... (96 %)
Writing at 0x000fa5bd... (100 %)
Wrote 973984 bytes (532881 compressed) at 0x00010000 in 7.7 seconds (effective 1018.0 kbit/s)...
Hash of data verified.

Leaving...
Hard resetting via RTS pin...

Works Great! HTH :sunglasses:

Thanks for the reply.
But were you able to bond with bluetooth the acuma_p5_01?

Because in my case i can see it in the BLE connection manager, but not able to bond it

Hi Brente88,
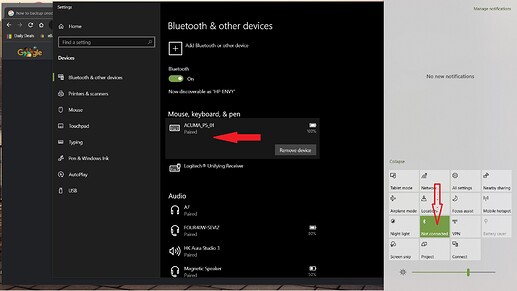
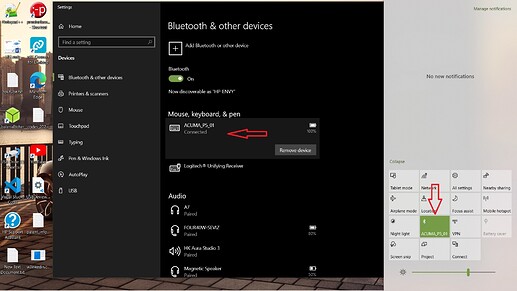
On my Win 10 HP laptop it pairs and connects , Not sure why you want to bond to it ? encryption maybe ?
AFAIK there is no clean Arduino code or lib that does allow it?
Here is what it does for me.
Trying to bond fails but connects and will reconnect if I drop the BLE off On my Android phone and NRF connect.


If you do want this you can easily implement something yourself on the service/characteristic level. Simple version a characteristic that needs to be written to by the client, when the client connects. If the peripheral is not happy about the value/pass code that gets written it disconnects. That should be enough for a light project.
I remember a BLE password required connection code example I’ve seen here or in the Arduino Forum that delivers that sort of functionality.
HTH
GL :slight_smile: PJ

That’s really strange. Did you aldo check with a smartphone?

In your situation seems to perfectly work.

Is it maybe the firmware inside the xiao which needs something special?

Seems i am missing something along the path.

I am using the arduino IDE to do everything. The blekeyboard library version is aligned on what you have.

Is it compiled enabling the nimble?

Is it necessary to flash the xiao to completely erase everything inside?

Hi there,
Only seems to work as intended on the PC , note: It shows up as a Keyboard on PC, The Mobile phone (nRF-connect) shows it as a Mouse? Wacky? IF I set auto-connect to ON in nRF-connect and walk away with phone it disconnects at about 30’ when I walk back It DOES reconnect AOK?

Seems to me the code works, setting on your pairing device may be some issue’s
HTH
GL :slight_smile: PJ

Do you use nrf-Connect to test with? PC or Android?

Hi,
I am testing with both pc and android.

This morning i noticed that with PC, at first pairing, everything works good.
But after turn off and on again the BT on PC, the device connection alternates between paired and not paired.

With android no way to pair the device.

What i should look at on android or pc to set correctly the connection parameters?

Yeiiiiii finally i have found the solution.

I was using the BLEkeyboard library but not the correct one.

It’s available a modified library written for esp32c3 which makes the nimBLE mode to work properly.

I guess my seeed was already set to work in nimble mode in BT.

After changing the library, and after having installed on my phone the EFRconnect app, it’s now possible to pair without problem the board.

Super happy

1 Like

can you tell me what is the name of the correct library?

Thanks,

HTH
Gl :slight_smile:

1 Like

Thank you for your response!

Can you link the correct library? i’ve the same problem and i’m not able to solve it.
tnx

Check the link in post number five, It’s there.
HTH
GL :slight_smile:

tnx a lot… only one question more, Esp32C3 and this librares works correctly?

ESP32 BLE KEYBOARD 0.3.2
BLE ARDUINO 2.0.0
Keypad 3.1.1

wich differences between BLE arduino and NimBLE?
tnx a lot.