I have a Jetson Xavier NX module (Jetson SUB Mini PC-Silver with powerful Jetson Xavier NX module, aluminium frame enclosure, 128GB SSD, WIFI, antennas and pre-installed JetPack system.(Ready to use) - Seeed Studio), which I have previously been able to flash Jetpack 5.0.1 to with no issues (both to EMMC & NVMe). My host OS is Ubuntu 20.04. Recently I tried to flash Jetpack 5.0.2 to Xavier’s NVMe (after flashing 5.0.2 to EMMC) and this has taken me down a very frustrating rabbit hole. At first the flash of 5.0.2 kept failing, so I uninstalled everything from EMMC & NVMe (using GUI SDK Manager). Then I systematically installed 5.0.1 to EMMC (worked), then 5.0.2 to EMMC (worked), then 5.0.2 to NVMe. The latter “worked” in the sense that the flash completed successfully (according to SDK Manager)…however, when I connected a monitor to the Xavier to do the initial Ubuntu setup I just see a black screen. I also trieded to ssh to Xavier (192.168.55.1) but it just hung. So when I opened the GUI SDK Manager back up the first thing I get is a pop-up window saying "SDK Manager detected device connected. Please select the target hardware for (USB port: 1-3 Bus/Device: 001/010): " and it presents two options: Jetson Xavier NX and Jetson Xavier NX [developer kit version]. This is the first time I’ve ever seen it do this, and seems no matter what I do it continues to see two devices (even though there is only one device connected). The board in this housing is not a developer kit version, so I’m not sure where this second option is coming from. I have tried using other USB ports on my laptop and even tried rebooting the laptop - still the same thing. I’ve also tried flashing 5.0.2 via the Jetson linux flash container (Jetson Linux Flash container | NVIDIA NGC), but I get an error part way through the flash when I try this: “Skip generating EFI system partition image. EFI system partition image (esp.img) not found.”
Does Seeed Studio provide any method to check the log in serial console (to check log when monitor is dead)?
We have provided methods here to query the device’s boot log via minicon.
Based on your feedback, we will also start testing the installation of Jetpack 5.0.2 in parallel to check if this is an isolated case or a common occurrence, I will update here if there is any news.
When I installed to EMMC, I didn’t check in the SDK components, since they won’t fit. But I believe I did check in SDK components when I installed to NVMe. NVMe is where I’d previously (a few months ago) installed 5.0.1 multiple times with no issues.
I am guessing that it does, given the below output from “dmesg --follow” after connecting my board using the USB cable:
[215134.057688] usb 1-3: new high-speed USB device number 34 using xhci_hcd
[215134.207896] usb 1-3: New USB device found, idVendor=0955, idProduct=7e19, bcdDevice= 1.02
[215134.207908] usb 1-3: New USB device strings: Mfr=1, Product=2, SerialNumber=0
[215134.207914] usb 1-3: Product: APX
[215134.207917] usb 1-3: Manufacturer: NVIDIA Corp.
There is no “tty” in the output (as the per instructions on querying the device’s boot log via minicom), and it does not mention a low-speed USB device, but a high-speed USB device…
We tested the problem you mentioned yesterday, JetPack 5.0.2 installed on EMMC is no big problem, the main problem occurs in the installation of NVME, we will contact the relevant departments to check whether this is a problem of JetPack.
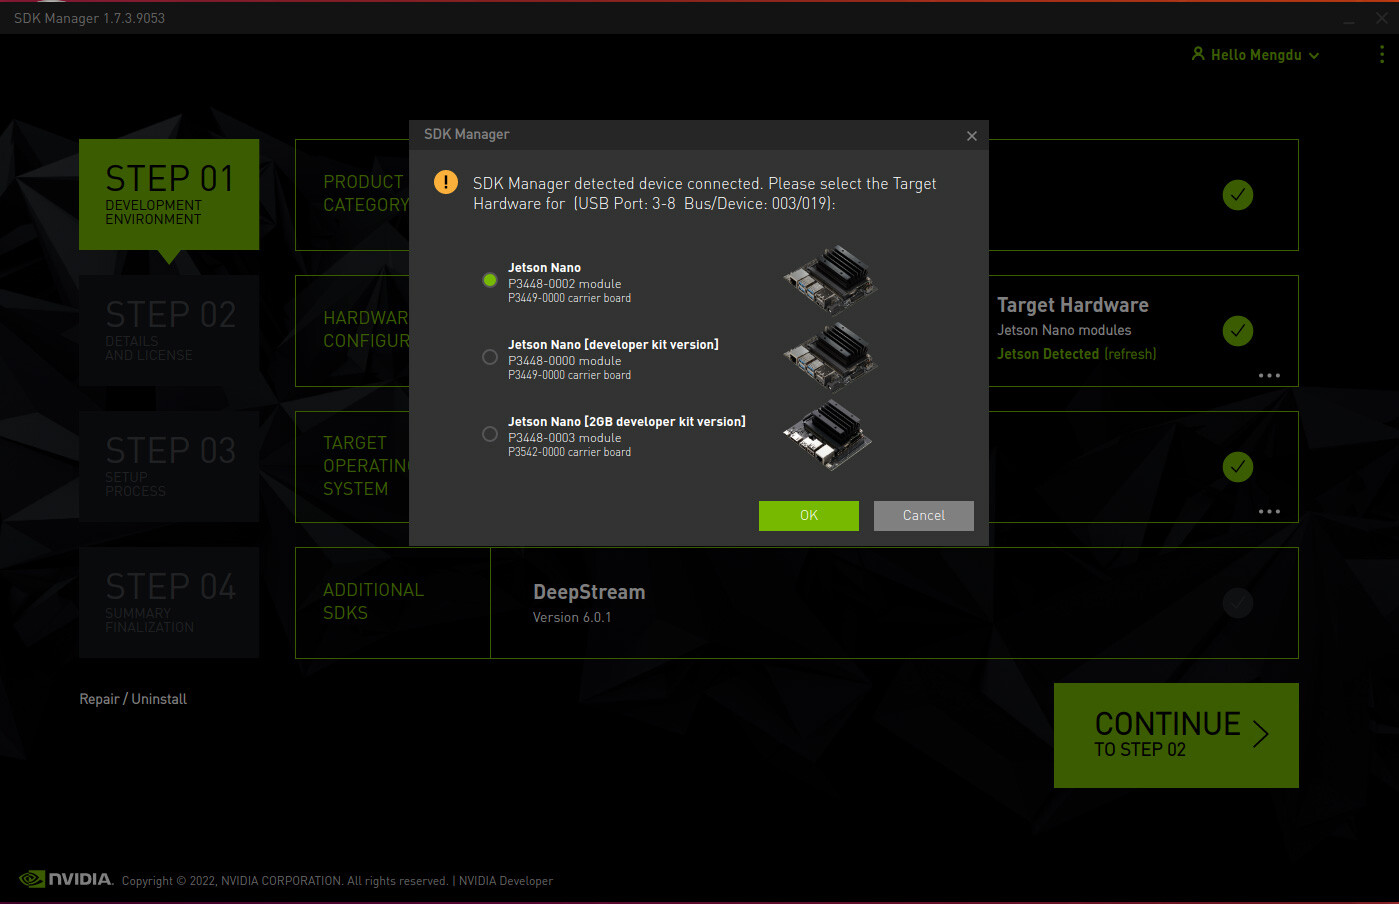
One other thing I tried (and that failed…) is I removed the 128GB SSD from the carrier board and connected my host laptop to the device. SDK Manager still showed two physical devices connected to the host, which I found very strange. I would have thought the only way SDK Manager would potentially recognize two separate boards would be if it were actually recognizing two separate installations of the device OS…and I had technically removed one of them. That seems to be incorrect though.
I also tried jumping the appropriate pins to put the device into force recovery mode. That also did not work, with SDK Manager still seeing two physical devices connected.
This so-called “show two boards” is a normal phenomenon. This is not actually a display, but requires the user to manually select whether your board is the official Dev kit or another carrier board of your own, as SDK Manager cannot determine it. Here we should follow the Wiki and choose a non-Dev Kit carrier board.
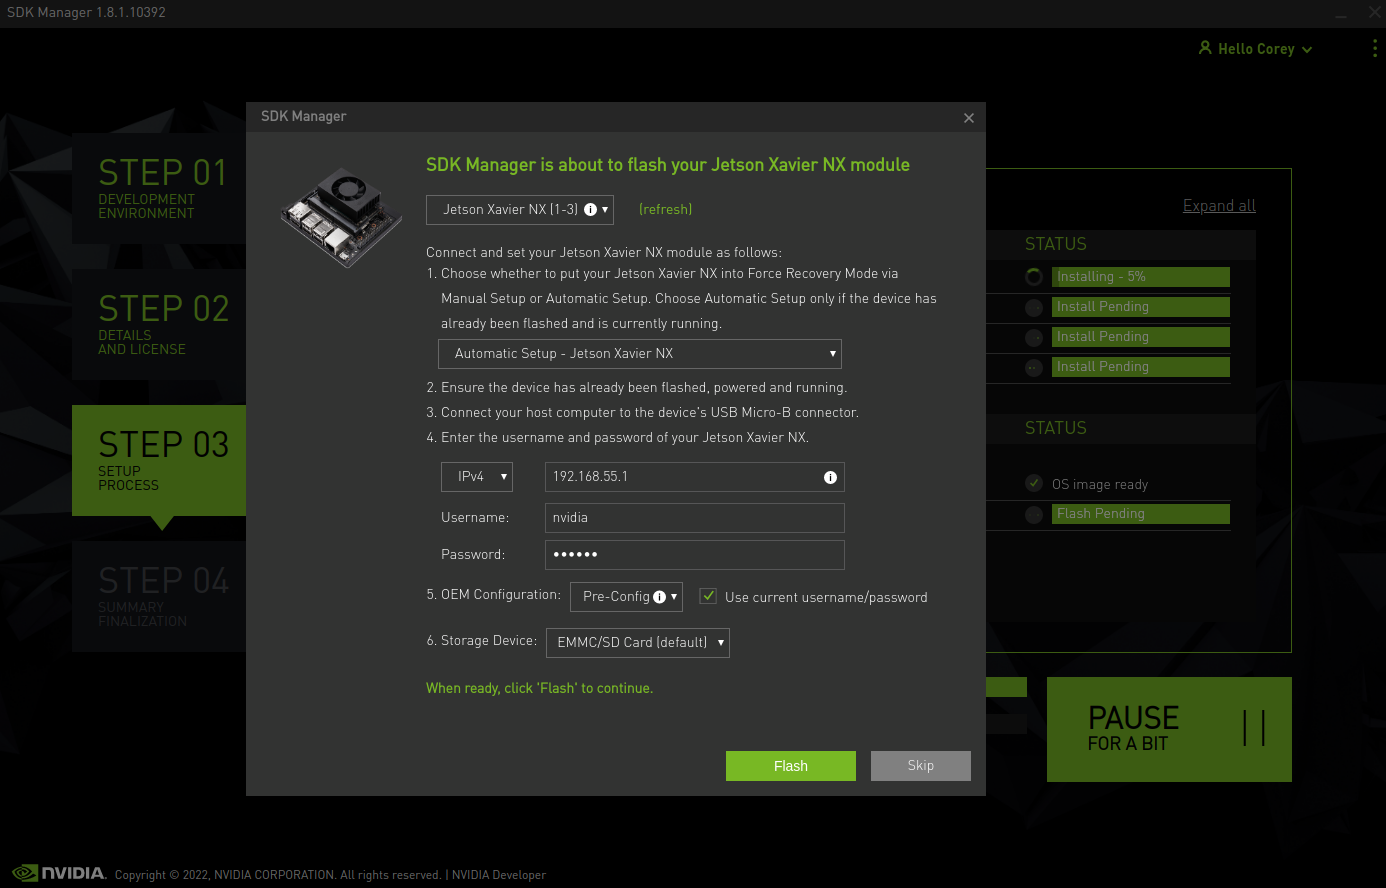
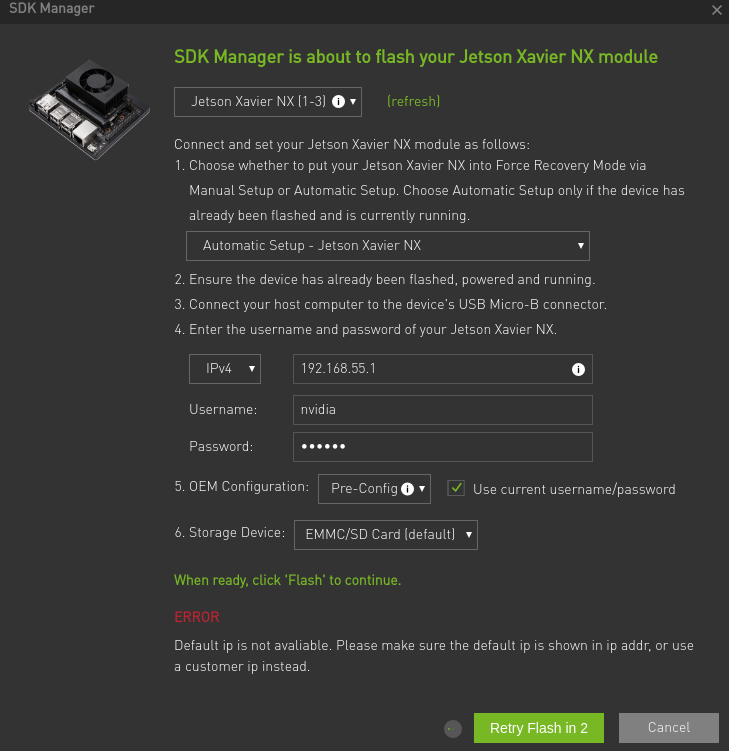
This was not a window that appeared previously (when Jetpack 5.0.1 was installed / being installed), but has just started appearing after installing 5.0.2 to NVMe. I’m aware that the board is custom / non-Dev kit, and made the appropriate selection. However, when I try to flash the OS SDK Manager says that the default IP is not available (see image below). Given that this problem started at the same time the SDK Manager window you posted a screen capture of started appearing, I assumed latter problem was caused by the former. So the two are not related? How then would I know the IP of the board if it is not the default IP?
The IP of 55.1 is available, the reason it is not available is that after flashing the system, you did not manage to enter the system. 55.1 is available when your device finishes flashing the system and boots up successfully.
We ran a new round of tests and the flashing system to NVME was no longer a problem. Until then, we again recommend that you reinstall the JetPack 5.0.2 system (for both EMMC and NVME), and then please follow the video content here to modify the boot settings.
If you reference my original post, you’ll see that when I connected a monitor to the Xavier to do the initial Ubuntu setup (after flashing the OS) I just see a black screen. I also tried to ssh to Xavier (192.168.55.1) but it just hung. Both of these comments are still true at present.
I do understand what you mean regarding 55.1 not being available until the device first boots up though, as once in the past I forgot to boot up first after flashing (and was consequently not able to ssh to 55.1).
I am currently unable to flash any version of Jetpack to either EMMC or NVMe due to the above inability for either SDK Manager to flash the board (as per the screen capture in my previous post) or to access the device via ssh. I just plugged the device into a monitor, attached the USB cable and plugged in the power…waited a while to see if it would start to boot and it did not. I tried hitting the escape key anyway, hoping maybe I’d be able to access the boot options, but nothing happened. So I seem to be stuck as far as accessing the board at all. Is there a way around this?
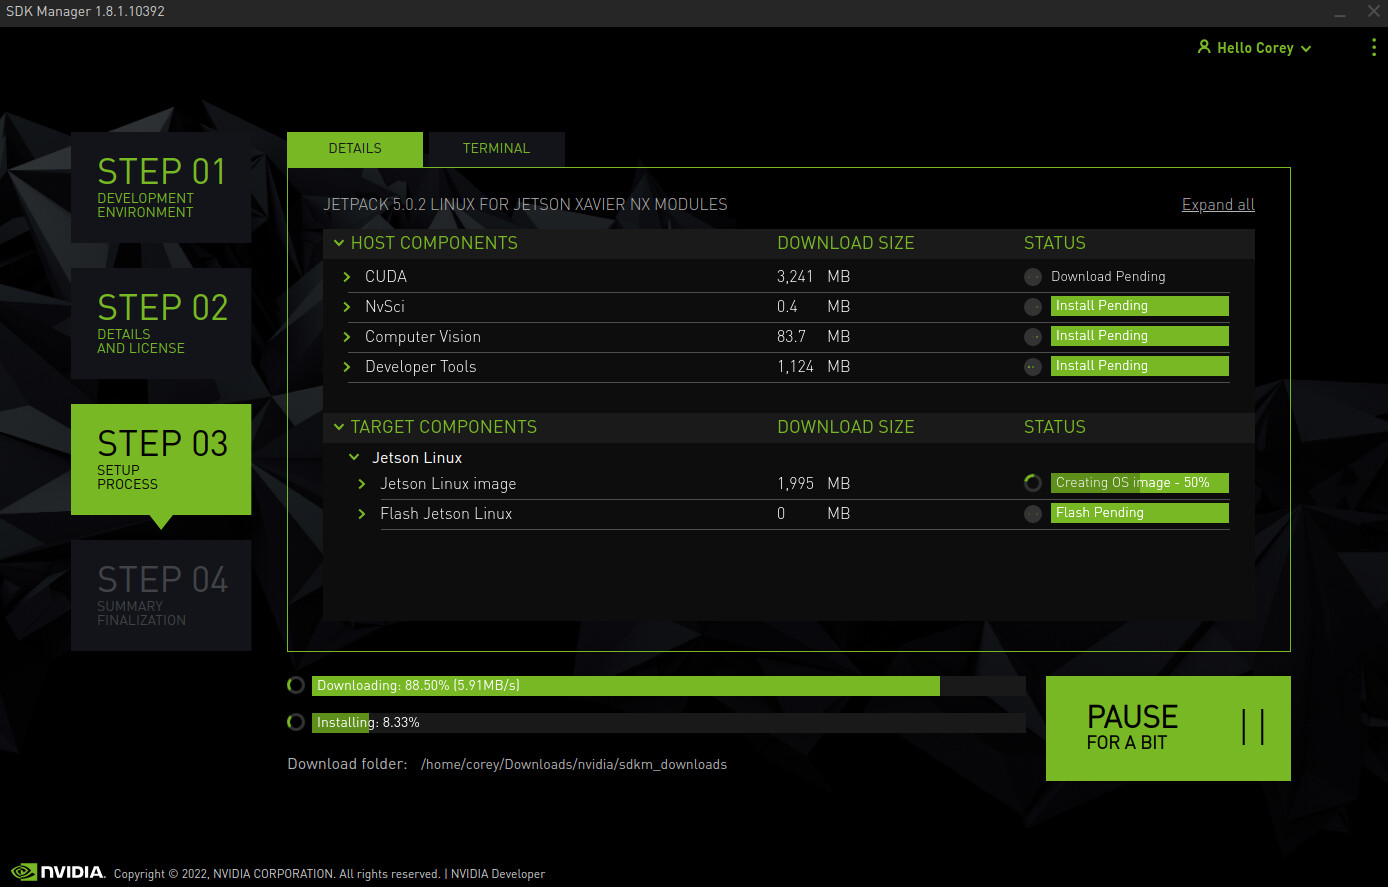
Here, step by step, is what happens if I attempt to flash Jetpack via SDK Manager (I have to put each image in a separate post…):
OK, so I just tried using manual setup (which I tried a few days ago…) and it’s allowing me to flash the 5.0.2 OS now. I’m not sure exactly what changed since then, but at least SDK Manager can now flash the board. I was also able to boot up Ubuntu on the device after flashing (to EMMC). I’ll try flashing to NVMe now…
The flash to NVMe failed, so I uninstalled everything and started over. I started by flashing 5.0.2 to NVMe first (without any SDK components), then flashed 5.0.2 to EMMC. That setup currently allows me to boot the Xavier into Ubuntu and ssh into it from the host. Will now try to follow your boot order setup video and then flash the SDK Components to NVMe …
Sure enough, there was a problem in the installation step. In fact, we also have a very detailed tutorial on the installation steps, before proceeding, I hope you can read the content of these wiki in full before proceeding, this will reduce a lot of problems.