lboue
September 29, 2025, 10:08am
1
Hello,
I see that button 3 is used in the Matter examples (contact_sensor).
#define UAT_BUTTON_MASK DK_BTN3_MSK
I would like to know how to configure either:
the button built into the board
another button connected to a GPIO
Should I add a new def in xiao_nrf54l15_nrf54l15_cpuapp.overlay file?
    buttons {
        compatible = "gpio-keys"; // Use "gpio-keys" for button input handling
        xiao_button: button_3 {
            gpios = <&xiao_d 3 (GPIO_PULL_UP | GPIO_ACTIVE_LOW)>;
            zephyr,code = <INPUT_KEY_3>;
        };
    };
          /*
           * SPDX-License-Identifier: Apache-2.0
           */

          / {
          	xiao_d: connector {
          		compatible = "seeed,xiao-gpio";
          		#gpio-cells = <2>;
          		gpio-map-mask = <0xffffffff 0xffffffc0>;
          		gpio-map-pass-thru = <0 0x3f>;
          		gpio-map = <0 0 &gpio1 4 0>,	/* D0 */
          			   <1 0 &gpio1 5 0>,	/* D1 */
          			   <2 0 &gpio1 6 0>,	/* D2 */
          			   <3 0 &gpio1 7 0>,	/* D3 */
          			   <4 0 &gpio1 10 0>,	/* D4 */
          			   <5 0 &gpio1 11 0>,	/* D5 */
I dont think you can use the button on the board because they are hard wired to the reset and boot triggers…
lboue
September 29, 2025, 12:02pm
3
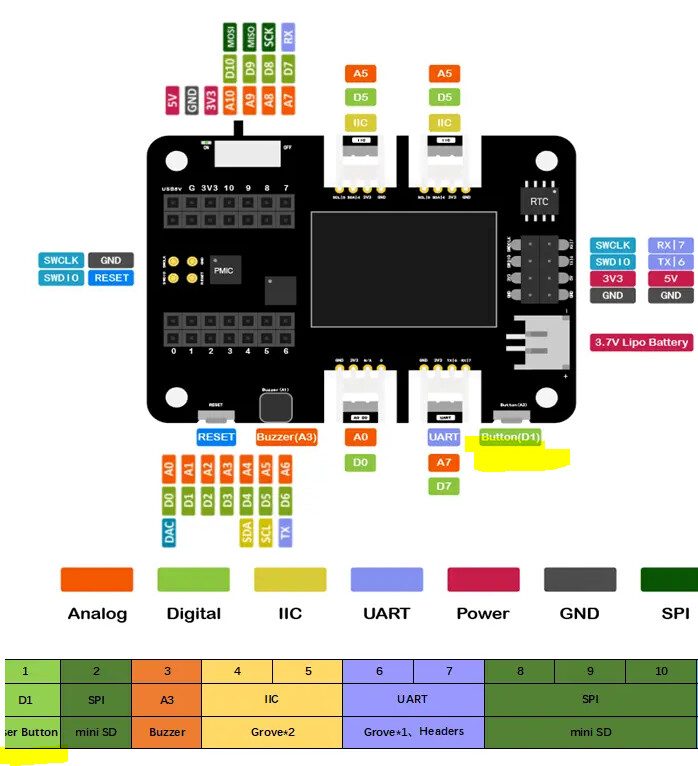
So I would use expansion board User button (D1 pin) or a custom button (D3 pin).
2 Likes
the button on the left is the reset button… same as the reset button on the board… it was made for the original SAMD that did not have a reset button on board the user button is on D1
if you are using the expansion board you can use Grove - Dual Button - Seeed Studio
If you read this part about strapping pins and understand you may be able to get the boot button to function as a user button, but the reset pin as i understand pulls directly to ground in hardware
lboue
September 29, 2025, 1:08pm
5
There is an User button (D1 pin) with expansion board:
Yes actually 2 buttons… as you noted the user button is on the right… the reset button is on the left… I was just
1 Like
Hi there,
So there are a couple ways (2) AFAIK, use “&xiao_d” for the “D Pins” with these, “the SILK pins”
on the XIAO nRF54L15 Sense the mappings are:
Below is a clean Zephyr setup that replaces the DK button masks and gives you debounced events for both buttons via gpio-keys.
Create boards/xiao_nrf54l15_nrf54l15_cpuapp.overlay (or your app’s overlay) with:
/ {
    aliases {
        sw0 = &user_btn;   /* USER button (P0.00) */
        sw1 = &ext_btn;    /* External button on D0 (P1.04) */
    };

    buttons: buttons {
        compatible = "gpio-keys";

        /* On-board USER button: P0.00 → GND (pull-up, active-low) */
        user_btn: user_btn {
            gpios = <&gpio0 0 (GPIO_PULL_UP | GPIO_ACTIVE_LOW)>;
            label = "USER_BUTTON_P0_00";
            zephyr,code = <INPUT_KEY_0>;
        };

        /* External button on D0: P1.04 → GND (pull-up, active-low) */
        ext_btn: ext_btn {
            gpios = <&gpio1 4 (GPIO_PULL_UP | GPIO_ACTIVE_LOW)>;
            label = "EXT_BUTTON_D0_P1_04";
            zephyr,code = <INPUT_KEY_1>;
        };
    };
};
Enable the input stack and gpio-keys (and stop using the DK helper):
CONFIG_GPIO=y
CONFIG_INPUT=y
CONFIG_INPUT_GPIO_KEYS=y
CONFIG_DK_LIBRARY=n
// src/main.c
#include <zephyr/kernel.h>
#include <zephyr/input/input.h>
#include <zephyr/logging/log.h>
LOG_MODULE_REGISTER(app, LOG_LEVEL_INF);

static void input_cb(const struct device *dev, struct input_event *evt)
{
    if (evt->type != INPUT_EV_KEY) return;
    const bool pressed = (evt->value != 0);

    switch (evt->code) {
    case INPUT_KEY_0: // USER (P0.00)
        LOG_INF("USER (P0.00) %s", pressed ? "pressed" : "released");
        /* TODO: in Matter contact_sensor, flip contact attribute here */
        break;
    case INPUT_KEY_1: // D0 (P1.04)
        LOG_INF("D0 (P1.04) %s", pressed ? "pressed" : "released");
        break;
    default:
        break;
    }
}

INPUT_CALLBACK_DEFINE(NULL, input_cb);

int main(void)
{
    LOG_INF("Buttons ready: USER=P0.00 (INPUT_KEY_0), D0=P1.04 (INPUT_KEY_1)");
    while (1) { k_sleep(K_SECONDS(1)); }
}
USER button is already wired to GND on the board—keep GPIO_PULL_UP | GPIO_ACTIVE_LOW. Seeed Studio Files+1 D0 external button: wire D0 → switch → GND ; no external resistor needed (we enable the internal pull-up). D0 maps to P1.04 . Seeed Studio Files Boot-time safety: Using D0 at runtime is fine. Just don’t hold it asserted at reset if any boot strap is ever assigned to that pad in other firmware.
I like using the onboard buttons, why NOT ? just don’t mess with them at boot time as always. I don’t like them location wise though, "Best in Button Class " goes to the C3
HTH
2 Likes
lboue
September 29, 2025, 7:42pm
8
Thanks for all these detailed examples. I’ll give it a try
1 Like