lboue
September 29, 2025, 10:08am
1
Hello,
I see that button 3 is used in the Matter examples (contact_sensor).
#define UAT_BUTTON_MASK DK_BTN3_MSK
I would like to know how to configure either:
the button built into the board
another button connected to a GPIO
Should I add a new def in xiao_nrf54l15_nrf54l15_cpuapp.overlay file?
    buttons {
        compatible = "gpio-keys"; // Use "gpio-keys" for button input handling
        xiao_button: button_3 {
            gpios = <&xiao_d 3 (GPIO_PULL_UP | GPIO_ACTIVE_LOW)>;
            zephyr,code = <INPUT_KEY_3>;
        };
    };
          /*
           * SPDX-License-Identifier: Apache-2.0
           */

          / {
          	xiao_d: connector {
          		compatible = "seeed,xiao-gpio";
          		#gpio-cells = <2>;
          		gpio-map-mask = <0xffffffff 0xffffffc0>;
          		gpio-map-pass-thru = <0 0x3f>;
          		gpio-map = <0 0 &gpio1 4 0>,	/* D0 */
          			   <1 0 &gpio1 5 0>,	/* D1 */
          			   <2 0 &gpio1 6 0>,	/* D2 */
          			   <3 0 &gpio1 7 0>,	/* D3 */
          			   <4 0 &gpio1 10 0>,	/* D4 */
          			   <5 0 &gpio1 11 0>,	/* D5 */
I dont think you can use the button on the board because they are hard wired to the reset and boot triggers…
lboue
September 29, 2025, 12:02pm
3
So I would use expansion board User button (D1 pin) or a custom button (D3 pin).
the button on the left is the reset button… same as the reset button on the board… it was made for the original SAMD that did not have a reset button on board the user button is on D1
if you are using the expansion board you can use Grove - Dual Button - Seeed Studio
If you read this part about strapping pins and understand you may be able to get the boot button to function as a user button, but the reset pin as i understand pulls directly to ground in hardware
lboue
September 29, 2025, 1:08pm
5
There is an User button (D1 pin) with expansion board:
Yes actually 2 buttons… as you noted the user button is on the right… the reset button is on the left… I was just
Hi there,
So there are a couple ways (2) AFAIK, use “&xiao_d” for the “D Pins” with these, “the SILK pins”
on the XIAO nRF54L15 Sense the mappings are:
Below is a clean Zephyr setup that replaces the DK button masks and gives you debounced events for both buttons via gpio-keys.
Create boards/xiao_nrf54l15_nrf54l15_cpuapp.overlay (or your app’s overlay) with:
/ {
    aliases {
        sw0 = &user_btn;   /* USER button (P0.00) */
        sw1 = &ext_btn;    /* External button on D0 (P1.04) */
    };

    buttons: buttons {
        compatible = "gpio-keys";

        /* On-board USER button: P0.00 → GND (pull-up, active-low) */
        user_btn: user_btn {
            gpios = <&gpio0 0 (GPIO_PULL_UP | GPIO_ACTIVE_LOW)>;
            label = "USER_BUTTON_P0_00";
            zephyr,code = <INPUT_KEY_0>;
        };

        /* External button on D0: P1.04 → GND (pull-up, active-low) */
        ext_btn: ext_btn {
            gpios = <&gpio1 4 (GPIO_PULL_UP | GPIO_ACTIVE_LOW)>;
            label = "EXT_BUTTON_D0_P1_04";
            zephyr,code = <INPUT_KEY_1>;
        };
    };
};
Enable the input stack and gpio-keys (and stop using the DK helper):
CONFIG_GPIO=y
CONFIG_INPUT=y
CONFIG_INPUT_GPIO_KEYS=y
CONFIG_DK_LIBRARY=n
// src/main.c
#include <zephyr/kernel.h>
#include <zephyr/input/input.h>
#include <zephyr/logging/log.h>
LOG_MODULE_REGISTER(app, LOG_LEVEL_INF);

static void input_cb(const struct device *dev, struct input_event *evt)
{
    if (evt->type != INPUT_EV_KEY) return;
    const bool pressed = (evt->value != 0);

    switch (evt->code) {
    case INPUT_KEY_0: // USER (P0.00)
        LOG_INF("USER (P0.00) %s", pressed ? "pressed" : "released");
        /* TODO: in Matter contact_sensor, flip contact attribute here */
        break;
    case INPUT_KEY_1: // D0 (P1.04)
        LOG_INF("D0 (P1.04) %s", pressed ? "pressed" : "released");
        break;
    default:
        break;
    }
}

INPUT_CALLBACK_DEFINE(NULL, input_cb);

int main(void)
{
    LOG_INF("Buttons ready: USER=P0.00 (INPUT_KEY_0), D0=P1.04 (INPUT_KEY_1)");
    while (1) { k_sleep(K_SECONDS(1)); }
}
USER button is already wired to GND on the board—keep GPIO_PULL_UP | GPIO_ACTIVE_LOW. Seeed Studio Files+1 D0 external button: wire D0 → switch → GND ; no external resistor needed (we enable the internal pull-up). D0 maps to P1.04 . Seeed Studio Files Boot-time safety: Using D0 at runtime is fine. Just don’t hold it asserted at reset if any boot strap is ever assigned to that pad in other firmware.
I like using the onboard buttons, why NOT ? just don’t mess with them at boot time as always. I don’t like them location wise though, "Best in Button Class " goes to the C3
HTH
lboue
September 29, 2025, 7:42pm
8
Thanks for all these detailed examples. I’ll give it a try

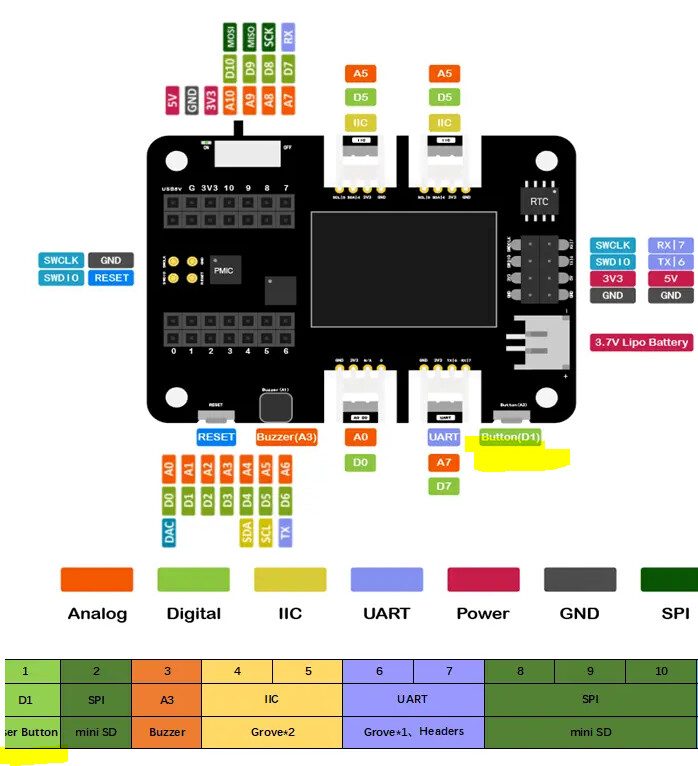
 i.e. the diagram pic or the
 PJ
PJ 
