Hi there,
So, What is the USB Host device you want to plug in ? Keyboard / Mouse ?
Yes it is indeed possible , in fact some have done that on here. But used BLE as the Wireless part.
Your Best solution, known to work is simplest, most traditional: keep USB-C for programming, use UART for debug, use a separate USB host connector
Recommended for reliable development.
- Program/flash: use the XIAO’s USB-C as normal (USB device to PC).
- Runtime debug: use Serial1 on D6/D7 (GPIO43/44) to a cheap USB-UART dongle.
- USB Host peripheral connection: you do not use the same USB-C jack for both roles; instead you add a second connector (USB-A or another USB-C breakout) wired to D+ / D− (same lines) through a USB 2.0 switch


You still need 5V on VBUS**. Host mode isn’t just “software”; the host must power the bus (or use a powered hub that does). If VBUS isn’t present, most USB devices won’t even wake up to enumerate. That part doesn’t go away no matter how clever the code is. 
A single physical USB-C port can’t be your PC debug/program link and a USB Host port to a peripheral at the same time, unless you add extra hardware (hub/switch)
The biggest point: USB Host won’t work unless the device you plug in gets 5V on VBUS. The XIAO’s USB-C port is great for USB-device-to-PC, but it typically doesn’t magically become a powered host port; you’ll need to provide 5V to VBUS externally if the board doesn’t. (This is exactly why people see “nothing happens” with keyboards/mice
I took the liberty of trying this and If you have a USB hub that will take a external 5v , via 1/4" pin jack (or any powered) switch to get the 5V required for the host to present to the peripheral . etc.
Below is a clean, practical demo:
- LED blinks on USER_LED (GPIO21) (that’s the orange user LED on the XIAO).
-
- USB-C runs USB Host (HID keyboard)
- Debug is on D6/D7 via Serial1, so you can keep the native USB dedicated to host.
// =====================================================
// XIAO ESP32S3 - USB-C as USB HOST (HID) + UART Debug + Blinky
// Debug console: Serial1 on D6/D7 (GPIO43/GPIO44)
// LED: USER_LED (GPIO21)
// USB data pins: ESP32-S3 native USB uses GPIO19 (D-) / GPIO20 (D+)
// =====================================================

#include <Arduino.h>
#include "EspUsbHost.h"

// ---- XIAO ESP32S3 UART pins ----
#define DBG_TX D6   // GPIO43 (TX)  :contentReference[oaicite:7]{index=7}
#define DBG_RX D7   // GPIO44 (RX)  :contentReference[oaicite:8]{index=8}
#define BAUD   115200

// ---- XIAO USER LED ----
#define LED_PIN 21  // USER_LED = GPIO21 :contentReference[oaicite:9]{index=9}

class MyUsbHost : public EspUsbHost {
public:
  void onKeyboardKey(uint8_t ascii, uint8_t keycode, uint8_t modifier) override {
    (void)keycode; (void)modifier;
    if (ascii >= 32 && ascii <= 126) {
      Serial1.printf("[KBD] '%c'\r\n", (char)ascii);
    } else if (ascii == '\r') {
      Serial1.println("[KBD] ENTER");
    } else {
      Serial1.printf("[KBD] ascii=0x%02X\r\n", ascii);
    }
  }

  void onGone(const usb_host_client_event_msg_t *eventMsg) override {
    (void)eventMsg;
    Serial1.println("[USB] Device disconnected");
  }
};

MyUsbHost usb;

uint32_t lastBlink = 0;
bool ledState = false;

void setup() {
  // UART debug on pins (not native USB)
  Serial1.begin(BAUD, SERIAL_8N1, DBG_RX, DBG_TX);
  delay(200);

  Serial1.println();
  Serial1.println("=== XIAO ESP32S3: USB HOST (USB-C) + UART Debug + Blinky ===");
  Serial1.println("Debug: Serial1 on D6(TX)/D7(RX)  |  LED: GPIO21");
  Serial1.println("IMPORTANT: USB HOST requires 5V on VBUS for the plugged-in USB device.");
  Serial1.println();

  pinMode(LED_PIN, OUTPUT);
  digitalWrite(LED_PIN, LOW);

  Serial1.println("[USB] Starting host...");
  usb.begin();
  Serial1.println("[USB] Host started. Plug in a USB HID keyboard (needs VBUS power!).");
}

void loop() {
  // Keep USB host stack serviced
  usb.task();

  // Blinky
  const uint32_t now = millis();
  if (now - lastBlink >= 500) {
    lastBlink = now;
    ledState = !ledState;
    digitalWrite(LED_PIN, ledState ? HIGH : LOW);
    Serial1.printf("[BLINK] LED=%d  t=%lu ms\r\n", ledState, (unsigned long)now);
  }
}
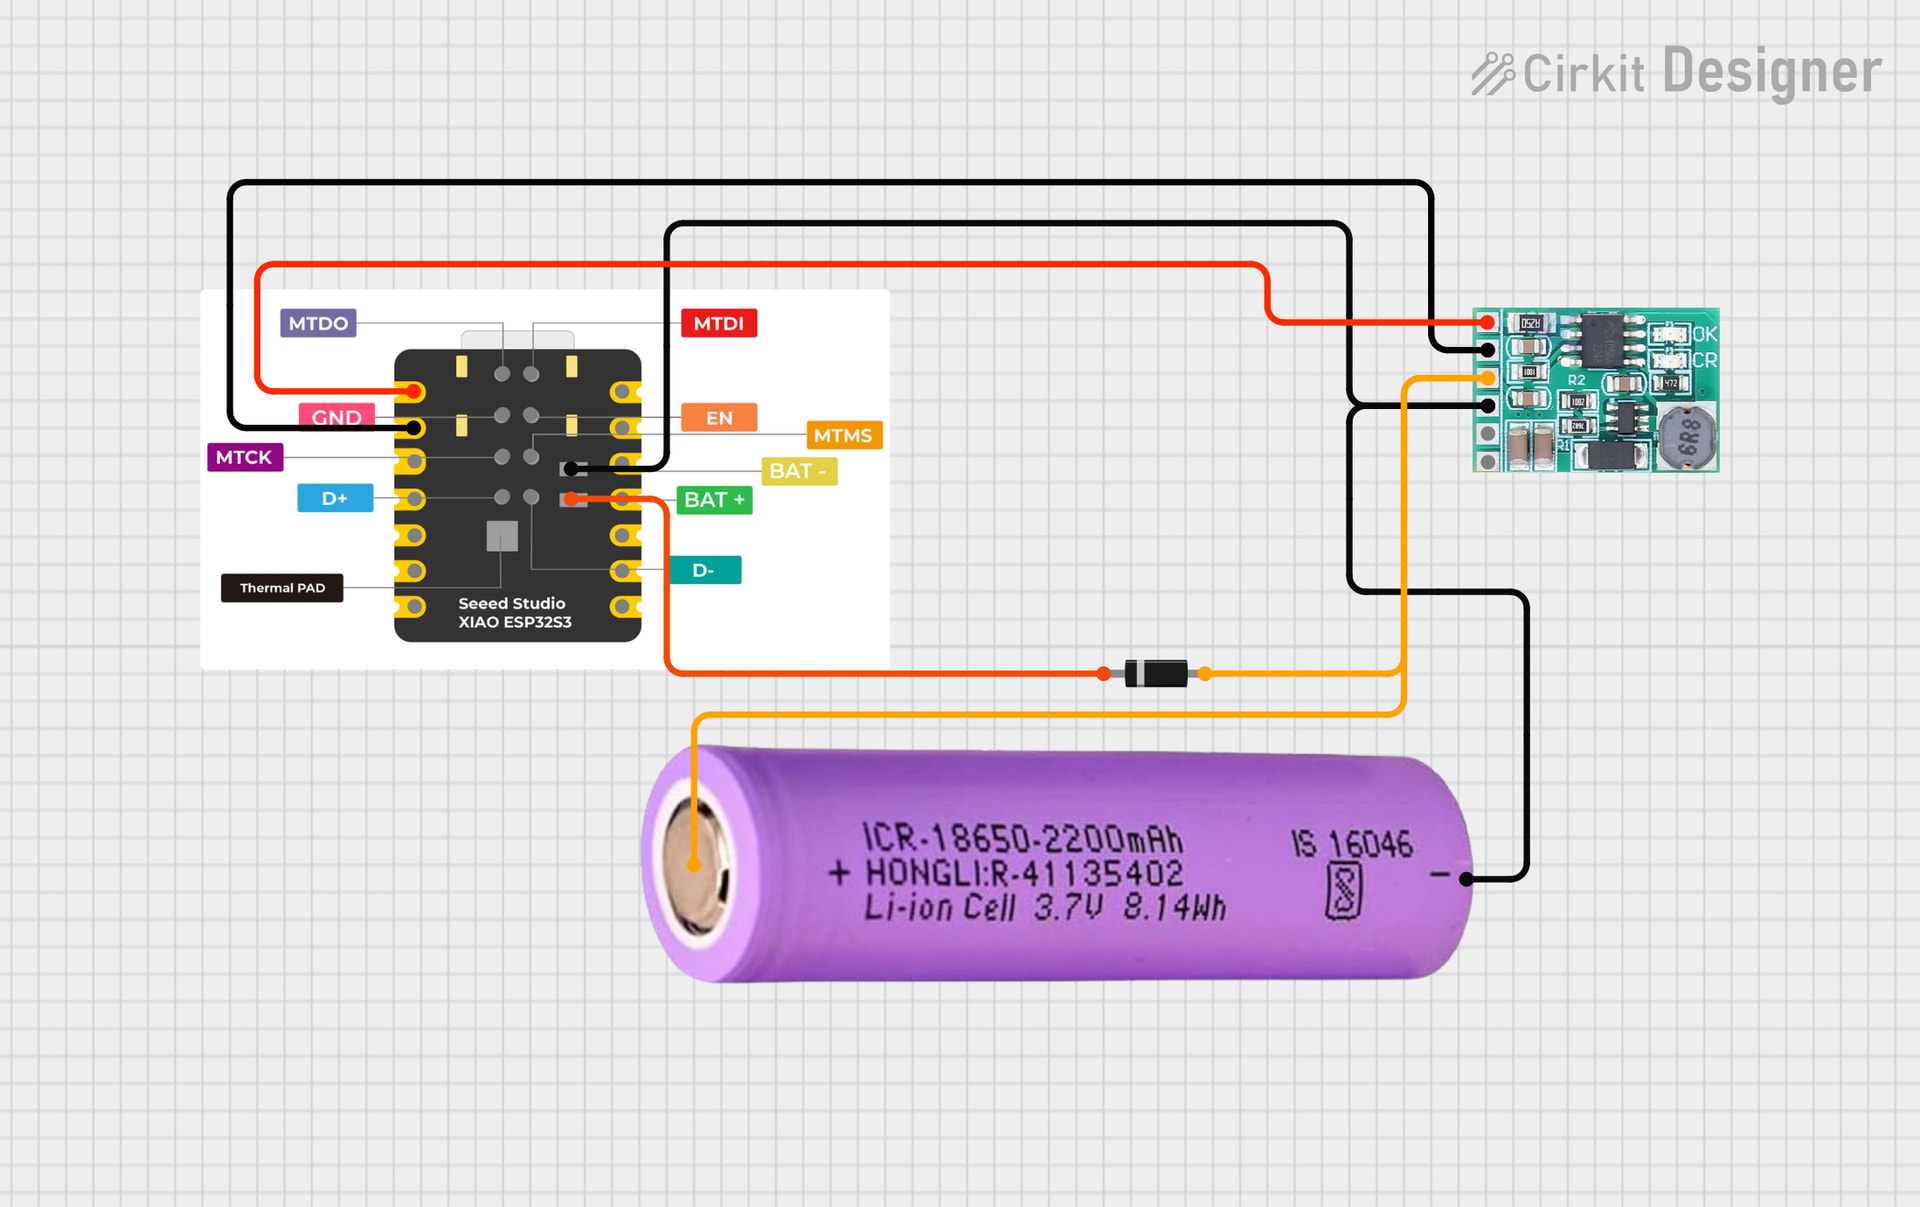
These are really the only things you have to do , BTW Wiring you must do (or it won’t enumerate)
1) UART debug (to a USB-UART dongle)
- Dongle TX → XIAO D7 (RX / GPIO44)
- Dongle RX → XIAO D6 (TX / GPIO43)
- GND → GND
2) USB Host power (VBUS) (switch/Hub)
If you don’t power VBUS, you’ll get exactly what you described: host code runs, but no device events.
HTH
GL  PJ
PJ 
- Open your USB-UART serial monitor at 115200 → you should see the header + blink logs.
- Plug a USB keyboard into the XIAO’s USB-C using an OTG adapter and make sure the keyboard actually gets 5V → you should see
[KBD] prints.
- If you get blink prints but no USB events: it’s almost always VBUS not powered, or you’re using a cable/adapter that doesn’t assert host mode.
FYI, Worth noting is the Real ESP32 Dev Kit-C has two USB-C ports as @olivia_49 points out.