Following Getting Started with reComputer Industrial | Seeed Studio Wiki we’ve been able to properly setup our reComputer devices (Industrial J4012). We repeatedly need to change settings for each new device and thought it would be faster to create an image. However, using
sudo ./l4t_create_images_for_kernel_flash.sh
we’re not managing to create an image. We’ve noticed that certain files are missing. At some point the file references flash.sh which is not present in the tar file linked on the wiki. We’ve copied it from the nvidia sdk, but then we run into issues with the chipid.
Does someone know what steps need to be taken to create an image of your reComputer, and how to flash this to another device of the same kind (Industrial J4012)?
In theory, you should be able to successfully flash the image for the reComputer Industrial by following the steps without needing to recreate the image file. Regarding your issue, I would like to clarify a few points:
What version of JetPack are you flashing?
What do you mean by “non-existent file”? Could you please provide a screenshot of that part?
Please send us your flash log for us to review.
Thank you in advance for your cooperation, as this will help us assist you better!
We are able to flash our devices according to your manual [wiki.seeedstudio]/reComputer_Industrial_Getting_Started/#flash-jetpack (can’t include links), no issues there. However, after this, we change additional settings, install software, set IPs for the ethernet ports, etc. We would like to create something like an image of this prepped device, such that we can flash a new device with this new image, and we don’t have to do all the extra steps again.
We use jetpack 6.0. I can’t reproduce the steps for point 2 as fast as it has been a while since I’ve tried, but I’ll try if it seems necessary. As for point 3, there are no issues with flashing whilst following your manual. I hope the above explanation helps clear up what we’re trying to achieve, and you already have some good pointers.
/home/bpa/Desktop/flash_jetson/j4012/mfi_recomputer-industrial-orin-j201/recomputer-industrial-orin-j201.conf: line 29: /home/bpa/Desktop/flash_jetson/j4012/mfi_recomputer-industrial-orin-j201/p3768-0000-p3767-0000-a0.conf: No such file or directory
/home/bpa/Desktop/flash_jetson/j4012/mfi_recomputer-industrial-orin-j201/recomputer-industrial-orin-j201.conf: line 29: /home/bpa/Desktop/flash_jetson/j4012/mfi_recomputer-industrial-orin-j201/p3768-0000-p3767-0000-a0.conf: No such file or directory
Error: /home/bpa/Desktop/flash_jetson/j4012/mfi_recomputer-industrial-orin-j201/flash.sh is not found
This l4t_create_images_for_kernel_flash.sh generally doesn’t apply to custom carrier boards. We actually host our source, check Linux_for_Tegra. We understand that you want to made some modifications to the jetpack we made, please check the repo see if you can find something useful.
General idea is, you need to chroot to the rootfs folder (after setting up qemu-aarch64-static) and you may operate inside, installing the software you want, change the configurations and leave this chroot environment.
If you have special flash requirements, you may contact our techsupport for image customization.
Hi Kevin, it has been a while but we have taken up the process of a custom image again.
Instead of using chroot we flashed a j4012 recomputer industrial according to the manual (Getting Started with reComputer Industrial | Seeed Studio Wiki with Jetpack 6.0) and installed everything on this device. Then we copied the rootfs of this device and replaced the rootfs in the flashing tool from the manual with this updated rootfs and flashed again. However, we ran into the following error:
writing item=1, 9:0:primary_gpt, 512, 19968, gpt_primary_9_0.bin, 16896, fixed-<reserved>-0, b7f7d29c85f36a4c84373fd4ec1c1dbcad930a05
flock: cannot open lock file /var/lock/nvidiainitrdflash: No such file or directory
Flash failure
Either the device cannot mount the NFS server on the host or a flash command has failed. Debug log saved to /tmp/tmp.kV2Mzk4rl6. You can access the target's terminal through "sshpass -p root ssh root@fc00:1:1:0::2"
Cleaning up...
When we look for nvidiainitrdflash it is present in rootfs/var/lock/. Do you have any clue why we’re running into this issue?
We also followed “Getting Started” GitHub - Seeed-Studio/Linux_for_Tegra at r36.3.0 and for step 2 we don’t use the sample rootfs, but instead the rootfs of the prepped device, as mentioned in the previous post.
However, we run into the same error when we try: sudo ./tools/kernel_flash/l4t_initrd_flash.sh --external-device nvme0n1p1 -c tools/kernel_flash/flash_l4t_t234_nvme.xml -p "-c bootloader/generic/cfg/flash_t234_qspi.xml" --showlogs --network usb0 recomputer-industrial-orin-j201 internal
Waiting for device to expose ssh ......Waiting for device to expose ssh ...Run command: flash on fc00:1:1:0::2
SSH ready
blockdev: cannot open /dev/mmcblk0boot0: No such file or directory
[ 0]: l4t_flash_from_kernel: Serial Number: 1423624314923
[ 0]: l4t_flash_from_kernel: Starting to create gpt for emmc
Active index file is /mnt/internal/flash.idx
Number of lines is 61
max_index=60
[ 1]: l4t_flash_from_kernel: Successfully create gpt for emmc
[ 1]: l4t_flash_from_kernel: Starting to create gpt for external device
Active index file is /mnt/external/flash.idx
Number of lines is 18
max_index=17
writing item=1, 9:0:primary_gpt, 512, 19968, gpt_primary_9_0.bin, 16896, fixed-<reserved>-0, 8d83b5fcade4ac25d0ec4d0de257dc442f9e800c
flock: cannot open lock file /var/lock/nvidiainitrdflash: No such file or directory
Flash failure
Either the device cannot mount the NFS server on the host or a flash command has failed. Debug log saved to /tmp/tmp.rOUBDuHij6. You can access the target's terminal through "sshpass -p root ssh root@fc00:1:1:0::2"
Cleaning up...
Tried using the suggested commands, after following the guideline in the repo, and according to the logs they both finished succesfully (backup and restore). I did need to use recomputer-industrial-orin-j201 instead of jetson-orin-nx-devkit for <board_name>.
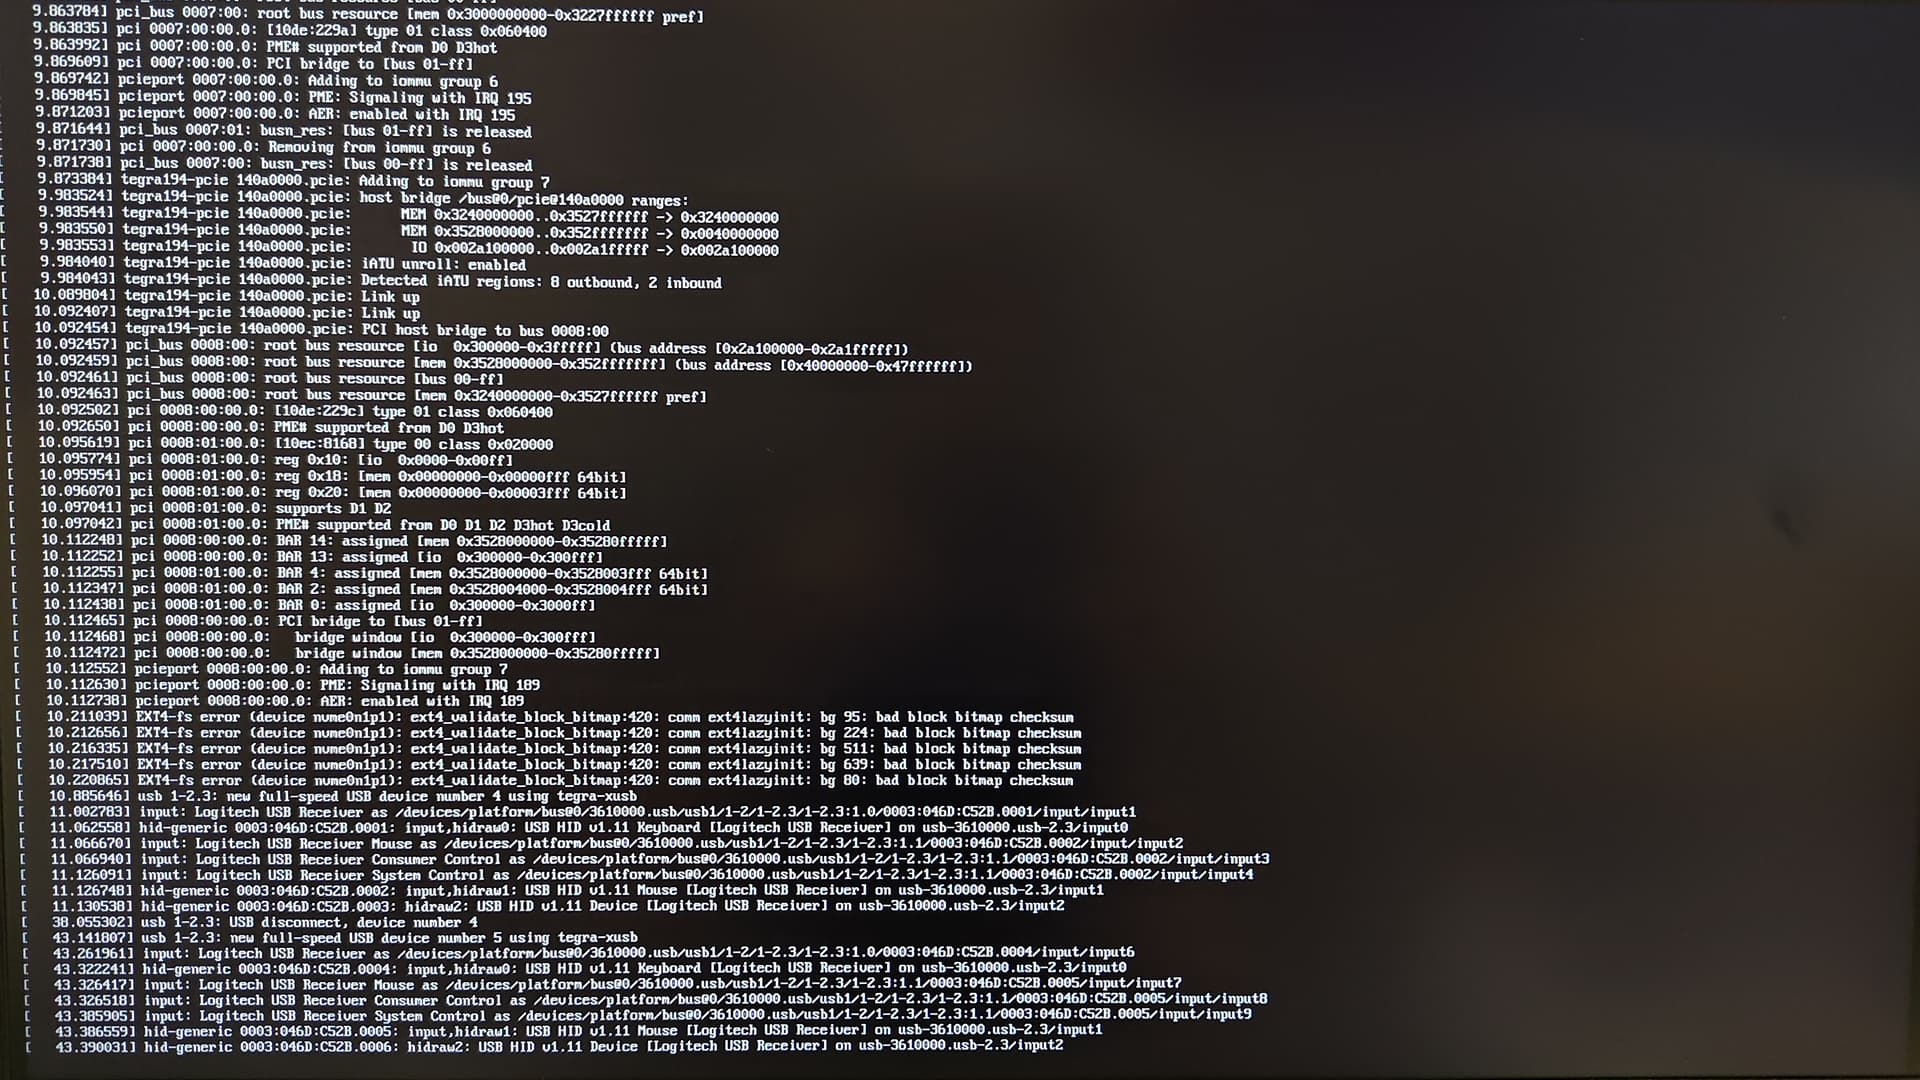
However, the device doesn’t fully boot and I get the following errors suggesting something went wrong when flashing to the nvme.
Indeed, you’ll need to use our board name. I haven’t got a reComputer Industrial J4012 at hand but we did some tests on reComputer J3011 with JetPack 6.2.
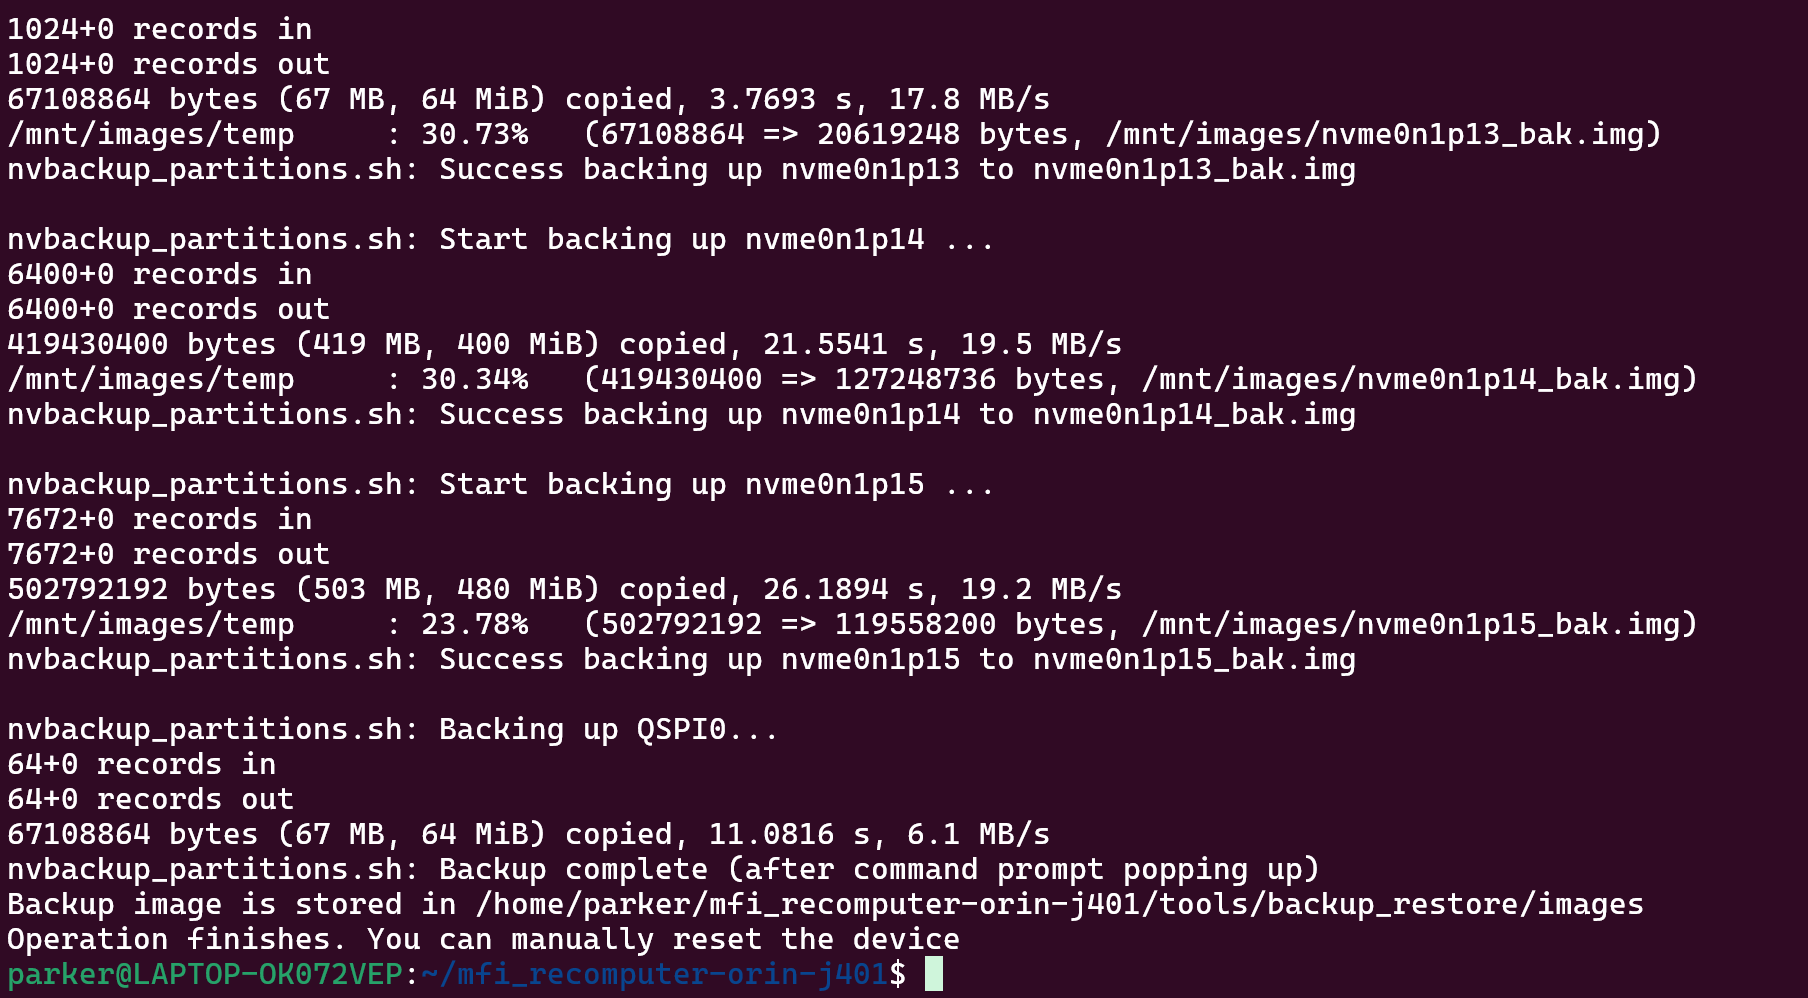
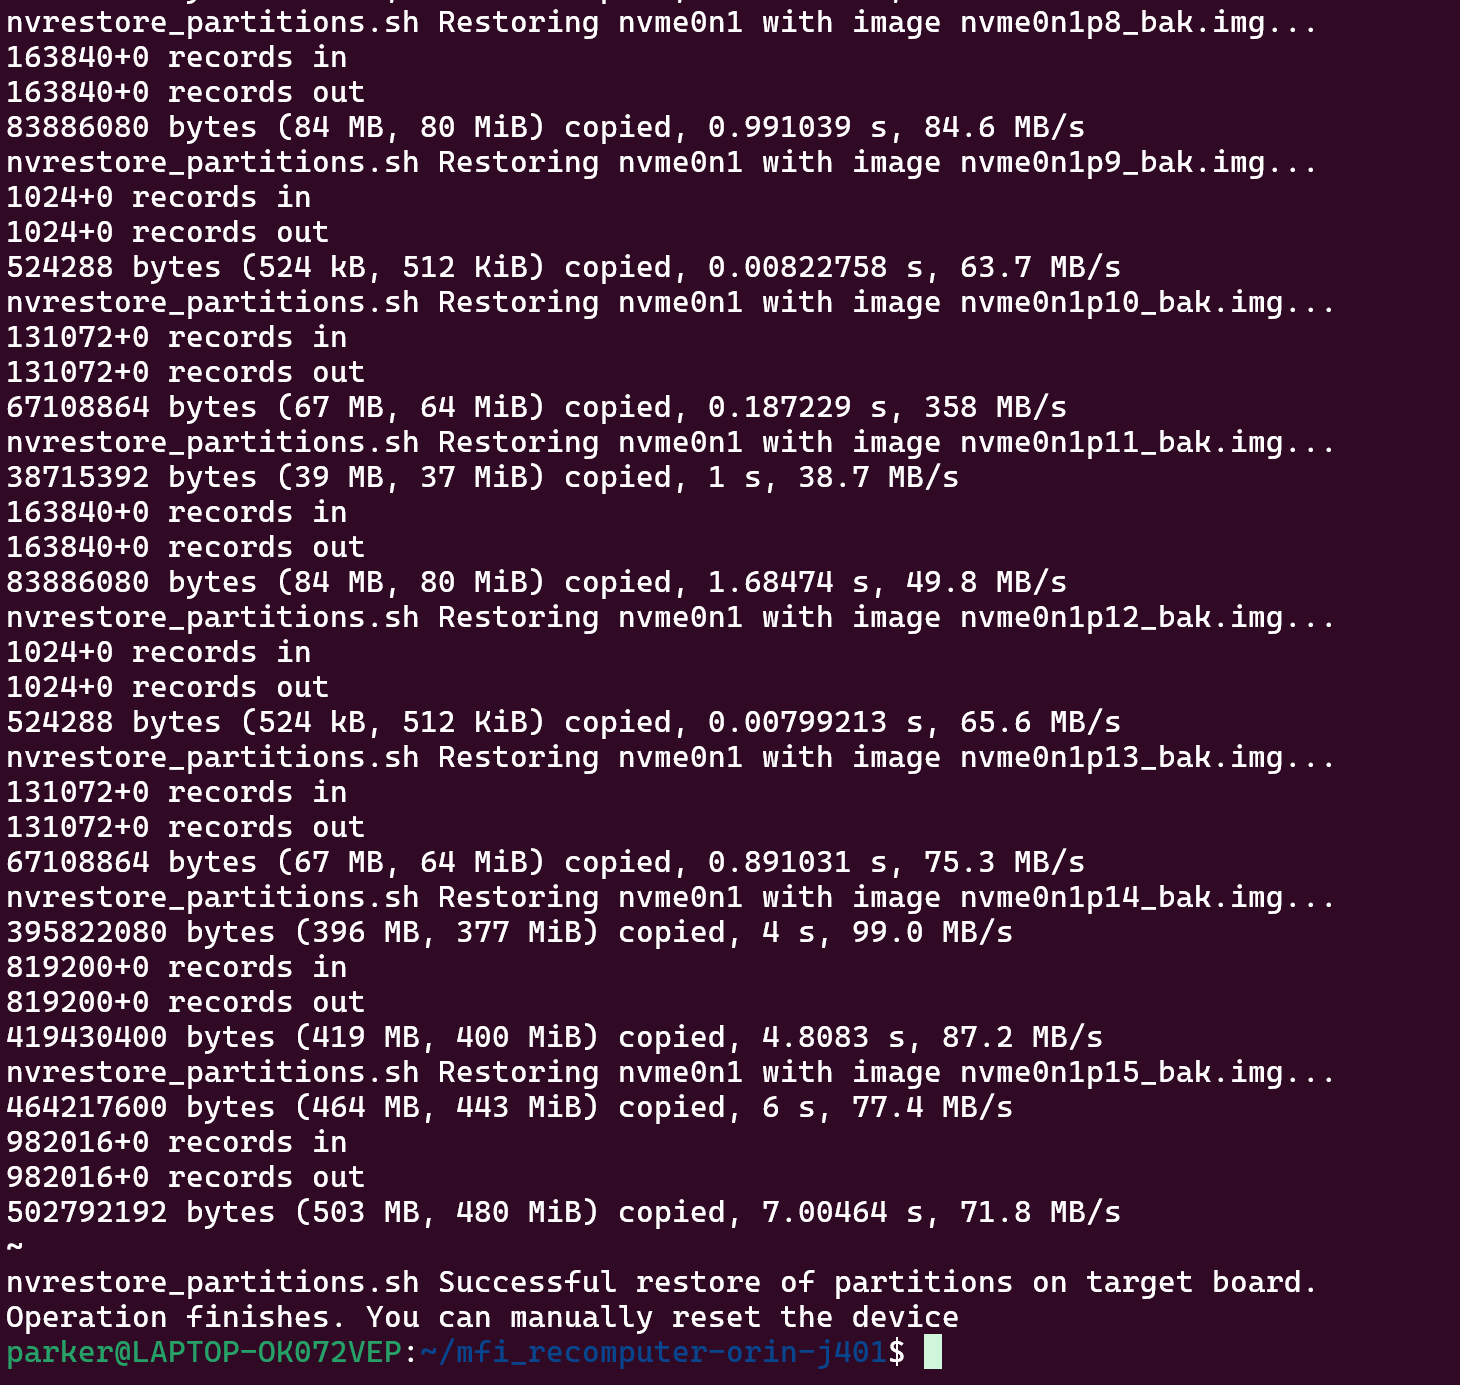
Using the script l4t_backup_restore.sh is a viable solution. Please check the below screenshots:
As you can see the backup and restore process are successful and completed. The first SSD contain the orignal OS we modified(create backup), and we installed a seperate SSD for restore operations.
From your boot log it seems that something is wrong with filesystem, would you please try another SSD and format it as EXT4 beforehead? Usually going through all those process should be able to restore the image.
Hi guys,
running into the same issue that I want to use a custom rootfs to be used for flashing.
Were you successful with flashing via this method @Frank_B ?
Is this still the best way of having custom software at flash time via a rootfs @Seeed_Kevin ?
I’m just wondering why there is a rootfs in the original folder if it does not seem to get used at all.
Thanks!
Hey @Benjamin_Kiefer
I just tried again, but instead of using r36.3.0 I tried it with the most up to date release: r36.4.3. I followed it until step 5 in “Getting Started” and then ran
On the unprepped device, and now it seems to work. Please do note that not all is copied properly. For example, we link the ethernet devices to a fixed mac-address, but this changes when switching to a new device, so this does not work.
Also, I’m still not sure if this is the intended method of flashing to new devices by Seeed Studio.
I’ve followed the getting started guide all the way through (except for step 9, as that results in a standard flash). From there I followed Workflow 3 from tools/backup_restore/README_backup_restore.txt:
Workflow 3: To massflash the backup image

Steps:
- Make sure you have only ONE device in recovery mode plugged in the host
- Run this command from the Linux_for_Tegra folder:
      $ sudo ./tools/backup_restore/l4t_backup_restore.sh -b -c <board-name>
  Where <board-name> are similar to the corresponding variables used
  in the flash.sh command. (See more details in the official documentation's
  board name table).
  Be aware that this massflash workflow does not support multiple external storage devices.
  For example, you cannot do "-e nvme0n1:sda -b -c".
- If this command completes successfully, an initrd flash image  is stored in
Linux_for_Tegra/tools/kernel_flash/images.
- Put the device in recovery mode again and generate a massflash package using backup image:
      $ sudo ./tools/kernel_flash/l4t_initrd_flash.sh --use-backup-image --no-flash --network usb0 --massflash <x> <board-name> internal
  Where <x> is the highest possible number of devices to be flashed concurrently.
  <board-name> are similar to the corresponding variables used
  in the flash.sh command. (See more details in the official documentation's
  board name table).
- After generate the massflash image and environment, you can flash new device by putting the device into recovery mode:
      $  sudo ./tools/kernel_flash/l4t_initrd_flash.sh --flash-only --massflash <x> --network usb0
  Alternatively, use the generated mfi_<target-board>.tar.gz tarball. More
  detailed instruction can be found in the Initrd flash README.
In my case <x> is 1 and <board-name> is recomputer-industrial-orin-j201. In step 2, I also added -e nvme0n1 before -b as per the command provided by @Seeed_Kevin. This worked. The tarball is similar to the one that is provided by Seeed Studio. I’ve not tested massflashing multiple devices at the same time.
Great JOB and hats off to Kevin for breaking it in. I was puzzled why it didn’t work before. but I find with this stuff you just never know the latest change or file command could make it work.