Assistance Needed: Loading Softdevice (S340) onto Seeed XIAO BLE Sense nRF52840 Board

Hello everyone,

I’m currently working with a Seeed XIAO BLE Sense nRF52840 board and aiming to connect it to a Garmin Edge device to serve as a Heart Rate Monitor. To achieve this, I intend to utilize the ANTPLUS-Arduino library. However, I encountered an issue where the example code provided did not function as expected.

Upon reaching out to the creator of the library, I was advised that I need to download a “softdevice (e.g., S340)” for proper functionality.
He also said the following: “That being said, loading the softdevice is not trivial and, if you don’t have a programmer handy, can brick your device.”

I would greatly appreciate it if someone could provide clear and concise step-by-step instructions on how to load the S340 softdevice onto my Seeed XIAO BLE Sense nRF52840 board.

Thank you in advance for your assistance.

Best regards,
Victor

Hi there,
I see you have tried this ANT+ for a few years, (Arduino forum)
I doubt you get any help for that, It’s a PAY and need License
( My motto "If it’s FREE it’s for Me , If you have to PAY, Take it AWAY! :grin:)
In case you need more info , Thisisant will educate you about the product

https://www.thisisant.com/developer/components/nrf52832#660_tab

Dynastream does not allow redistribution of the ANT softdevice.
the examples require an ANT+ Network Key also…?
I’m sure you :index_pointing_at_the_viewer: know this. Why ant+ anyway because it’s Garmin?
You would have a better time using an OPEN setup Like BLE, albeit more code work. IMO
This might help you, Nrf_desktop and the NRF_SDK are your friend, See many Demo I posted how to use. YMMV, You would want to use an NRF52840-DK (dev-board) for supported and working examples.

IMO , the juice is NOT worth the squeeze with , ANT, ANT+ :wink: :v: Also I don’t feel it’s supported well on Nrf52840(seeed Xiao) but Much better on Nrf5340,

HTH
GL :slight_smile: PJ

The problem is that at the moment I want to implement this on Arduino. I don’t want to use nRF SDK / nRF Connect, since I have a Seeed Sense board (and nRF Connect simply doesn’t see it).
Maybe you know specifically how to load the S340 onto my board? It would help me!

As for the Arduino forum - no, it wasn’t me. I started getting interested in Ant+ just recently, apparently someone else needs the same thing. Yes, I know that the Ant+ license is paid.

Hi there,
AFAIK, You will need to be able to load the Softdevice and the Programmer in the NRF_Desktop is what is used to get that level of capabilities, Not available in Arduino.

You can Load the SDK libraries needed in Arduino IDE, that’s the only place they are available. along with the ANT+ (i was under the impression the ANT+ included the Softdevice 340.??
HTH
GL :slight_smile: PJ

Post up whatever code you are trying to get working , allot of smart people here can help. :v:

Hello.
I apologize for not answering right away, because there are so many things to do at the same time, I can’t manage everything at once.
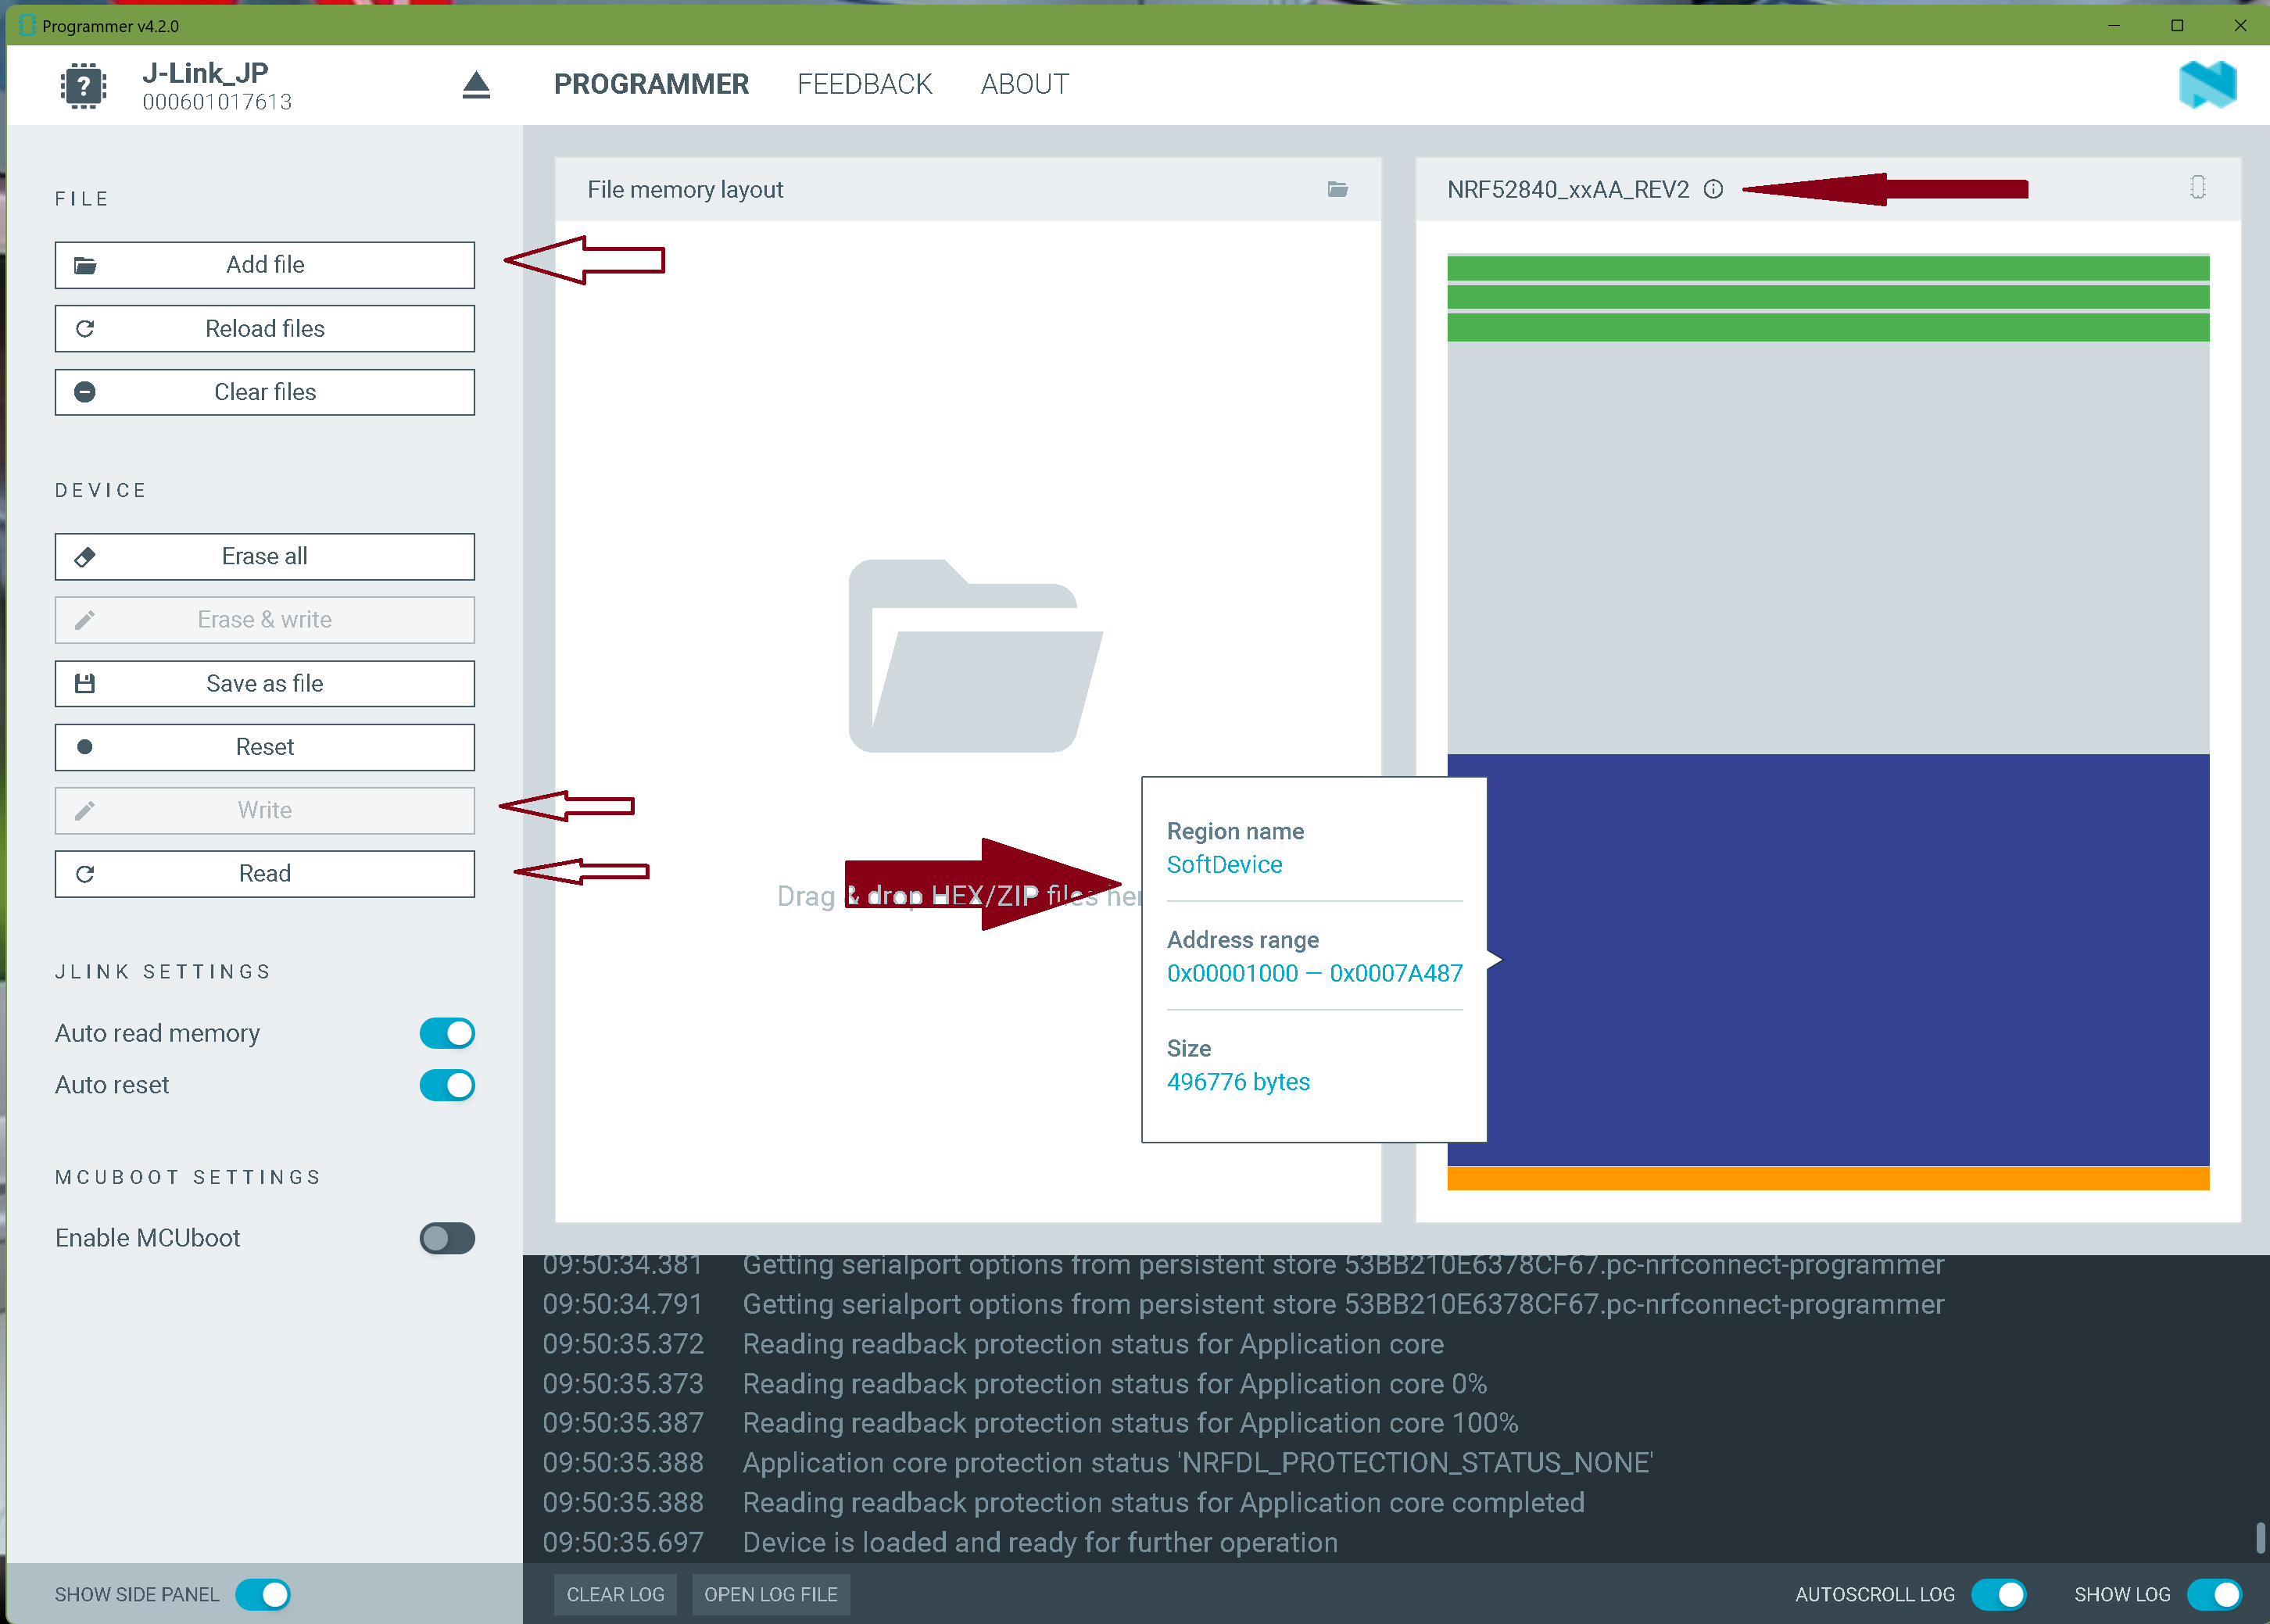
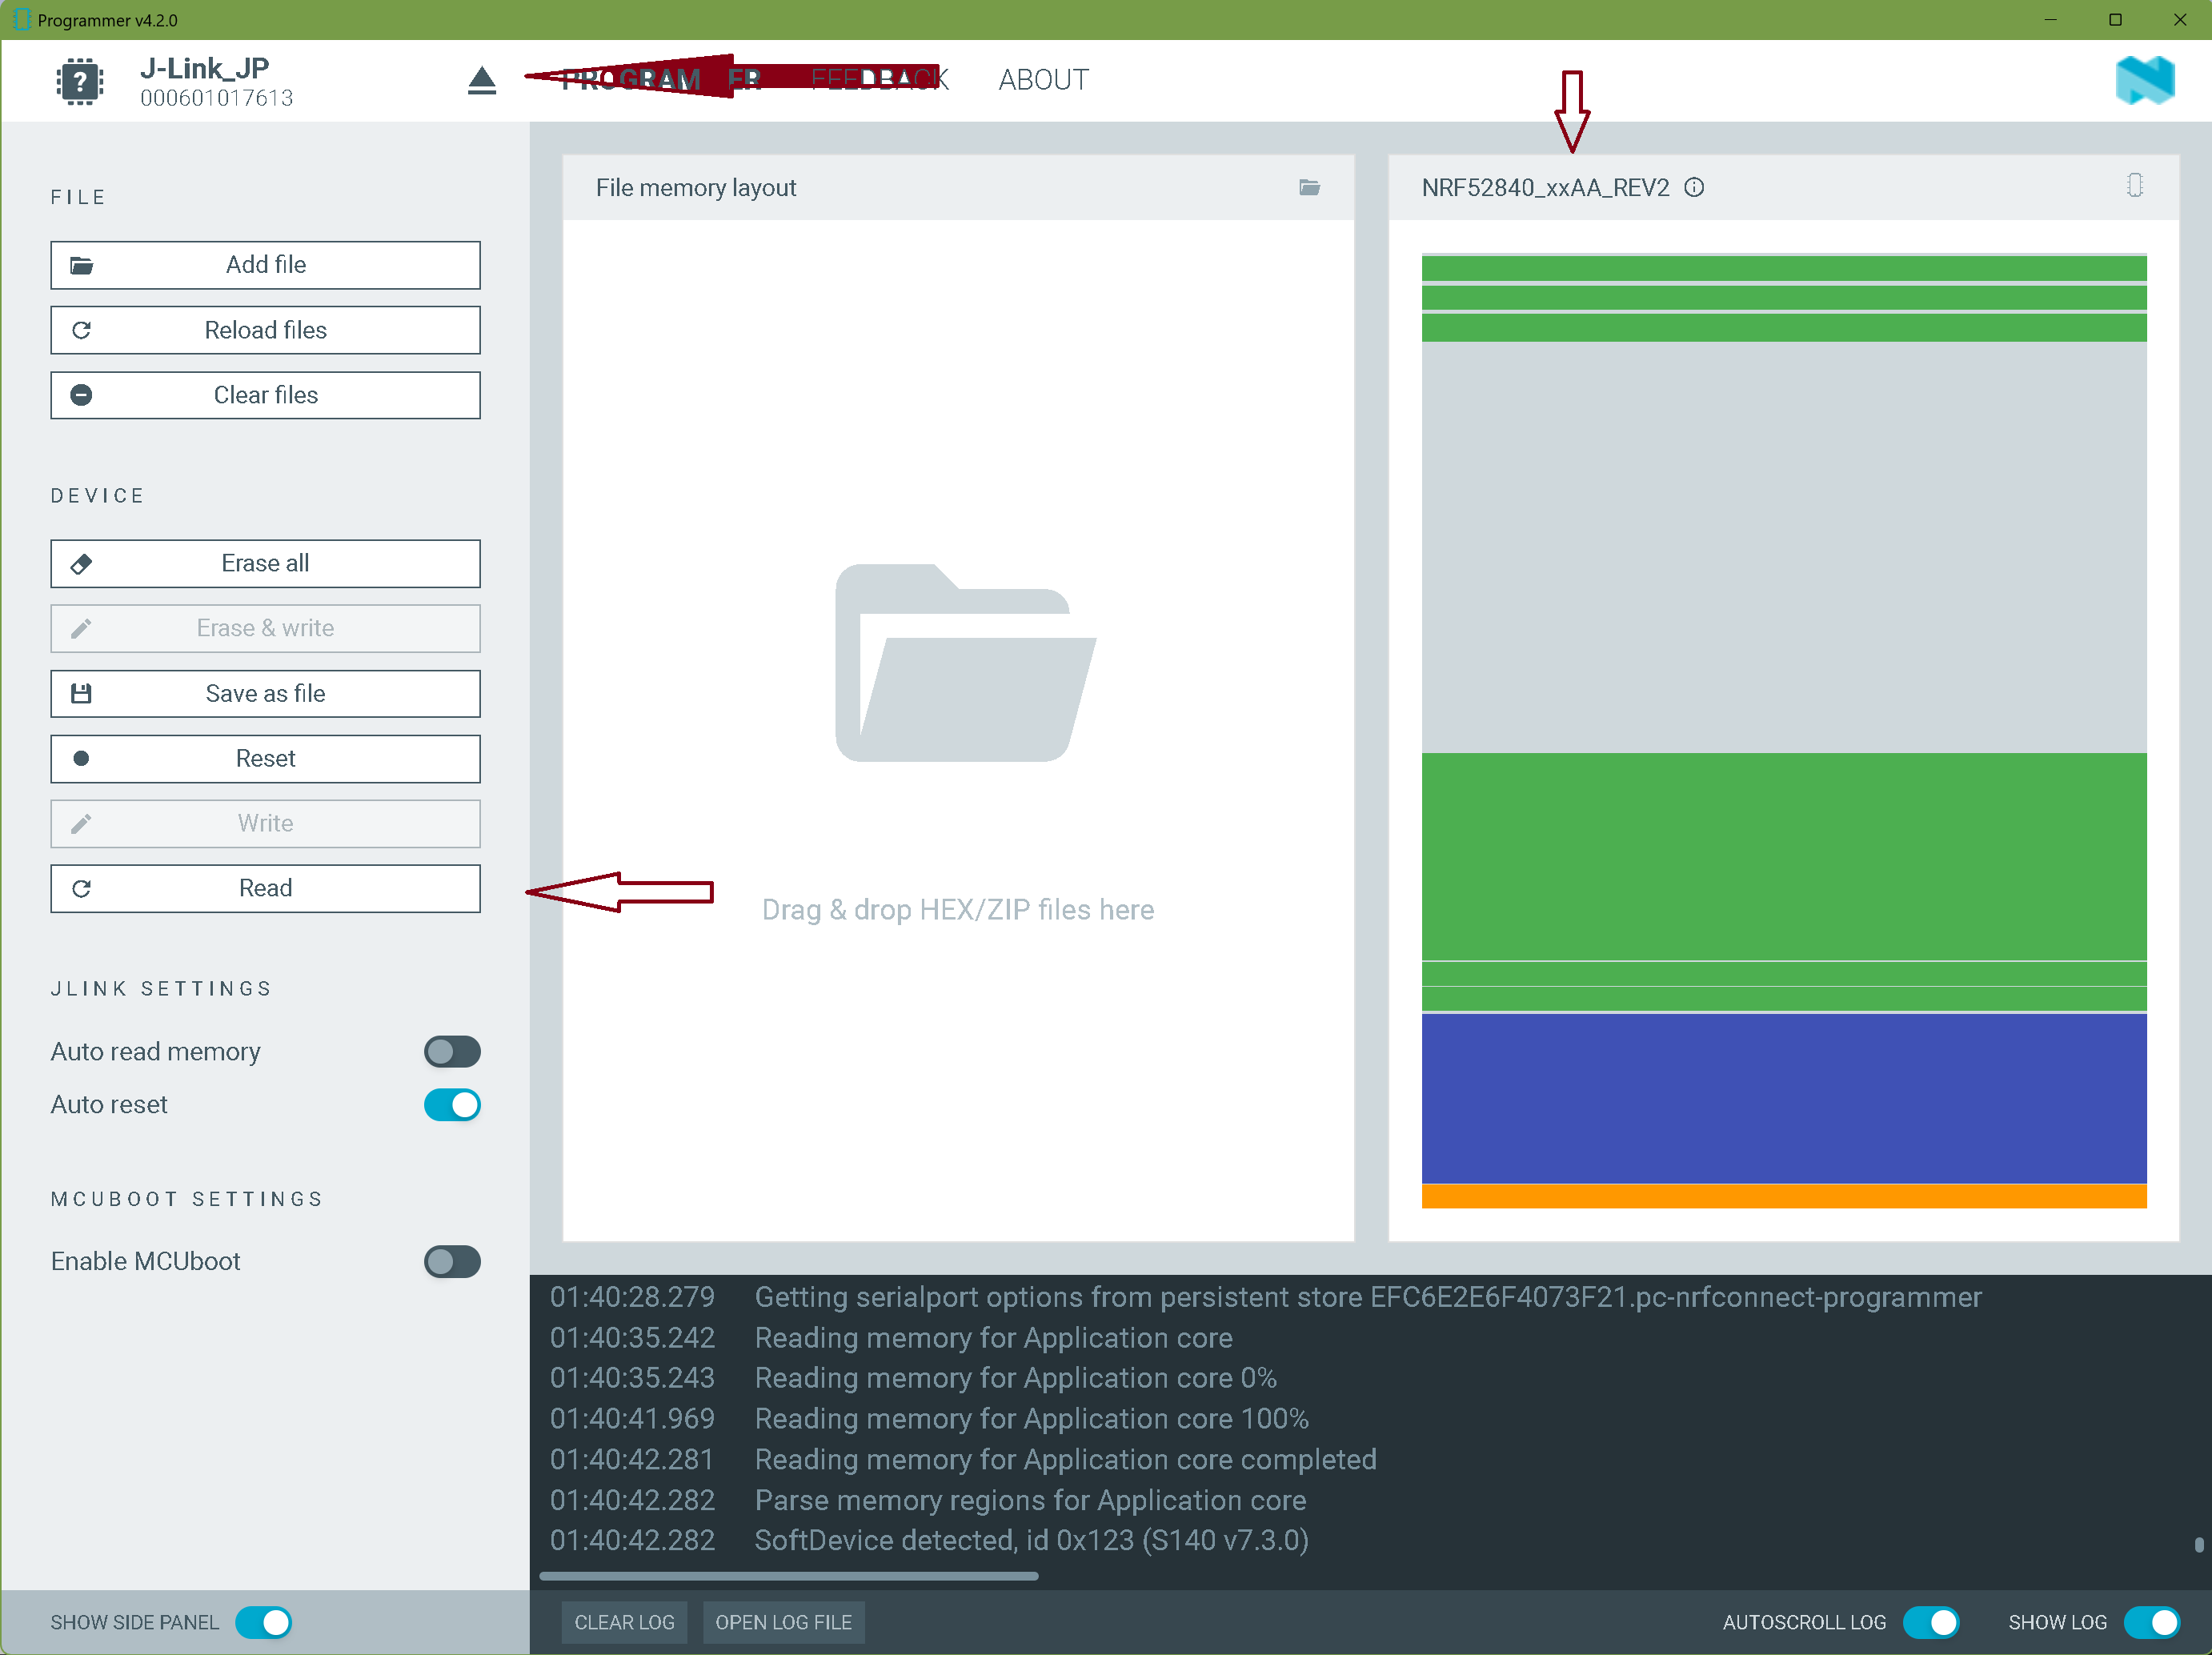
As for the code. I have the following code but it doesn’t work, I contacted Curtis (who made the Antplus-Arduino library) and he told me to program the S340 soft-device.
He also sent me a link to a step-by-step guide, but it seems that it is a little out of date, at least that’s what its author writes.
Here is the guide: S340 SoftDevice & Adafruit nRF52840 Express Feather | Blogarak a fejemben
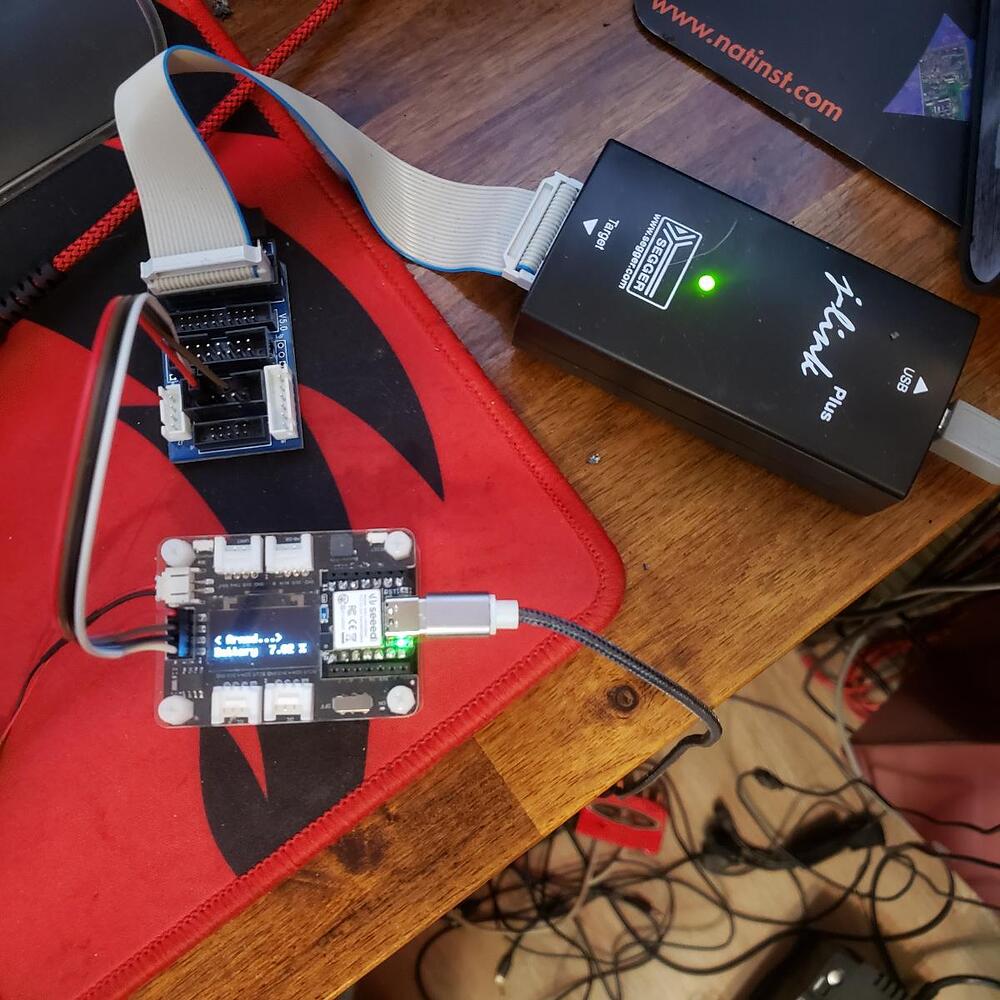
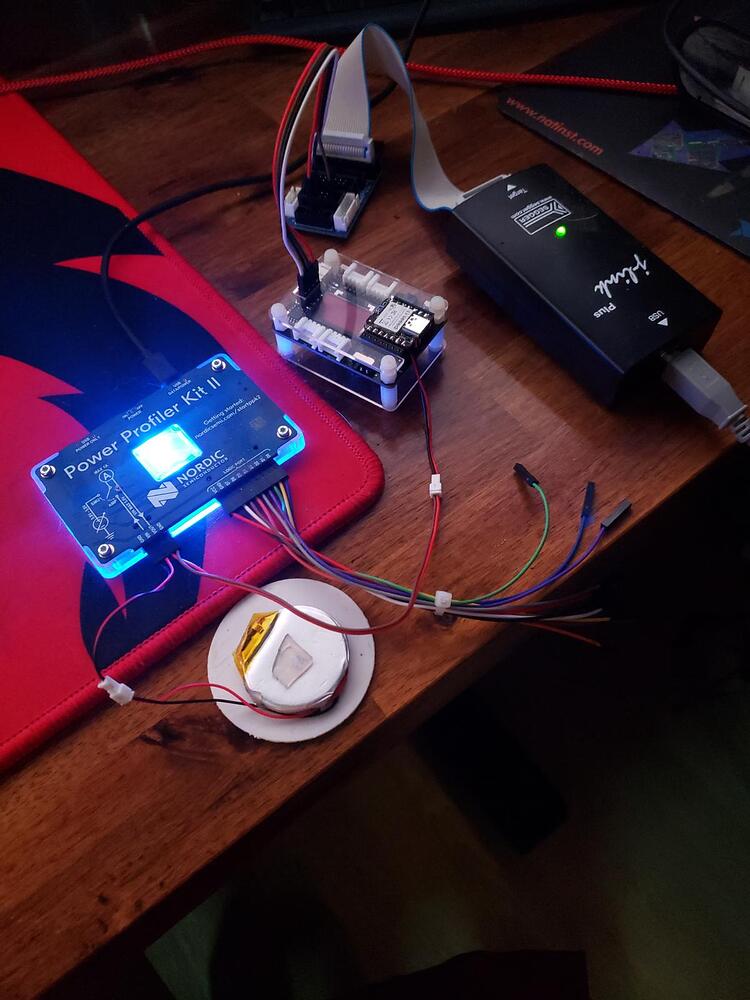
It looks like what I need. Simple, step by step. The only thing is that I have a Seeed Sense nRF52840, but I think it won’t be difficult to try to do it by analogy.
And here is my code itself:

/***********************************
 * AntPlus HRMonitor example
 *
 * Implements a HR Monitor sensor with
 * mocked data to it and then reports
 * all events through the serial port
 *
 * This is a minimum viable example
 * all additional datapages are optional
 * and are enabled through flags passed
 * into the profile
 *
 * It is highly recommended you read the documenation at
 * https://github.com/cujomalainey/antplus-arduino/wiki/HeartRate-Monitor-Profile
 *
 * Author Curtis Malainey
 ************************************/
#include <Arduino.h>
#include "ANT.h"
#include "ANTPLUS.h"

#define BAUD_RATE 9600
#define CHANNEL_0 0

const uint8_t NETWORK_KEY[] = {0x00, 0x11, 0x22, 0x33, 0x44, 0x55, 0x66, 0x77}; // get this from thisisant.com

uint32_t flags = 0;
ArduinoSerialAntWithCallbacks ant;
AntPlusRouter router;
ProfileHeartRateMonitor hr(123, 0, flags);

// void batteryStatusDataPageHandler(HeartRateBatteryStatusMsg& msg, uintptr_t data);
// void capabilitiesDataPageHandler(HeartRateCapabilitiesMsg& msg, uintptr_t data);
// void cumulativeOperatingTimeDataPageHandler(HeartRateCumulativeOperatingTimeMsg& msg, uintptr_t data);
void defaultDataPageHandler(HeartRateDefaultMsg& msg, uintptr_t data);
void manufacturerInformationDataPageHandler(HeartRateManufacturerInformationMsg& msg, uintptr_t data);
// void previousHeartBeatDataPageHandler(HeartRatePreviousHeartBeatMsg& msg, uintptr_t data);
void productInformationDataPageHandler(HeartRateProductInformationMsg& msg, uintptr_t data);
// void swimIntervalSummary(HeartRateSwimIntervalSummaryMsg& msg, uintptr_t data);

void populateBaseHeartRate(HeartRateBaseMainDataPageMsg& msg);

void setup() {
    Serial1.begin(BAUD_RATE);
    ant.setSerial(Serial1);
    delay(15000);
    Serial.begin(BAUD_RATE);
    Serial.println("Running");

    router.setDriver(&ant); // never touch ant again
    router.setAntPlusNetworkKey(NETWORK_KEY);
    router.setProfile(CHANNEL_0, &hr);
    // Delay after initial setup to wait for user to connect on serial

    // hr.createHeartRateBatteryStatusMsg(batteryStatusDataPageHandler);
    // hr.createHeartRateCapabilitiesMsg(capabilitiesDataPageHandler);
    // hr.createHeartRateCumulativeOperatingTimeMsg(cumulativeOperatingTimeDataPageHandler);
    hr.createHeartRateDefaultMsg(defaultDataPageHandler);
    hr.createHeartRateManufacturerInformationMsg(manufacturerInformationDataPageHandler);
    // hr.createHeartRatePreviousHeartBeatMsg(previousHeartBeatDataPageHandler);
    hr.createHeartRateProductInformationMsg(productInformationDataPageHandler);
    // hr.createHeartRateSwimIntervalSummaryMsg(swimIntervalSummary);
    Serial.println("===========================");
    hr.begin();
}

void loop() {
    // Call this very frequently
    router.loop();
}

void printDpMsg(int dp, const char* s) {
    Serial.print("Sending DataPage: ");
    Serial.print(dp);
    Serial.print(" - ");
    Serial.println(s);
}

/* Optional */
// void batteryStatusDataPageHandler(HeartRateBatteryStatusMsg& msg, uintptr_t data) {
//     printDpMsg(7, "Battery Status");
//     populateBaseHeartRate(msg);
// }

/* Optional */
// void capabilitiesDataPageHandler(HeartRateCapabilitiesMsg& msg, uintptr_t data) {
//     printDpMsg(6, "Capabilities");
//     populateBaseHeartRate(msg);
// }

/* Optional */
// void cumulativeOperatingTimeDataPageHandler(HeartRateCumulativeOperatingTimeMsg& msg, uintptr_t data) {
//     printDpMsg(1, "Cumulative Operating Time");
//     populateBaseHeartRate(msg);
// }

void defaultDataPageHandler(HeartRateDefaultMsg& msg, uintptr_t data) {
    // All fields are reserved
    printDpMsg(0, "Default");
    populateBaseHeartRate(msg);
}

void manufacturerInformationDataPageHandler(HeartRateManufacturerInformationMsg& msg, uintptr_t data) {
    printDpMsg(2, "Manufacturer Information");
    populateBaseHeartRate(msg);
    msg.setManufacturerIdLsb(78);
    msg.setSerialNumber(0xabcd);
}

/* Optional */
// void previousHeartBeatDataPageHandler(HeartRatePreviousHeartBeatMsg& msg, uintptr_t data) {
//     printDpMsg(4, "Previous Heart Beat");
//     populateBaseHeartRate(msg);
// }

void productInformationDataPageHandler(HeartRateProductInformationMsg& msg, uintptr_t data) {
    printDpMsg(3, "Product Information");
    populateBaseHeartRate(msg);
    msg.setHardwareVersion(1);
    msg.setSoftwareVersion(2);
    msg.setModelNumber(3);
}

/* Optional */
// void swimIntervalSummary(HeartRateSwimIntervalSummaryMsg& msg, uintptr_t data) {
//     printDpMsg(5, "Swim Interval");
//     populateBaseHeartRate(msg);
// }

void populateBaseHeartRate(HeartRateBaseMainDataPageMsg& msg) {
    static uint8_t toggle = 0;
    static uint8_t hr = 0;
    static uint16_t eventTime = 0;
    static uint8_t count = 0;
    msg.setPageChangeToggle(toggle++ < 4);
    msg.setComputedHeartRate(20*sin(hr++) + 120);
    msg.setHeartBeatEventTime(eventTime);
    msg.setHeartBeatCount(count++);

    if (toggle >= 8) {
        toggle = 0;
    }
    eventTime += 120;
}

Actually, this is just an example from Curtis. It seems to be working, it says “Sending data” to the console (Serial port), but the Garmin device does not see it.

Hi there,
Ok well that’s good information, You can download the Softdevice file for 340?
should work on Nrf52840. Loading the new softdevice is easy. Get the NRF connect for Desktop and Use the Programmer app in there, looks like this.

you need a Jlink+ or Jling programmer. to write the new soft device.


I don’t have “ANT.h” or “ANTPLUS.h” so I’m not able to compile it for , Their code looks pretty straight forward. Would be good if it could detect the softdevice installed?
HTH
GL :slight_smile: PJ :v:

1 Like

Unfortunately no. Their code doesn’t detect SoftDevice

Did not quite understand.
Do I need to physically buy this device? Or is it software? I did not quite understand.

I can. But I didn’t understand something, where is my nRF in this sequence?
You haven’t written a word about him. How can I program it using JLink?
Or should I connect (insert) it to my nRF?

Hi there,
Yes you need to BUY a programmer to do that.
See the Part number in the red arrow, That’s an Nrf52840 being looked at, with softdevice 140 loaded. The memory map of the device.
HTH
GL :slight_smile: PJ

Check the threads (magnifying glass) for “JLink” to gain some good knowledge :v:
connected like this

with power profiler II connected too.(PPKII)


note.
the Nrf52840DK board also has a Programmer built in that works well too.

1 Like

When you say, it’s just to flash the softdevice to the board using nRF connect with a jlink, is that really the whole truth?

I have tried with the standard bootloader in arduino and flash a S340 on to it with nRF connect. Sure, the board now says it has a S340 softdevice on it, when looking at the uf2 files. But that’s about it.

To upload a sketch from arduino ide is not possible. Even with a little tinkering with board and softdevice definitions I have not been able to get it to work.

The S340 takes more space then the standard S140 supplied, so application code probably over writes something crutial in the bootloader. I also tried changing the application start memory address, but that just results in a dead board. It’s like the bootloader does not know where the application code starts.

Any idea?

1 Like

Hi there,
Yes, That’s the issue with Arduino IDE, for upload you would use the programmer.
I have a high suspicion you didn’t read the documentation, I suggest you take some time and familiarize yourself with the differences and requirements to use that particular softdevice. There is a matrix about what is and isn’t in there. I don’t remember where exactly , so you’ll need to look at that as well. Look at the thread for Creating a BIN file. The offsets are listed as to what goes where, there’s 4 of them.
HTH
GL :slight_smile: PJ
Also You may need to enable cdc Boot or MCU boot, not sure which for that to work in Arduino ?
Nrf_connect SDk has everything in it in the menu config, so look at that as well. :v:

you’re not alone! Have you tried reaching out to the Seeed XIAO BLE Sense community for assistance? They might have valuable insights of Invisible Text or step-by-step guides to help you load the S340 softdevice onto your board.

Loading the S340 softdevice onto your Seeed XIAO BLE Sense nRF52840 board is crucial for proper functionality. While it can be complex, there are step-by-step guides available online. Make sure to follow them carefully to avoid any potential issues.

1 Like

Hi there,
To sum it up Just flashing the S340SD to the chip is only part of it, you still need a bootloader for the IDE to recognize the device, Upload can be DFU, serial, OTA,
The bigger SD means less room for your App is all, the Bootloader addresses and app entry also change.
Here is a Blog that does everything for you(except the Ant Keys) use his repo , But RTFM if you really want to make it happen, It is certainly NOT rocket Science but there is a process.
You got 1/4 away there, so keep going…
HTH
GL :slight_smile: PJ

1 Like