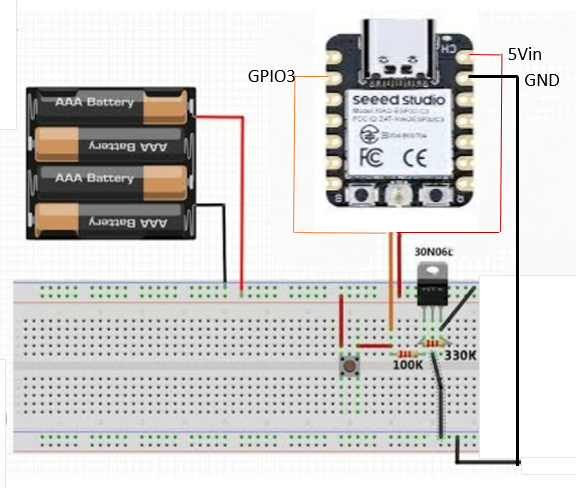
Hi, I am using xiao Esp32c3 to run a pressure sensor and an air quality sensor. I use the gpio3 to send signal to a mosfet as shown in attached pic. Please note the pic has Uno while I use Esp32c3. The issue is the C3 has no dedicated touch pin, so to use it it has to be grounded. The Uno has a dedicated touchpin so it does not need to be grounded. How do i modify the attached circuit to work with Esp32c3?
HI there,
Did you Know You can use the Boot Button ?
YES…you can use the onboard boot button in your application code as a normal input once the board has successfully booted up. However, there are a couple of things to keep in mind:
- Pin Assignment and Mode:
The boot button is typically connected to a specific GPIO (for example, GPIO0 on many ESP32 boards). Once the board has booted, you can configure that pin as a digital input with the built‑in pull-up enabled. For example, in your Arduino sketch you could do:
const int bootButtonPin = 0;  // Replace 0 with the actual GPIO number for the boot button
void setup() {
  pinMode(bootButtonPin, INPUT_PULLUP);
  // Other setup code...
}

void loop() {
  if (digitalRead(bootButtonPin) == LOW) {
    // Button is pressed (assuming active low)
    // Do something here...
  }
  // Other loop code...
}
- Boot Mode Consideration:
Be aware that if the boot button is pressed during reset or power-up, it may force the ESP32C3 into bootloader (or flashing) mode. So, you should make sure that the button is not inadvertently pressed at startup if you want your application to run normally. - No Additional Hardware Required:
Since the board already includes an onboard pull-up resistor for the boot button, you don’t need to add any external components if you just want to use it as a simple input after boot.
HTH
GL ![]() PJ
PJ ![]()
Hi there,
So here you can USE a Xiao ESP32C3 and the single channel relay board once connected and programmed After it boots up the “boot” button can be used to turn ON/Off the relay.
// Define the pins
const int BOOT_BUTTON_PIN = 9;  // Boot button; for Xiao ESP32C3  adjust if your board uses a different pin
const int LED_PIN         = 3;  // LED connected to R1

bool ledState = false;        // current state of the LED
bool lastButtonState = HIGH;  // to track button state for detecting edges

void setup() {
  Serial.begin(115200);
  while (!Serial) {
    ; // Wait for Serial connection (if needed)
  }
  Serial.println("Boot Button LED Toggle Example");

  // Configure the boot button pin as input with internal pull-up.
  pinMode(BOOT_BUTTON_PIN, INPUT_PULLUP);

  // Configure the LED pin as an output.
  pinMode(LED_PIN, OUTPUT);
  digitalWrite(LED_PIN, LOW); // Start with LED off (assuming LED turns on when HIGH; adjust if reversed)
}

void loop() {
  // Read the state of the boot button (active low)
  bool currentButtonState = digitalRead(BOOT_BUTTON_PIN);

  // Check for a button press: transition from HIGH to LOW.
  if (currentButtonState == LOW && lastButtonState == HIGH) {
    // Toggle the LED state
    ledState = !ledState;
    digitalWrite(LED_PIN, ledState ? HIGH : LOW);
    Serial.print("LED toggled: ");
    Serial.println(ledState ? "ON" : "OFF");

    // Simple debounce delay
    delay(50);
  }

  // Save the current state for the next loop iteration
  lastButtonState = currentButtonState;

  // Small delay to avoid rapid polling
  delay(10);
}

Works, Great!
HTH
GL ![]() PJ
PJ ![]()