XIAO BLE Sense battery level and charging status

I noticed that if you let one full battery reading complete using @POPOBE97 's code before setting the green LED to output mode, you can continue to use both the green LED and measure the onboard battery level.

I’m now able to use all the LEDs, Bluetooth, the microphone, the IMU, and read the battery level, all at the same time.

#include <nrf52840.h>
#include <nrfx_saadc.h>
#include <AnalogIn.h>
#include <pinDefinitions.h>

// Reading Battery Level
// https://forum.seeedstudio.com/t/xiao-ble-sense-battery-level-and-charging-status/263248/24

class HackAnalogIn: public mbed::AnalogIn 
{
  using mbed::AnalogIn::AnalogIn;
  public:
    analogin_t getAnalogIn_t();
};

analogin_t HackAnalogIn::getAnalogIn_t() 
{
  return this->_adc;
}

void startReadingBatteryLevel(nrf_saadc_value_t* buffer) 
{
  auto pin = PIN_VBAT;
  PinName name = analogPinToPinName(pin);
  if (name == NC)
  {
    return;
  }
  HackAnalogIn* adc = static_cast<HackAnalogIn*>(analogPinToAdcObj(pin));
  if (adc == NULL)
  {
    adc = new HackAnalogIn(name);
    analogPinToAdcObj(pin) = static_cast<mbed::AnalogIn*>(adc);
#ifdef ANALOG_CONFIG
    if (isAdcConfigChanged)
    {
      adc->configure(adcCurrentConfig);
    }
#endif
  }

  nrfx_saadc_buffer_convert(buffer, 1);
  nrfx_err_t ret = nrfx_saadc_sample();
  if (ret == NRFX_ERROR_BUSY)
  {
    // failed to start sampling
    return;
  }
}

nrf_saadc_value_t BatteryLevel = { 0 };

float vBat = 0.0;

void monitor_battery_level(void){
  // Monitor the Battery Level
  static unsigned long _lastT = 0;
  unsigned long _t = millis();

  if (_t - _lastT > 1000)
  {
    // read battery level every 1 second
    startReadingBatteryLevel(&BatteryLevel);
    _lastT = _t;
    Serial.print("startReadingBatteryLevel at time ");
    Serial.println(_t);
  }

  // check if ADC conversion has completed
  if (nrf_saadc_event_check(NRF_SAADC_EVENT_DONE))
  {
    // ADC conversion completed. Reading is stored in BatteryLevel
    nrf_saadc_event_clear(NRF_SAADC_EVENT_DONE);
     vBat = (float)BatteryLevel / 4096 * 3.3 / 510 * (1000 + 510);
    // write value to characteristic or things you want to do
    
    Serial.print("BatteryLevel: ");
    Serial.println(vBat);
  }
}
void setup()
{
  Serial.begin(115200);
  //while (!Serial);

  Serial.println("Battery Level Example!");  

  // Battery Level setup
  pinMode(P0_14, OUTPUT);
  digitalWrite(P0_14,LOW);
  
  while(vBat == 0.0){
    monitor_battery_level();
  }
  
  pinMode(LEDR, OUTPUT);
  pinMode(LEDG, OUTPUT); // Setting LEDG to pinMode OUTPUT casues the monitoring of Battery Level to stop working
  pinMode(LEDB, OUTPUT);
  digitalWrite(LEDR,HIGH);
  digitalWrite(LEDG,LOW);
  digitalWrite(LEDB,HIGH);

}

void loop()
{
  monitor_battery_level();
}
1 Like

There was a problem with analogRead() in mbed2.7.2, but this problem was fixed in mbed2.8.1.
[EDIT]
There was a problem with analogRead() in mbed2.7.2, but this problem was not fixed in mbed2.8.1.

2.8.2 fixes the problem with the green LED (so I no longer need to read the battery level once prior to using the green LED), but from my testing I still need @POPOBE97 's code to read the battery level while using bluetooth and the IMU.

My final battery level solution was moving away from mbed.

After additional ArduinoBLE stability issues, I moved my entire project to the non-mbed nrf52 core, and used the Bluefruit.h library, along with PDM.h for sound (along with ArduinoFFT), Seeed’s Sparkfun based IMU driver with step and tap detection (along with fusion.h for yaw pitch and roll), and Adafruit’s Neopixel library that supports nrf52 DMA acceleration (with a little hacking to make it async).

Analogread now works great, right out of the box, and everything is faster, and 100% stable while processing sound and motion, driving Neopixels, and streaming the data over bluetooth (both as a central and peripheral).

The Seeed Sense is an incredible piece of hardware, but the current mbed core is really problematic.

If anyone is curious, here is some of my code, and my libraries (WIP):

3 Likes

Thanks for the link to your coding. What does your project do?

It’s a work in process, but basically it’s a recreation of Jamiroquai’s Automaton helmet (from the music video).

I’m controlling it via two wrist bands, both with a XIAO nRF52840 Sense recording motion and sound at 20hz in central mode, reporting via BLE to another Sense in the helmet acting as a peripheral.

The XIAO nRF52840 Sense in the helmet takes the data, processes it, and sends out the results to the LEDs across the helmet, as well as a network of 15 XIAO RP2040s that each control one fin on the helmet. This architecture greatly simplifies the construction.
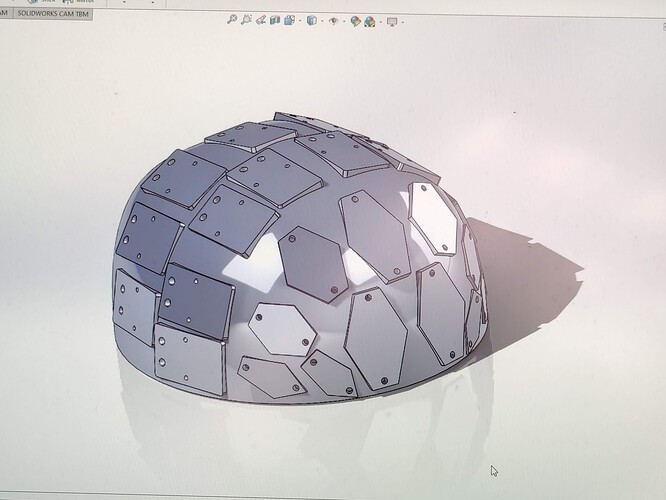
2 Likes

Looks like a complex but cool project.

1 Like

my conclusions:
first You have to choose library in Arduino IDE for Your XIAO board

Two Arduino Libraries

Seeed Studio XIAO nRF52840 assembles many functions in one tiny board and sometimes may not perform the best of them. Hence, Seeed has published two Arduino libraries to let it maximum the power of each function. Therefore:

  • It is recommanded to use the Seeed nRF52 Boards library if you want to apply Bluetooth function and “Low Energy Cost Function”.
  • It is recommanded to use the Seeed nRF52 mbed-enabled Boards library if you want to use it in embedded Machine Learning Applications or apply “IMU & PDM advanced function”.
  • Both libraries support very well when it comes to the basic usage, such as LED, Digital, Analog, Serial, I2C, SPI.

The Pin definition supported by these two libraries might be a little different and Seeed will keep update the wiki until it is clear.

from Getting Started with Seeed Studio XIAO nRF52840 (Sense) - Seeed Wiki

We found that working with mbed type is causing problems …so its better to choose adafruit based libraries … as did Swap_file user :slight_smile: : XIAO BLE Sense battery level and charging status - #43 by Swap_File

Then I can use even this sketch from adafruit

remembering to add this part specific to XIAO BLE board

//enable battery measuring
pinMode(VBAT_ENABLE, OUTPUT);
digitalWrite(VBAT_ENABLE, LOW);

This is my conclusion from this disscusion :slight_smile:

1 Like

ADD me to the Quire… If SEEED would dedicate some real effort in getting this together half as good as the Adafruit stuff. Great link, lots of good knowledge there.
I’ve used their libraries by accident and it worked first time out. trying to get the best of both worlds with the seeed stuff is a struggle if at all possible.
my .02
I love the seeed foootprint and basic premise of the BLE Xiao.
The Sense version raises the bar, unfortunately they don’t reach it with the firmware support.
They should run at it again but add the RTC. talk about a complete package… WOW :grinning:
HTH
GL :-p

Add me to the frustration around this… nothing I’ve tried works. This shouldn’t be this hard to derive charge level from a board that supports charging!

For anyone using Arduino BSP instead of mBed the pins for charging state and charging current are not assigned to names as of writing this comment. Also, I also by default in Arduino BSP the reference voltage is coming from the internal regulator and it’s set to 3.6V. You can change that using analogResolution.

Here the code for Arduino:

#define BAT_HIGH_CHARGE 22  // HIGH for 50mA, LOW for 100mA
#define BAT_CHARGE_STATE 23 // LOW for charging, HIGH not charging

class Xiao {
public:
  Xiao();
  float GetBatteryVoltage();
  bool IsChargingBattery();
};

Xiao::Xiao() {
  pinMode(VBAT_ENABLE, OUTPUT);
  pinMode(BAT_CHARGE_STATE, INPUT);

  digitalWrite(BAT_HIGH_CHARGE, HIGH); // charge with 100mA
}

#define VBAT_PER_LBS (0.003515625F) // 3.6 reference and 10 bit resolution

float Xiao::GetBatteryVoltage() {
  digitalWrite(VBAT_ENABLE, LOW);

  uint32_t adcCount = analogRead(PIN_VBAT);
  float adcVoltage = adcCount * VBAT_MV_PER_LBS;
  float vBat = adcVoltage * (1510.0 / 510.0);

  digitalWrite(VBAT_ENABLE, HIGH);

  return vBat;
}

bool Xiao::IsChargingBattery() { return digitalRead(BAT_CHARGE_STATE) == LOW; }
3 Likes

thanks for this example :slight_smile:

I wonder why Seeedstudio is publishing different information ?
seeedstudio wiki : https://wiki.seeedstudio.com/XIAO_BLE/

1:

" The battery charging current is selectable as 50mA or 100mA, where you can set Pin13 as high or low to change it to 50mA or 100mA."

You write about pin 22 and current 100/200 mA

2:

Refer to the following pin mappings of the LEDs and use them in your codes:

  • Red LED - LED_BUILTIN or LEDR
  • Green LED - LEDG
  • Blue LED - LEDB

These references are not working in my Arduino IDE :frowning:
I found these working: LED_RED LED_BLUE LED_GREEN

Do You think that these are seeed errors or it depends on some settings of the arduino IDE or what board do You select ?
In my Arduino IDE 1.8.9 I have choosen board: ‘Seeed XIAO nRF52840’

" The battery charging current is selectable as 50mA or 100mA, where you can set Pin13 as high or low to change it to 50mA or 100mA."

You’re right about this. I made a mistake there.

Regarding the LED pins I think they are referring to mBed names.

Do You think that these are seeed errors or it depends on some settings of the arduino IDE or what board do You select ?

They depend on the board and version which are fetched from the json file you set in the settings for “additional pins”. The pins are defined in variant.h file and the mapping between these pin numbers and NRF52 pins is defined in cpp file alongside.

1 Like

Again thanks for this reply.
It is sad that seedstudio (and many people also) do not distinguish between two versions of …how to call it ? … “boards selections” in Arduino IDE : version 1.0.0 based on adafruit and mbed 2.7.0 based on ?? .
For me, as a beginner, it is quite often hard to find out what version we are talking about when I read a sketch.

1 Like

I took Mike1808’s code and turned it into a library that can be downloaded here:
honvl/Seeed-Xiao-NRF52840-Battery: Arduino library to sense Seeed Xiao NRF52840 Battery voltage or charging state on non-Mbed 1.0.0 firmware (github.com)

1 Like

What’s funny and sorry at the same time is they don’t even differentiate the Forums for Xiao boards themselves but a separate thread for Mbed and one for NON-mbed would be a good start, you never know what’s working with what based on the WIKI info- LAG, and lack of interest on their part to set a quality standard on the software support for the products documentation, is my guess.

Take this Subject… “XIAO BLE Sense battery level and charging status”
great place to start and say

You do it this way , If your using mbed.

Code goes here

or

Non mbed example goes here...

TOO easy, low hanging fruit… Shows you have some ideas of the community needs and clearing up the confusion the forum is littered with. All while improving sales and extending your core business’, the people spending there money on your products. IMO.

I’ll try the library and go print some carbon fiber :slight_smile:
HTH
GL :slight_smile:

1 Like

So is it know now which pin is used for high charging current? Is it 13 or is it 22?

HI , iggzzzz, post above…

HTH
GL :slight_smile:

1 Like

I think both Mike’s code and your library Honvl, might need the following to enable 100mA charging …

pinMode(BAT_HIGH_CHARGE, OUTPUT);

I could not get 100mA charging without this.

This THREAD has gotten a TAD off-track, So I’m asking if Seeed Intends to fix the 2.9.1 board files or a .2 or whatever to address reading the battery voltage and setting the charge current.

The configuration is:

  • Arduino 2.1.0 IDE
  • boards 2.9.1
  • Standard battery read example
  • Xiao Nrf52840 BLE & Sense versions

How about some clarification? BLE, IMU and battery reading ? all together.

Gl :slight_smile:
PJ