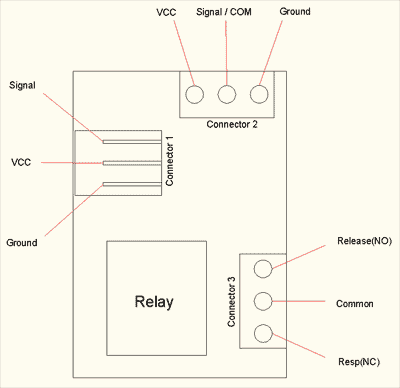
Where do I find instructions or hook-up information on the relay module teminal connections. I would assume that one block is for NC and the other is for NO control and what is the terminal layout of each screw post. I have search the fourm and can not find any information on how to connect this 5v Relay module to AC for control.
I agree with you. Product information would be most helpful on all parts they offer. Your drawing is most helpful. I found your question about com/signal very useful. I was confused with this also. Other question I had is about the power side of the relay (connector 3). The comm position, is that the white wire from a power cord and then goes to the comm on the outlet? I have seen other relay setups where the hot lead (black wire) of the power cord is connected there and then runs over to the outlet power side. Thanks so much for your insight on this. Once I get this worked out I will do an INSTRUCTABLE on it to help others out and make it clear on the steps needed to get this working with a power cord and outlet to run whatever people need. This actully is a very nice relay with some great features.
Thanks, I understand how the relay will function once the arduino goes high. Here is the connections I was going to use when I wire the project together. Please let me know if this looks right. Don’t to make a mistake on this. I am working off the drawing in prior post of the relay. Once I get all this worked out I will work out the SKETCH for the Arduino to test it all. My plan is to complete an instructable on the whole process so others will be able to hook all this up in short order and save a lot of time in working out how this could be wired up. I will post the instructable url once I get done with it. I need to get this working for my pumps and valves on my aquaponic units.
ARDUINO to RELAY:
PIN 7 (signal) to Connector 2 center position (COMM-SIGNAL)
5v (RED) or (+) to Connector 2 left of center position (V[size=85]DD[/size] )
GND (BLACK) or (-) to Connector 2 right of center position
POWER CORD to RELAY to OUTLET CONNECTION:
BLACK WIRE from power cord connected to Connector 3 center position
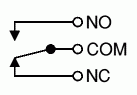
NC or NO connected to HOT side of outlet (small prong side)
WHITE WIRE from power cord connedted to NETURAL OR COMM side of the outlet
(large prong side of the outlet)
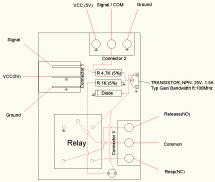
I’ve tried to make a complete circuit of the relay. I’m not 100% sure about the transistor, but that’s what came up on Farnell when I made a search for “S8050”.
Well, I’m actually not 100% sure about anything, but I did the investigation as best I could and it actually seems to make sence, so I guess its allright
Note: The 1N4148 diode is connected in a odd fashion for a reason. This is placed between power and ground in a reverse fashion. When the coil of the relay is de-activated, it acts like an inductor, trying to suppress current change. This can cause some havoc on the 5V power rail. When this happens, the 1N4148 will forward bias causing the current stored in the coil to flow happily back to the 5V rail protecting the power supply and the near-by parts.