OdysseyX86J4105: Ubuntu-GPIO Setup

Hi
I am having trouble using GPIO pins for this product, the following is the error message I receive when I use SenseHat for testing.

Traceback (most recent call last):
File “SenseHat.py”, line 8, in
sense = SenseHat()
File “/home/username/lib/python3.6/site-packages/sense_hat/sense_hat.py”, line 39, in init
raise OSError(‘Cannot detect %s device’ % self.SENSE_HAT_FB_NAME)
OSError: Cannot detect RPi-Sense FB device

Tried adding “dtoverlay=rpi-sense” to “config-5.3.0-51-generic” and “config-5.3.0-28-generic” at the end of the file and no luck.

Also, confirmed multiple times, the SenseHat is working very well on other systems with no issues.

Looking for your support to help resolve this issue. 

Current Config

  1. Ubuntu 18.04 with latest updates
  2. sense_hat library installed with no issues
  3. under BIOS /HAT configuration, the following are set to “GPIO”
    GPIO / I2C5, GPIO /I2C6, GPIO/I2S1, GPIO/SPI0, GPIO/UART0

Thanks & appreciate all your support.

SenseHat is used for the RPI platform. Obviously this hardware is different, the ODYSEEY-X86 just has a corresponding pin with RPI functionality. @Orion

1 Like

When you look at the i2c buses, do that sense hat devices show up? If the 40-pin header is RPi-compatible, then pins 27 & 28 should be an i2c bus. So you should be able to see something on that bus using i2c-tools…although I’m not sure which bus it would be. But I’ve used i2c-tools to evaluate all the buses on the Odyssey and it does work. Just just interrogate each bus with the hat off the board, and then again with it on the board. Then you should be able to tell that the hat is recognized by the board, and of course which bus it is that is mapped to pins 27 & 28. It doesn’t solve your problem, but would yield some useful information.

TB

Here’s is a pastebin post with the results of my trials with the i2c bus:

https://pastebin.com/4rw9v93g

At least it will give you a starting point.

TB

TB
Did further research using i2cdetect for 0 to 6 with and without SenseHat, I found most of them are blanks, except " sudo i2cdetect -y 3" and found both (with & without Hat) the entries are same as shown below. This only means either there is some other configuration i need to setup or Hat cannot be used in the Odyssey X86J4105

Also, there are some suggestions to change the overlay in config.txt for RPI, need to know where & which config.txt

Read this posting by FunkMast3rFlex dated on Apr 4, 2017 at the link below.

Let me know your thoughts.

Appreciate the support.

EDIT: You also have to make changes in the BIOS. See my next post below this one, for details.

You do not have config.txt or cmdline.txt files in the Linux system on your Odyssey board. Those files are in the Raspberry Pi’s /boot directory, which is not in the x86 Odyssey board. So that’s not going to work for you.

The device tree overlay system is, as I understand it, the Linux solution for hardware variations from board to board, when those boards want to use the Linux kernel. Instead of needing kernel modules (drivers) for every possible configuration of every possible board that wants to use Linux, Linus Torvalds (creator of the Linux kernel, and still Grand Master of the effort) basically got irritated when all sorts of board manufacturers wanted to have built-in support for their products in the Linux kernel. So they (the Linux development people) came up with the concept of a device tree overlay, so SBC hardware can be mapped to the normal Linux file system.

The x86 Odyssey board doesn’t use DTOs, because it’s not really a single board computer–it’s an x86_64 board. It just happens to have header pins compatible with the RPi (and an Arduino), but my search of the Ubuntu 18.04 file system shows no .dto files. Therefore you won’t be able to modify any device tree overlay, because none exist on this board. So you cannot use the ideas discussed in that thread to try to remedy your problem, because the Odyssey isn’t a Raspberry Pi.

But I would think that if you can connect the Sense Hat to one of the two i2c buses mapped to the 40-pin header, you should be able to access the i2c devices located on that thing. You may not be able to mount the hat on the Odyssey, but you should still be able to talk to the hat as I see it. I could be wrong. But if the Odyssey supports i2c, and the Sense Hat is simply a product that sits on an RPi, holds a bunch of i2c sensors, and communicates to the RPi over the second i2c bus…then why should the Odyssey care that it’s for a Raspberry Pi? I don’t know whether there are pull-up resistors on the Sense Hat, so you’ll need to check that out. But you should be able to connect the thing to the Odyssey using plain old wires on the i2c, power and ground lines.

OK, I got it to work. It’s a little confusing, but essentially what you have to do is this:

  1. Go into the BIOS (press DELETE at boot)

  2. Go to the Advanced > HAT Configuration option.

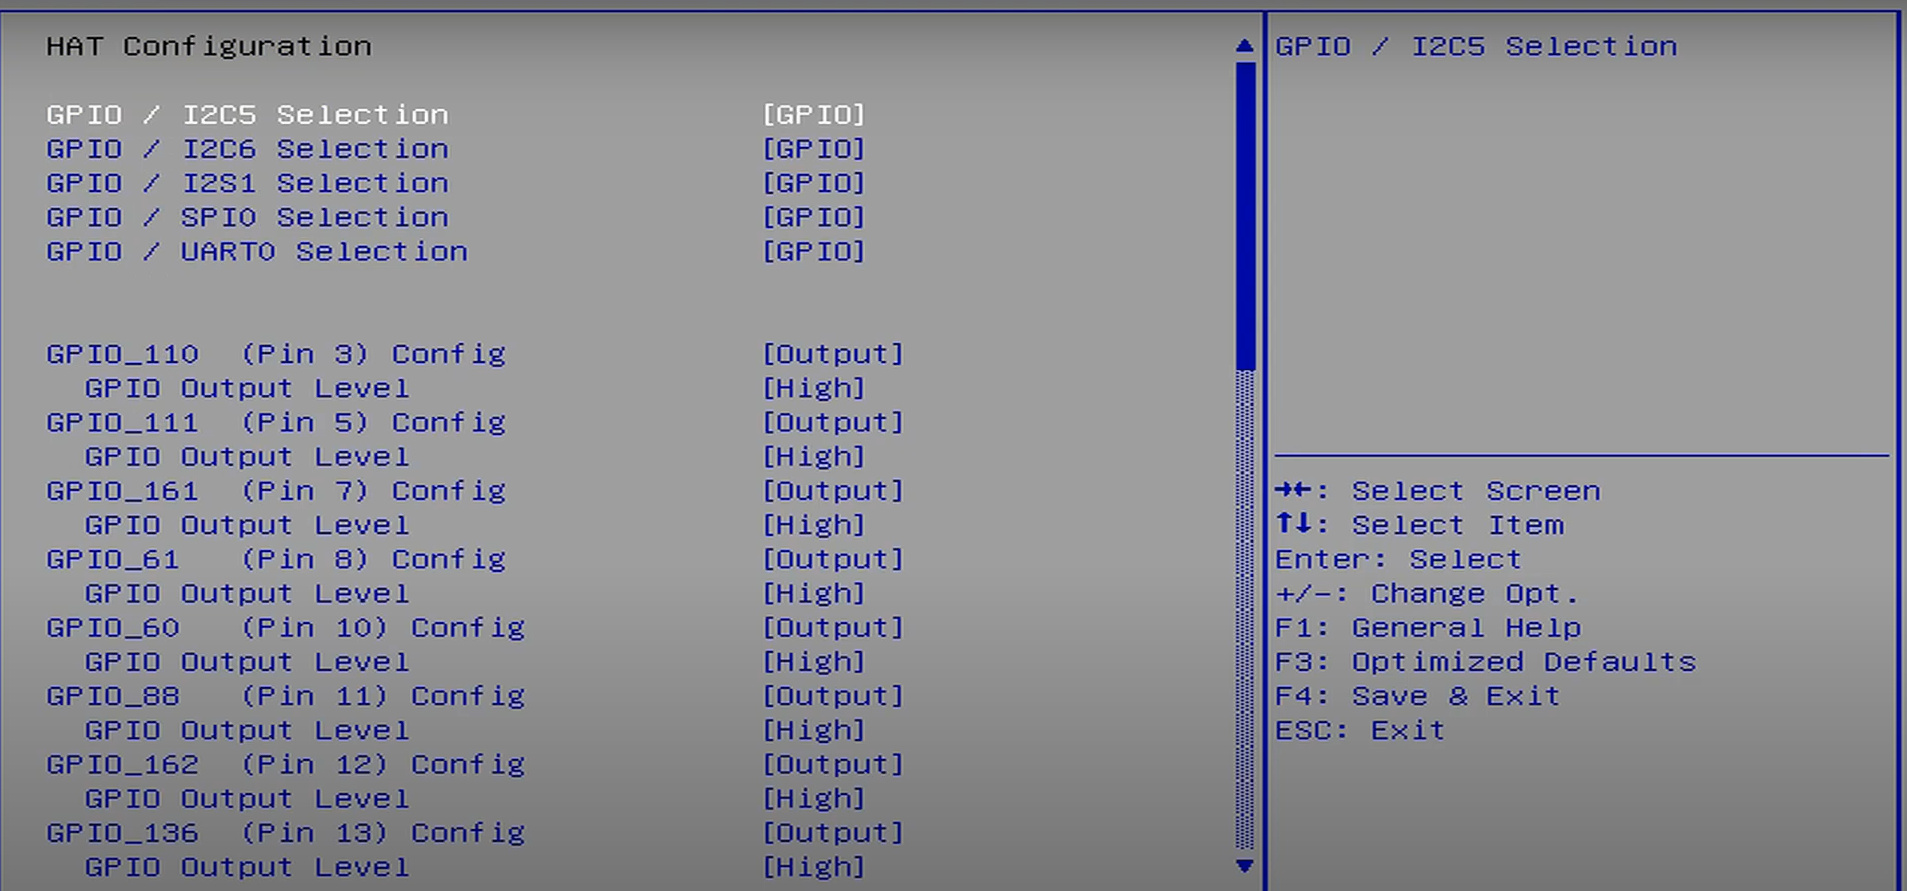
  3. Once you’re there, there are a couple of options at the very top of the list, to choose between GPIO and I2C5 (top line) and GPIO vs I2C6 (second line). Select each and toggle the option to I2C5 (first line) and I2C6 (second line).

  4. Press F4 to save changes and exit from BIOS. Confirm when asked.

  5. Boot into Linux.

  6. Open a terminal, and install i2c-tools: $ sudo apt install i2c-tools

  7. When finished with the install, add yourself to the ‘i2c’ group if you’d like to use the i2c buses as user (so you don’t have to do it as ‘root’ or ‘sudo’ all the time):

    $ sudo usermod -a -G i2c user (substitute your username for ‘user’ of course)

  8. Reboot. To confirm it worked, enter “id” at the command line after it reboots. You should see something like this:

tb@tb-Odyssey:~$ id
uid=1000(tb) gid=1000(tb) groups=1000(tb),4(adm),20(dialout),24(cdrom),27(sudo),30(dip),46(plugdev),116(lpadmin),126(sambashare),127(i2c)

  1. Now you can use the i2c buses as user. NOTE: Pins 3 & 5 on the 40-pin header represent the i2c-1 bus. Pins 27 & 28 on the 40-pin header represents the i2c-2 bus.

Note that these ARE NOT the same names as you’ll see for those two buses in the BIOS, which is one of the things that had me confused for a while. But through experimentation I was able to figure it out–and both buses seem to work fine, at least in terms of seeing the devices on them. I haven’t written any code to work with an i2c device yet, but I don’t see why it wouldn’t work. If we can see the devices on the bus, then we should be able to work with them (again, as ‘user’ if you do the usermod thing I listed above).

So I would try to enable I2C6 in the BIOS, mount your Sensor Hat, and then use i2cdetect on bus 2.

$ i2cdetect -r -y 2

See if anything shows up. I would think you’d see it, but I don’t have one here so you’ll have to try it and then report back on your progress. If it does show up, then note the addresses of the devices and compare it to the Sense Hat documentation.

I actually want to see about maybe getting wiringPi to work on this board, because that would be a very easy way to have a very nice library to do i2c and GPIO stuff. But since this isn’t an RPi of course, it might be a challenge. Worst-case scenario, I have to write my own i2c library for this board. I’ve done it before for a Linux device…back in the days before wiringPi. These things are just files in the Linux file system, so providing you have the correct permissions to use the bus (file), it’s not rocket science.

Hope this helps.

TB

EDIT: I just checked out the features of the Sense Hat, and they look pretty cool…so I ordered one! It will be here in two days, and I’ll play around with it.

I also found a video about this board on YouTube and was able to grab a screen shot of the page in the BIOS where you’ll need to change to the I2C5 and I2C6 choices, if you want to make assign those pins to the i2c buses. This is step #3 in my post above.

TB
Following are some additional updates.

  1. BIOS update: as recommended, I2C5 & I2C6 were set for 1st & 2nd line.

  2. After the BIOS update & Hat install, the i2cdetect -r -y 1 provided the following which is in
    alignment with pinout for the SenseHat

    0 1 2 3 4 5 6 7 8 9 a b c d e f
    00: – -- – -- – -- – -- – -- – -- –
    10: – -- – -- – -- – -- – -- – -- 1c – -- –
    20: – -- – -- – -- – -- – -- – -- – -- – --
    30: – -- – -- – -- – -- – -- – -- – -- – --
    40: – -- – -- – -- 46 – -- – -- – -- – -- –
    50: – -- – -- – -- – -- – -- – -- 5c – -- 5f
    60: – -- – -- – -- – -- – -- 6a – -- – -- –
    70: – -- – -- – -- – --

But the error continues with SenseHat when you run the scripts with following msg

orion@HostUbuntu1804:~/TestDir$ python3 myHat.py
Traceback (most recent call last):
File “myHat.py”, line 8, in
sense = SenseHat()
File “/home/orion/.local/lib/python3.6/site-packages/sense_hat/sense_hat.py”, line 39, in init
raise OSError(‘Cannot detect %s device’ % self.SENSE_HAT_FB_NAME)
OSError: Cannot detect RPi-Sense FB device

  1. Also I replaced the Sensehat and connected a real circuit by actually wiring the required pins to read MFRC522 and following is the message I receive

Traceback (most recent call last):
File “./main.py”, line 23, in
import RPi.GPIO as GPIO
File “/usr/local/lib/python3.7/site-packages/RPi/GPIO/init.py”, line 23, in
from RPi._GPIO import *
RuntimeError: This module can only be run on a Raspberry Pi!

As of now I need your help in reading the GPIOs in Odyssey X86j4105, some documentation supporting with simple scripts using GPIOs would go a long way in the adaptation of the board.

Appreciate all your support.

Thanks

1 Like

Interesting… I’m not surprised that an RPi-specific python library doesn’t work with a non-RPi board. That makes complete sense to me. Without looking at the python code though, I won’t be able to tell you much I’m afraid. That said–I did get notification that my Sense Hat actually arrived TODAY, a day early!! So maybe I can get the thing going here tomorrow and see for myself how things go.

I am very encouraged that you are able to see the i2c devices (sensors) on that Hat though–but again, I’m not surprised. Why should the Odyssey care that this is a product intended for the RPi? I mean, all the board is doing is providing a home for a bunch of sensors, with 3v3 power, a ground and SDA/SCL lines. In other words, it’s providing a “two-wire interface” to the sensors. So I am not at all surprised that you see them. Were you able to mount the Sense Hat right on the Odyssey board, or did the physical size of the Hat prohibit that? As you saw this on i2c-1, I presume you were connecting the sensors to pins 3 & 5?

I will play around some with that code library when I get the Hat going, and see if I can make any sense out of it. It might be as simple as changing the python code they’ve provided to be less RPi-specific…although I’ll need to study that code to be sure. This brings me back to the WiringPi library issue I mentioned in a previous post: If we can get that ported to the Odyssey, it would be MOST convenient. I have written C/C++ code to work with i2c devices on Linux in past, so I can certainly do it. But it takes time to develop a library of code to do that–because you first have to learn the sensors. In other words, it’s not really writing the C/C++ code that’s the hard part–rather learning how each sensor stores its data, and how to access that data, that’s the time-consuming part. So while it would be nice to be able to use something like WiringPi to do i2c and (especially) GPIO work so that a person doesn’t have to write their own code to do it, it would REALLY be nice to be able to use some sort of library for the sensors. So that’s where reviewing the python code for that thing will come in handy.

Glad to hear that my i2c instructions helped you though. At least you’re making progress.

TB

EDIT: I forgot to mention that reading from/writing to GPIO pins (or even i2c or spi buses) is not terribly difficult in Linux. They are mapped the file system, so all it takes is opening the “file” (pin you want to work with), reading from it or writing to it, and then closing the “file” again. It’s really not hard. So the GPIO (or i2c) part should be easier than knowing how to work with the sensors…as I mentioned above.

TB
Thanks for the quick reply, the following are my response.

  1. Agreed, that RPi specific library does not seem to work, then which PY-GPIO library is being recommended.
  2. Sensehat was connected as a Hat rather than as individual wiring of the device.
  3. Good to know that you plan on having some porting done to Odyssey - but it does takes time, curious - what library was used in the development & testing of the GPIO for RPi 40 pins.

Bottom line, this is slowing down my progress and any help / support you can provide would certainly fasten our adoption.

Appreciate your support.

Well, I can’t answer your questions regarding what was done in development. I don’t actually work for Seeed Studios–I just bought the board like you did, and found things wrong with it. I’m an embedded systems developer myself, and also have been learning electronics in a home-study course for the past couple of years…so I have all kinds of electronic test equipment around. Also, Linux is my favorite OS, so I seem to be attracted to all-things-Linux, I guess.

But I wouldn’t say that Seeed necessarily has plans to port anything to the Odyssey board. I certainly don’t speak for them. I’m just saying that it’s something I might end up doing myself–because I would love to use the board for various projects, possibly even professionally. So the effort will certainly not be wasted.

TB

TB
Thanks for the clarification and it’s my fault to assume you are SeeedStudio employee. Your responses and passion is awesome in helping the community.

     Appreciate all your clarification & notes.
1 Like

That’s what we do.

Thanks for the sentiment.

TB

I installed the SenseHat on an RPi4 I have here, but the frame buffer issue is still haunting me on that machine, so I didn’t get it to work in a headless mode. So then I installed it on an RPi3, which was still a little buggy in the headless mode. It’s likely due to those LEDs on top as far as I can tell, at least from what I’ve found in the various forums. So I connected an HDMI monitor to the RPi3 and the SenseHat works right away. Not only can I see it (on i2c-1 by the way), but I can use it with the sample python library in the Raspbian repository. I haven’t started experimenting yet with the C++ library that comes with it.

As for using the SenseHat with the Odyssey board, I think that’s going to be some heavy lifting. I think you’re going to have to just write C/C++ code that uses the Linux API–like ioctl(), fread() and fwrite(). It’s not hard, it’s just a bit cumbersome. But I see no reason why it wouldn’t work. I wrote some C code today to work with the GPIO pins, and was able to change the state of the ‘value’ property, after exporting the pin and changing the direction to “in.” Typical sysfs stuff.

how can i use RPi library on ODYSSEY-X86 ?