anybody know how to put the XIAO into a UART pass thru mode to program this without a TTL converter?
")
Hi there,
Use a Xiao C3 and do the same as the Air530 GPS module sketch , wait on Serial2 and pass it to serial1(usb) and bob’s ur uncle. Have a look at that code basically passes everything to the USB port anything you type goes through…
HTH
GL ![]() PJ
PJ ![]()
i was totally thinking i saw that work on the gps module… but was not sure if it would work… i will try… i am wanting a grove pigtail and dont want to have to keep disconecting!
Just checking out the demos now… had to jump thru a few hoops as this display is new old stock… i got it in a haul when the warehouse sale was on and just coming up for air… i love to play with toys at christmas
this is some of the most assinine code ever written by the human mind… what da?
Hi there,
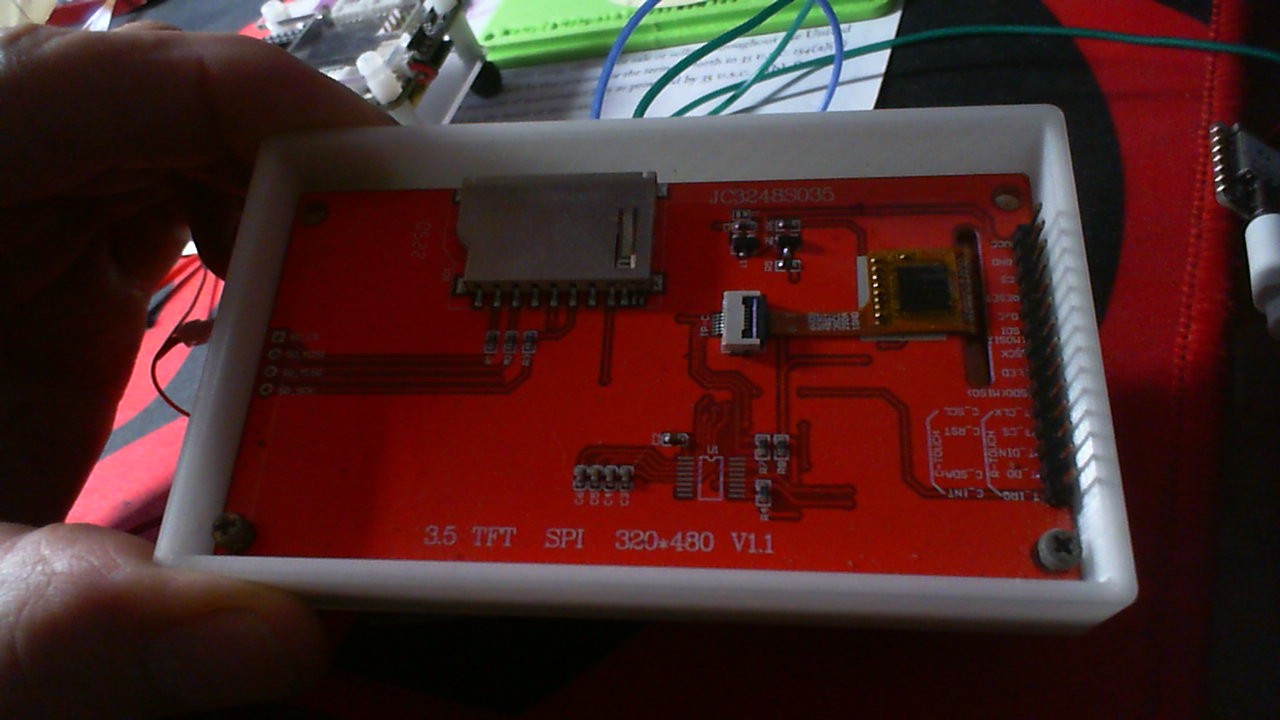
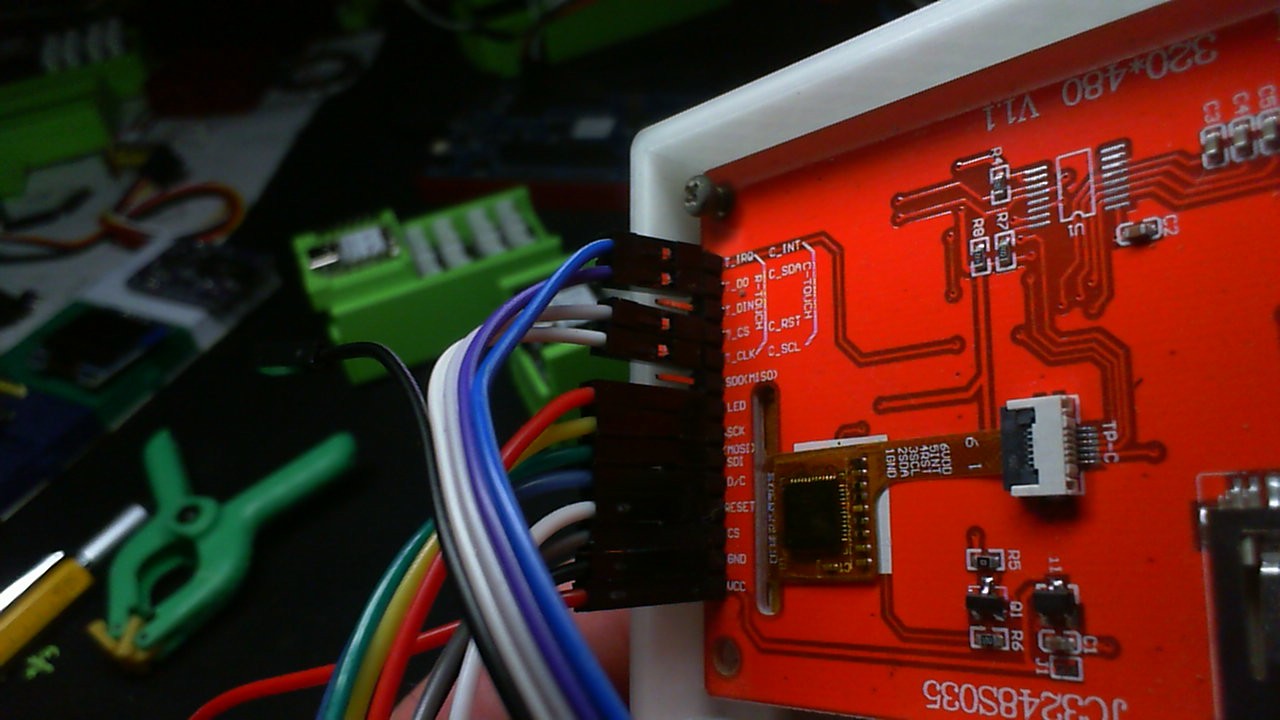
So I was able to connect it up and happily even the touch screen works…

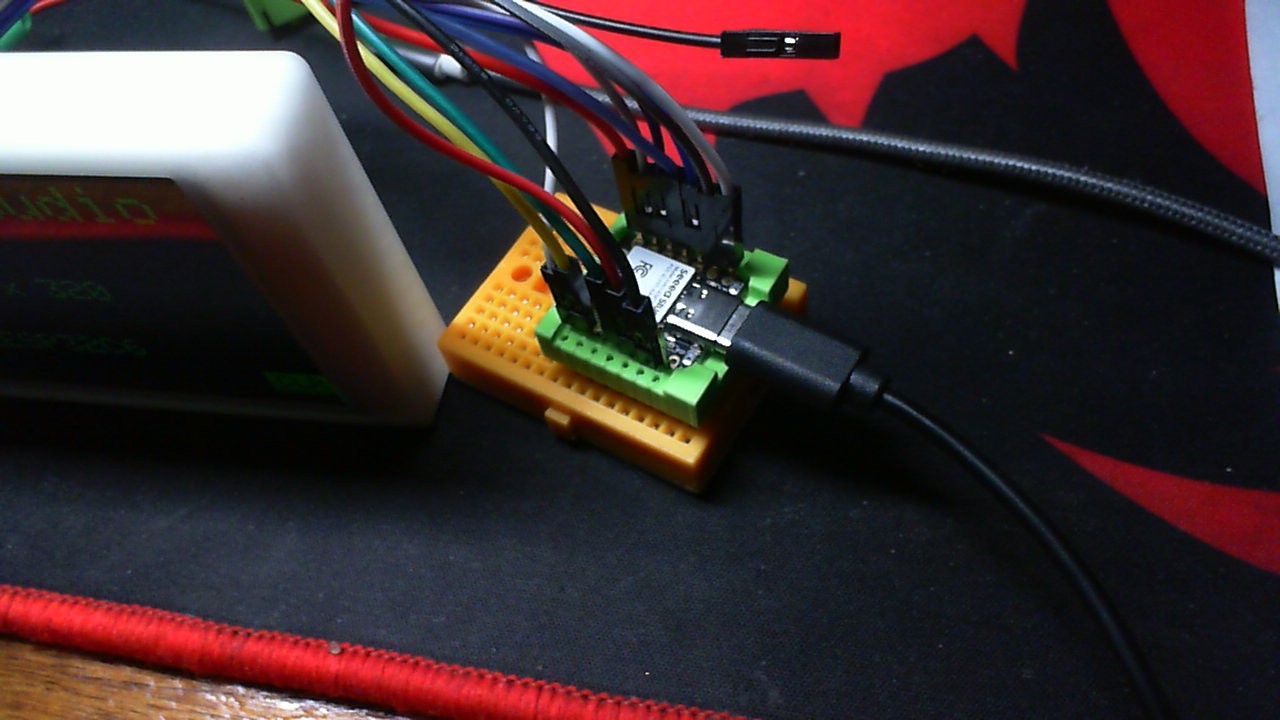
if anyone is interested I’ll put up the connection diagram, here are some pictures.
I didn’t test or setup the SSD but I’m sure it will work as well.
#include <SPI.h>
#include <ILI9486_SPI.h>
#include <Adafruit_GFX.h>
#include <bb_captouch.h>
#include <Wire.h>

// Touch Pins
#define TOUCH_SDA  22
#define TOUCH_SCL  23
#define TOUCH_INT  2
#define TOUCH_RST  17

// TFT Pins
#define TFT_CS     1
#define TFT_RST    0
#define TFT_DC     21
#define TFT_MOSI   18
#define TFT_SCK    19

// Some color definitions
#define ILI9488_BLACK     (0x0000)
#define ILI9488_WHITE     (0xFFFF)
#define ILI9488_RED       (0xF800)
#define ILI9488_GREEN     (0x07E0)
#define ILI9488_BLUE      (0x001F)
#define ILI9488_CYAN      (0x07FF)
#define ILI9488_MAGENTA   (0xF81F)
#define ILI9488_YELLOW    (0xFFE0)
#define ILI9488_ORANGE    (0xFC00)

// Screen dimensions (rotation = 3)
constexpr int SCREEN_WIDTH  = 480;
constexpr int SCREEN_HEIGHT = 320;

// "CLR" button location & size (bottom-right corner)
constexpr int CLR_BTN_WIDTH  = 80;
constexpr int CLR_BTN_HEIGHT = 40;
constexpr int CLR_BTN_X      = SCREEN_WIDTH  - CLR_BTN_WIDTH;   // 480 - 80 = 400
constexpr int CLR_BTN_Y      = SCREEN_HEIGHT - CLR_BTN_HEIGHT;  // 320 - 40 = 280

// "Home" button location & size (center of the screen)
constexpr int HOME_BTN_WIDTH  = 80;
constexpr int HOME_BTN_HEIGHT = 40;
constexpr int HOME_BTN_X      = (SCREEN_WIDTH  / 2) - (HOME_BTN_WIDTH  / 2);
constexpr int HOME_BTN_Y      = (SCREEN_HEIGHT / 2) - (HOME_BTN_HEIGHT / 2);

// Blinking "Touch Demo" variables
bool blinkState = true;
unsigned long lastBlinkTime = 0;
unsigned long blinkInterval = 500; // 500ms blink

// Track which "screen" or state we're in
// false = Initial screen (shows CLR only)
// true  = Cleared screen (draw allowed, shows Home button)
bool clearedState = false;

ILI9486_SPI tft(TFT_CS, TFT_DC, TFT_RST);
BBCapTouch bbct;

void setup() {
  Serial.begin(9600);
  while (!Serial);

  // Touch panel initialization
  pinMode(TOUCH_RST, OUTPUT);
  pinMode(TOUCH_INT, OUTPUT);
  digitalWrite(TOUCH_RST, LOW);
  digitalWrite(TOUCH_INT, LOW);
  delay(10);
  digitalWrite(TOUCH_INT, HIGH);
  delayMicroseconds(100);
  digitalWrite(TOUCH_RST, HIGH);
  delay(5);
  digitalWrite(TOUCH_INT, LOW);
  delay(50);

  bbct.setOrientation(270, 0, 480); // Top left
  bbct.init(TOUCH_SDA, TOUCH_SCL, TOUCH_RST, TOUCH_INT);

  // TFT init
  SPI.begin(TFT_SCK, -1, TFT_MOSI, TFT_CS);
  tft.setSpiKludge(false);
  tft.init();
  tft.fillScreen(ILI9488_BLACK);
  tft.setRotation(3);

  // Draw the initial screen
  drawInitialScreen();
}

void loop() {
  // Handle blinking of “Touch Demo” on both screens
  unsigned long now = millis();
  if (now - lastBlinkTime >= blinkInterval) {
    lastBlinkTime = now;
    blinkState = !blinkState;
    drawBlinkingText(blinkState);
  }

  // Handle touch input
  TOUCHINFO ti;
  if (bbct.getSamples(&ti)) {
    for (int i = 0; i < ti.count; i++) {
      uint16_t tx = ti.x[i];
      uint16_t ty = ti.y[i];

      if (!clearedState) {
        // ====== Initial Screen Logic ======
        // User can only tap CLR
        if (isPointInRect(tx, ty, CLR_BTN_X, CLR_BTN_Y, CLR_BTN_WIDTH, CLR_BTN_HEIGHT)) {
          // Switch to cleared screen
          clearedState = true;
          enterClearedScreen();
        } else {
          // Do nothing if tapped outside CLR
          Serial.println("Tapped outside CLR button on initial screen - no action.");
        }
      } else {
        // ====== Cleared Screen Logic ======
        // 1) If tapped Home, restart
        if (isPointInRect(tx, ty, HOME_BTN_X, HOME_BTN_Y, HOME_BTN_WIDTH, HOME_BTN_HEIGHT)) {
          Serial.println("Home tapped, restarting...");
          delay(500); // optional
          ESP.restart();
        }
        // 2) Otherwise, allow drawing
        else {
          tft.fillCircle(tx, ty, 10, ILI9488_WHITE);
          Serial.printf("Touch => Drawing circle @ (%d, %d)\n", tx, ty);
        }
      }
    }
    Serial.println();
  }
}

// ----------------------------------------------------------------
// Screen / Drawing Logic
// ----------------------------------------------------------------

// Draw the initial screen with CLR button only
void drawInitialScreen() {
  tft.fillScreen(ILI9488_BLACK);

  // Title texts
  tft.setTextSize(6);
  tft.setCursor(0, 10);
  tft.setTextColor(ILI9488_GREEN);
  tft.println("Seeed Studio\n");

  tft.setTextSize(4);
  tft.setTextColor(ILI9488_RED);
  tft.println("4.0inch LCD");
  tft.setTextColor(ILI9488_YELLOW);
  tft.println("Res=480 x 320");
  tft.setTextColor(ILI9488_BLUE);
  tft.println("ILI9488\n");

  tft.setTextSize(4);
  tft.setTextColor(ILI9488_WHITE);
  tft.println("XIAO_ESP32C6");

  // Draw CLR button
  tft.fillRect(CLR_BTN_X, CLR_BTN_Y, CLR_BTN_WIDTH, CLR_BTN_HEIGHT, ILI9488_GREEN);
  tft.setTextSize(3);
  tft.setTextColor(ILI9488_BLACK);
  tft.setCursor(CLR_BTN_X + 10, CLR_BTN_Y + 5);
  tft.print("CLR");

  // Ensure blinkState is true initially
  blinkState = true;
  drawBlinkingText(blinkState);
}

// Switch to "Cleared" screen: only blinking text, plus "Home" in center
void enterClearedScreen() {
  // Fill screen black, keep blinking text
  tft.fillScreen(ILI9488_BLACK);
  // Re-draw blinking text according to blinkState
  drawBlinkingText(blinkState);

  // Draw "Home" button in center
  tft.fillRect(HOME_BTN_X, HOME_BTN_Y, HOME_BTN_WIDTH, HOME_BTN_HEIGHT, ILI9488_CYAN);
  tft.setTextSize(3);
  tft.setTextColor(ILI9488_BLACK);
  tft.setCursor(HOME_BTN_X + 10, HOME_BTN_Y + 5);
  tft.print("Home");
}

// Blink or erase “Touch Demo”
void drawBlinkingText(bool showText) {
  // “Touch Demo” near bottom
  int16_t xPos = 0;
  int16_t yPos = 280;

  tft.setTextSize(4);
  if (showText) {
    tft.setTextColor(ILI9488_WHITE);
  } else {
    tft.setTextColor(ILI9488_BLACK);
  }
  tft.setCursor(xPos, yPos);
  tft.print(" Touch Demo ");
}

// Check if (x, y) is inside a rectangle
bool isPointInRect(uint16_t x, uint16_t y, uint16_t rx, uint16_t ry,
                   uint16_t rw, uint16_t rh) {
  return (x >= rx && x < (rx + rw) && y >= ry && y < (ry + rh));
}
I 3D printed the Bezel from Glow in the dark PLA… Now you can find the console in the dark…![]()
HTH
GL ![]() PJ
PJ ![]()
This post is full of know-it-alls wist bad advice… but other than that
It is EXTREMELY rare to find a library bug, I think I have only encounter two.
IF ONLY!
I am going to try the ”Easy Nextion Library”
Hi there,
I try to stay away from the proprietary stuff Unless no other route exists, Try to use the GFX and TFT-eSPI, lvgl. beside most of there’s comes from those, even the drivers, originate at CST’ stuff for touch and ST77xx drivers, Generic whenever possible. They don’t often say what they are compatible with so you would “Think” you must use theirs.
It does sometimes take some tweaking but pretty much everything out there can go this way with enough effort. None of these modern day manufactures are the originators of this stuff they know but want us to think they are. Try it I say.
My saying is " If it’s FREE it’s for ME! , If you have to Pay then Take it AWAY! ![]()
![]()
HTH
GL ![]() PJ
PJ ![]()
I FINALLY GOT IT WORKING WITH EASY NEXTION LIBRARY!
Yes this is a complete sentance… what da?
This thing is awesome… why didnt i know about this when it first came outta the box… Same display used on 3D printers!
Has anyone been able to get this or any other Nextion display working with a SEEED board by chance? I bought a Xiao, ESP32-S3, C3, C6, MG24, and others in hopes I could get them to work. For some reason, the serial doesn’t send to the screen. I’ve been asking for help on this, but it seems like everyone is at a loss.
Been able to get it to work with a D1 Mini clone and regular ESP32s, but not the offshoots. I don’t get it.
Have tried -
I don’t want to use the library because I know this other method works, but just for some reason not with SEEED boards. Any ideas?
Hi there,
So what’s the problem? of course it works Nothing special about those. Which BSP are you using? How did you connect it? Got a picture?
or Schematic?
If it works with a D1 , then YES it will work with ALL the Xiao’s I’m certain. It works Hardware Serial pass-thru to software Serial so where is the issue.?
HTH
GL ![]() PJ
PJ ![]()
I have it working in an old thread (air530) GPS module and a Xiao ESP32C3 & Nrf52840…![]()
GPS … that is actually a good test case… lots of easy to parse changing data… I
May have to try this
Yes, it SHOULD, but they don’t. I’ve been working with a gentlemen on YT as well as some really smart folks in the Arduino discord and we haven’t been able to solve it.
The problem is that data does not get passed onto the screen like I say via Serial. Please see the methods we have tried as stated above.
I’m assuming you are using the library to get it to do so.
For example, here is some test code. This will work on the D1/ESP32, but not anything else.
void setup() {
  Serial.begin(9600);
  delay(1500);
  while (!Serial) {
  ;
  }

}
void loop() {
  Serial.print("t0.txt=\""); // Changing the value of box n1
  Serial.print("test");
  Serial.print("\"");
  Serial.write(0xff);  // We always have to send this three lines after each command sent to the nextion display.
  Serial.write(0xff);
  Serial.write(0xff);
  delay(1500);
  Serial.print("t0.txt=\""); // Changing the value of box n1
  Serial.print("test");
  Serial.print("\"");
  Serial.write(0xff);  // We always have to send this three lines after each command sent to the nextion display.
  Serial.write(0xff);
  Serial.write(0xff);
  delay(1500);
}
the way you have the code is transmitting to the serial monitor…(usb cable) you have to make a uart connection to the screen device and “talk” thru that port