mtXControl - a Rainbowduino Editor By Tobi

[size=200]mtXcontrol[/size]

[size=150]- a Rainbowduino Editor -[/size]
mtxcontrol.png

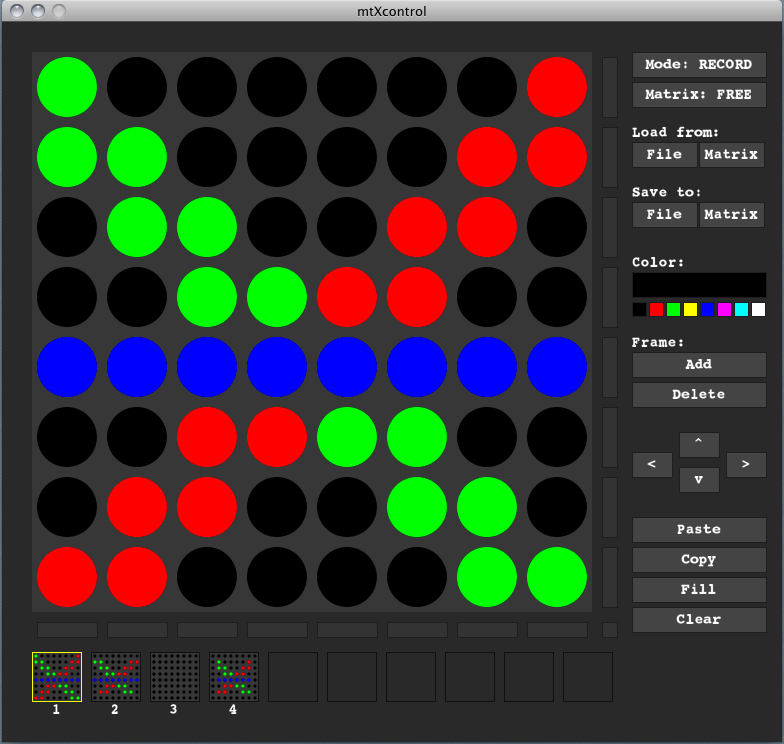
mtXcontrol is an editor written in Processing to easily create image sequences for the Rainbowduino controller. The Rainbowduino is a 8×8 RGB LED driver controler created by seeedstudio, based on the Arduino Project.

With mtXcontrol Editor you can draw points, lines & rows in different colors, create multiple frames and manipulate them. Add, delete, move, fill, copy & paste of frames is supported. Play all frames by different speed, liveupdate the controller and save your work to file or upload it to Rainbowduino to make it standalone (mind: due to 256kb memory only up to 10 frames can be stored by now). A special feature is typing letters and numbers. Future versions aim to support multiple controllers and

Check out this short demo video:
F46F2EE0-BF50-47FB-9CCA-10E17935C68D.jpg

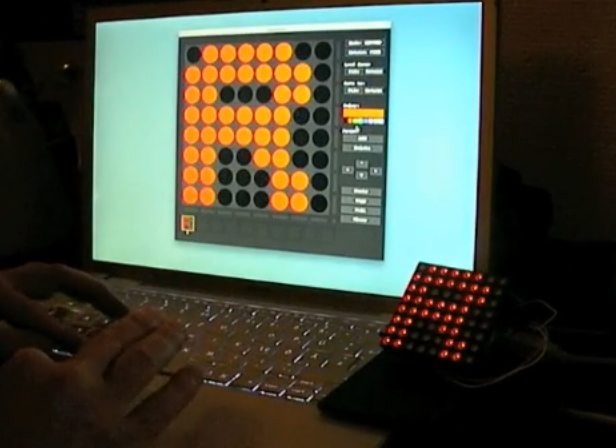
[size=200]http://vimeo.com/6924030[/size]

Download source here

Mini HowTo:
mtXcontrol consits of two parts: One is the Editor program which you run on your computer, the other is the firmware you have to upload to your rainbowduino. See instruction here. The firmware make use of the Rainbowduino.h Library to manioulate the Matrix easily. Connect your Rainbowduino via USB to your computer and you are ready to go – happy mtXcontrol drawing!

[size=150]Full list of Features:[/size]

  • Draw multicolor points, line and rows (8bit color support)
  • Add, delete, clear, fill, copy & paste, move frames
  • Draw letters and numbers, Font configureable
  • Save & Load to File
  • Upload and Download to Matrix EEPROM (mind: due to 256kb memory only up to 10 frames).
  • Frame preview, easily navigate through
  • Standalone Mode or realtime Rainbowudino Update
  • Keyboard shortcut for each function

Future ideas:

  • Use compression to save more frames to EEPROM (e.g. Huffman?)
  • Font configuration
  • Support for multiple Rainbowduinos
  • Standart import/export file format
  • Support other devices
  • More colors

[size=150]Keyboard shortcuts:[/size]
ENTER – switch between record /place Mode
– Frame forward/backward (Record Mode) or Speed in Place Mode
SPACE – Insert Frame after current Frame
S – Save to File
L – Load File
D – Delete Frame
C – Clear frame
F – fill frame

command+C – Copy Frame
command+V – Paste Frame

ctrl+ – Insert this Letter/Number
crtl+ – Move Frame in direction

alt+ENTER – connect/disconnect to Rainbowduino
alt+ – Adjust speed on Rainbowduino
alt+L – download from Rainbowduino
alt+S – upload from Rainbowduino

This project is a contribution for the seeedstudio carnival 2009

more to come soon, please stay tuned…

[size=150]Project page: http://www.rngtng.com/mtxcontrol/[/size]

This is a seriously great project. I will be trying out the code later tonight hopefully, and have some extensions in mind already!

I plan to make it work over xbee link :wink:

Hooray. I got the code installed on the Rainbowduino (through USPtinyISP and the ISP port), put a blank sketch on an Arduino, and got the sketch running in Processing. Thanks!

I’d like to experiment with this in a slightly different way as well. I’d like to use the Arduino to control the Rainbowduino without need of the computer running processing. Could you give me some tips on what parts of the code could be used that way? I’d like to write directly to individual pixels or by row. A couple other projects posted here might be more relevant, but this is the only code I’ve actually managed to install and run.

Thanks again Tobi.

_mike

Thanks to all for your great feedback! I hope you’ve fun with it!

Wow, this would be great, I’m thinking of buying ones as well, please keep me updated on your progress…!

well you can copy up to 10 frames to EEPROM. (push the upload to matrix button) After that you don’t need a PC anymore, it’ll run on its own. For more frames we need extra EEPROMs, or, and that’s what I’m working on, to optimize data storage, like through compression or special commands. Any help is appreciated!

I’ve just pushed an update (version 1.02), which includes method for that. Please see the latest source here:
github.com/rngtng/mtXcontrol

Cheers - Tobi!

Hey rngtng,

Fantastic work, I was particularly impressed with the API rewrite. You’ve created a nice method of interfacing with the Rainbow.

That being said, I’m having some troubles. When I load your sketch it switches all LEDs to an amber colour and it doesn’t respond via serial. The only solution was to reload a different sketch.

Do you have any thoughts. I’d quite like to use your API as a interface for my future code.

Hey Miles!

which version do you sue? plse make sure it’s the latest 1.02 which you’ll find here:
github.com/rngtng/mtXcontrol/downloads

Cheers Tobi

Hey everybody!
Thank you very very much for voting my project! It’s great encouragement continuing working and adding more features.
I’m really into adding Xbee and multiple Rainbwoduino support, as well improving the EEPROM storage… so stay tuned…

Thanks again
Cheers Tobi

Help deal with mtXcontrol.
firmware in Rainbowduino I upload.
And in the program to start processing all the rest ? What pde file to run ?
Contact details pls, as in the processing run mtXcontrol.
I always what the errors appear and do not run.

I’ve loaded the latest version, it’s not showing up orange any more. Using your app, I can “load from matrix” (not that it does anything other than show some numbers).

Clicking around doesn’t play on the matrix, any thoughts what I’m doing wrong?

What .pde do I load onto the rainbowduino? Do I need to have Processing running?

Thanks

Just throwing my two cents in…

First of all, thanks to Tobi for creating this application. After discovering it via the contest, it inspired me to order a Rainbowduino so that I could program it as a birthday present for my wife. Although the parts showed up a little late, I was able to successfully get everything going. That being said, I do have some thoughts/observations/questions in no particular order: (not a total newbie to Arduino or Processing, but still learning :slight_smile:

  1. I tried to follow the directions to change the speed of the animation between frames, but nothing seemed to have any effect. What mode should the application be in so that I may change the speed, and what are the relevant keystrokes? I tried ALT + -, which I took to mean the minus sign, then I thought better of it and tried ALT + a number. Nothing seemed to have any effect. Am I just missing something obvious?

  2. As seen in the comments on your blog post, I too fell victim to the fact that I was not able to use the precompiled binary of the app. I downloaded the source and ran it through the Processing environment and was then able to communicate with the Rainbowduino. If there is anyway I can help debug this, let me know. Also, did I again miss something simple in terms of downloading all the relevant source? I had to manually add each file to my sketch to make everything work. I know there should have been an easier way. Do I just not know how to download properly from the git repository?

  3. I was a little confused as to the proper procedure as to getting the Arduino ready to program the Rainbowduino. To clarify the steps:
    a. Load the latest Arduino environment on the PC
    b. Confirm the ability to upload a simple sketch to the Arduino, making sure to select the correct processor type
    c. Upload the “blank” sketch to the Arduino so that it acts like a pass-through connection
    d. connect the Rainbowduino to the Arduino as indicated in your blog picture (which is actually a little blurry and hard to read, maybe annotate the pin numbers/)
    e. Using the Arduino IDE, load the firmware.pde sketch and then transfer it. The Arduino serves as the middle-man so that the microcontroller on the Rainbowduino can be reprogrammed. Important note is to change the processor type to 168 if you have a 328 Arduino.
    f. A brand new Rainbowduino should now go from displaying the multi-colored test pattern to all white LEDs.
    g. Close the Arduino IDE. Load the latest Processing IDE (although similar in appearance, they are not the same). Remember to leave everything connected as displayed in the blog photo.
    h. Load the mtXControl application and compile and run it. The display should go blank.
    i. Use the application to design your animation and then Save it to the Matrix.
    j. Close the Processing IDE. Disconnect the USB cable from your PC to the Arduino and undo the connections between the Arduino and the Rainbowduino.
    k. Power the Rainbowduino up by itself (either with an AC adaptor or a battery) and the animation should display.

Does this seem like I have everything right? With a little guidance I could write something a little more detailed or perhaps make a screencast (at least for the Mac platform).

I think that is it for now. Thanks again for a great app. I hope you continue to improve it. Let me know if I can help or if anyone wants to help me put together a detailed tutorial or screencast.

Thanks,

Bob

Can’t get it to compile :frowning:

[code]E:\DOCUME~1\Carson\LOCALS~1\Temp\build58991.tmp/Rainbowduino.h:1: error: expected constructor, destructor, or type conversion before ‘/’ token

e:/arduino/arduino-0017/hardware/tools/avr/lib/gcc/…/…/avr/include/stdlib.h:143: error: ‘size_t’ has not been declared

[/code]

…and a whole bunch of ‘size_t’ has not been declared errors. :frowning:

Thanks.

Hey Bob thanks for you feedback here quick answers:

ALT and + key or ALT and - key change the speed on the arduino. Maybe hold the keys longer to take effect. Maybe I should add some visual feedback on processing side as well.

I still had not any time to debug this. Although non working precompiles seems to be only a problem for snow leopard macs? Would be great if anyone can report success stories on other system, by now I don’t hav any other to test with.

well I do have all file in structure like the repository is. The top mtXcontrol folder is within my sktechfolder directory, set up in processing preferences. I open mtXcontrol.pde with processing, and firmware.pde with arduino IDE. works allright.

wow right, looks all okay for my. After step i) I would only add one more step: switch to ‘Arduino: Slave’ mode (alt + ENTER) or second button form top) which allows you to display your drawing in processing in realdtime on rainbowduino to test it.
If it’s ok I’ll add those steps to the documentation, with mention your name, of course.

A proper setup screencast is indeed a good idea. I’ll see if I have time. If you or sthoneelse is interested, feel free to go for it, of course! :wink:

Thank you again… Cheers Tobi

Hm strange, I never saw this error before. Does other sketches compile well? try some ‘bigger’ examples usering libraries as well, maybe your library path isn’t correctly set up?

Hi Tobi,

Thanks for taking the time to answer my questions. Please feel free to use my text on your site. Hopefully someone will find it useful.

I may try to do a proper screencast this weekend.

Thanks again for the app and the guides.

P.S. You going to show off all your Rainbowduinos that you won any time soon?

cool, thanks, i just updated the documentation…

hehe, sure :wink: - but they havn’t arrived yet - they are still one the way…

From what I gather, download the “firmware” zip… Drop raindbowduino into the libraries folder…

Create a directory in your Arduino sketches directory (windows it’s documents\arduino) Something like RainbowduinoMXControl. Rename firmware.pde to RainbowduinoMXControl.pde… Then fire up Arduino 17… Sketches > RainbowduinoMXControl … Upload that

He’s hardcoded the serial port (?!) so you need to download the mxcontrol software to your desktop. Throw all the files in a directory called “mtXcontrol”. Download and unzip processing somewhere and upload up mtXcontrol.pde within processing.

Click on the tab named Arduino and look for the lines

Arduino(PApplet app) {
try {
port = new Serial(app, Serial.list()[0], BAUD_RATE);
}
catch(Exception e) {
port = null;
}
standalone = true;
}

Change serial.list()[0] to what ever com port your using… on my machine it was “COM7” (in quotes). On 'nix it may be something like /dev/usb0

At the author of this project.

is there any chance you could write a simple Arduino to Raindbowduino demo on how your “protocol” works. I’m trying to decipher your code but there’s no comments and I’m not sure how your client and server code mesh up.

Cheers, I’d appreciate it :slight_smile:

Hey Miles

I’ve just updated the SOURCE (not the binaries yet) to have an autodetection for the Rainbowduino port (only tested on Mac OS X yet) and Bitmap save and loading support. I cleaned up the code a bit and prepared quite a lot for more color support in futur. So check it out and stay tuned!

A screen cast is comming as well, hoepfully soon…

Cheers Tobi

Happy new Year to all of you!
Good news right from the beginning: I’ve just pushed a new version of mtXcontrol!

On big thing is support for Novation Launchpad, but maybe way more interesting bit for you is, I’ve move the complete rainbwoduino communication into a separate library which can include into your Processing programs easily. Check:
http://rngtng.github.com/rainbowduino
It now follows a proper API (likely to change) with extended functionality, including handshake and ok/error response Codes. Now, you updating the Buffer, loading/saving from EEPROM, setting the brightness or pinging the device works like charm!

As of that mtXcontrol is now way more stable, autodetects your Rainbowduino, im/exports BMP files, improved color chooser and many more. Download the latets version here:

http://github.com/rngtng/mtXcontrol/downloads

Pls. updated your Rainbowduion firmware (included with the binaries) as well!
Looking forward to your feedback and suggestion, enjoy 2010!

Cheers Tobi