https://www.amazon.com/HiLetgo-Infrared-Transmitter-Receiver-Transceiver/dp/B09KGXNZ2Q
i got this device… and assumed it e
would have some instructions somewhere but didnt find anything… i eant to use it ti turn on and off my window air condition when i leave in the morning and back on when i get home
Hi there, well I see from the page it’s a IR sender recv’r with a ESPchip for WiFi
and this.
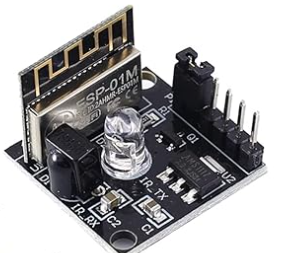
Product Description
Description:
This is a Infrared ESP8285 Wireless WIFI Transceiver Module.The ESP-01M module with ESP8285 as the core be used as the master control, The program is the same as ESP8266. The module board is equipped with an infrared receiving tube and an infrared transmitting tube which are respectively io14 and io4 controlled, and a burning port is set apart. The demonstration program can read and emit infrared key values and raw codes,user can record infrared remote controls in your home , which can be controlled remotely if connected to the Internet of things platform.
Firmware Update:
1.Connect IO0 and GND pins.
2.Connect module to PC by USB to UART converter.
3.Open software ‘FLASH DOWNLOAD TOOLS V3.6.4’.
4.Set parameters.
5.Click START to download firmware.
6.Remove connect between IO0 and GND pins then update complete.
Connect with TTL downloader:
GND -------- GND
5V -------- 5V
RX --------- TX
TX --------- RX
When programming a program, IO0 and GND must be short-circuited, and the module needs to be powered on again; after programming, disconnect IO0 and GND and power on again to run the program normally.
Note:
When supplying power, you need pay attention on 5V and GND. There is no reverse connection protection for the circuit, otherwise the chip may be burned out if connected incorrectly.
Package included:
2* ESP8285 ESP-01M Digital Infrared Transceiver Sensor Module
further used in HA. by some users comments.
This device was pretty easy to integrate into Home Assistant, and has been stable so far. Note that you can set this device up as a IR receiver and an IR transmitter. So, for example, you could receive IR codes in one room on one of these devices, and then use Home Assistant to repeat in a different room on a different one of these devices.

However, if you do not have a USB to TTL cable, you will need to order one to use this device. There's no direct connect USB port onboard (which is party of why this is such an attractively priced option).

That said, I have such a cable, and flashing was a breeze. I like that out of the bag the jumper was in place to permit flashing the device. I found that it was happiest being flashed when VCC was set to 3.3v. After flashing, you have to remove the jumper to boot, and the device insists on having 5v to boot, even though flashing was fine at 3.3v.

When configuring for Home Assistant, here are the most important YAML settings, which I had to piece together from several google searches:

esp8266:
board: esp8285

remote_receiver:
pin:
number: GPIO14
inverted: True
mode: INPUT_PULLUP
dump: raw

(I found dump: raw to be most useful for working with non-standard remotes, check the other options defined in the HA module "Remote Transmitter" if you want to take advantage of some of HA's more intelligent options).

remote_transmitter:
pin: GPIO4
# Infrared remotes use a 50% carrier signal
carrier_duty_percent: 50%

Hope the above saves you some time in getting up and running with this high-quality and easy to use device!

Further thoughts, a few days later: While I've flashed enough ESP8266 boards for it to not faze me, it'd be a nice upgrade of this product to provide a USB port. Almost everything has a USB C or at least USB micro port these days, so much so that on the rare occasions I have to flash the "hard way" that means I have to go dig out the USB to TTL cable out of storage. Adding USB would also make it simpler for less experienced users to get up and running.
should work good.
HTH
GL  PJ
PJ 
1 Like