Unable to get fire engine lighting Arduino Uno code to work on my XIAO RP2040

I apologise for my lack of code understanding before hand.

I have used some Ardrunio Uno code, from rudysarduinoprojects, to make some model railway sized fire engines lights flash in a realistic way. While using a full sized Ardruino Uni and Maker Uno, the LED’s work perfectly. But in installing the code and using the same pin numbers on the RP2040 only one set of LED’s on my test board light up and they aren’t flashing. Which is wired to pin 8.

I really want to get this tiny board to work, as then I can keep it inside the fire engine, rather than having loads of wired coming out of it. But I bearly understand the code (just enough to change the number of LED’s), also in case you’re wondering, I have 2 and 3x2 led’s on some of the pins, to cut down on the number of wires.

Here’s the code:

#define NUM_LEDS      5
#define NUM_STEPS    48
#define BLINK_SPEED  60 // [ms] lower value = faster blinking
#define BLINK_TIME   60 // [s]
#define TRIGGER_PIN   2
byte led_pin[NUM_LEDS] = {6,7,8,9,10};
byte sequencer[NUM_LEDS][NUM_STEPS] = {
// 0                   1                   2                   3                   4   
// 0 1 2 3 4 5 6 7 8 9 0 1 2 3 4 5 6 7 8 9 0 1 2 3 4 5 6 7 8 9 0 1 2 3 4 5 6 7 8 9 0 1 2 3 4 5 6 7
   1,0,1,0,0,0,0,0,0,0,0,0,0,0,0,0,1,0,1,0,0,0,0,0,0,0,0,0,0,0,0,0,1,0,1,0,0,0,0,0,1,0,1,0,0,0,0,0,
   0,0,0,0,0,0,0,0,1,0,1,0,0,0,0,0,0,0,0,0,0,0,0,0,1,0,1,0,0,0,0,0,0,0,0,0,1,0,1,0,0,0,0,0,1,0,1,0,
   0,0,0,1,0,1,0,0,0,0,0,1,0,1,0,0,0,0,0,1,0,1,0,0,0,0,0,1,0,1,0,0,0,0,0,1,0,1,0,0,0,0,0,1,0,1,0,0,
   1,0,1,0,0,0,0,0,0,0,0,0,0,0,0,0,1,0,1,0,0,0,0,0,0,0,0,0,0,0,0,0,1,0,1,0,0,0,0,0,1,0,1,0,0,0,0,0,
   0,0,0,0,0,0,0,0,1,0,1,0,0,0,0,0,0,0,0,0,0,0,0,0,1,0,1,0,0,0,0,0,0,0,0,0,1,0,1,0,0,0,0,0,1,0,1,0
   
};

byte state = 1, transition;
byte n, p, blink_enabled;
unsigned long time_to_change, time_to_switch_off;

void setup() {
  pinMode(TRIGGER_PIN, INPUT_PULLUP);
  for(n=0; n<NUM_LEDS; n++) {
    pinMode(led_pin[n], OUTPUT);
    digitalWrite(led_pin[n], LOW);
  }
  Serial.begin(9600);
  Serial.println("Blink sequencer ready, waiting for trigger");
}

void loop() {
  switch(state) {
    case 1:  // idle
      if(digitalRead(TRIGGER_PIN) == LOW) transition = 12;
    break;
    case 2: // blinking for ON_TIME seconds
      if(millis() > time_to_switch_off)   transition = 21;
    break;
  }

  switch(transition) {
    case 12:
      blink_enabled = 1;
      time_to_switch_off = millis() + (unsigned long)BLINK_TIME * 1000;
      Serial.println("Triggered,  blinking started");
      transition = 0;
      state = 2;
    break;
    case 21:
      blink_enabled = 0;
      time_to_change = 0;
      for(n=0; n<NUM_LEDS; n++)
        digitalWrite(led_pin[n], LOW);
      Serial.println("Time is up, blinking stopped");
      transition = 0;
      state = 1;
    break;
  }

  if (blink_enabled) {
    if (millis() > time_to_change) {
      time_to_change = millis() + (unsigned long)BLINK_SPEED;
      for(n=0; n<NUM_LEDS; n++) {
        digitalWrite(led_pin[n], sequencer[n][p]);
      }
    p = (p + 1) % NUM_STEPS;
    }
  }
}

I’d show you some pictures of how I wired it up, but the forum wont let me embed items, hopefully a link to the pictures on imgur work: Trying to get fire engine lighting to work - Album on Imgur
Here’s a video of what it looks when running on a Maker Uno: https://youtu.be/_Qk9Se5q3hU

Hi there,
Looks Cool, You do have the sequencing done NICE!
Use the GPIO pin numbers in place of the Logical pin numbers.

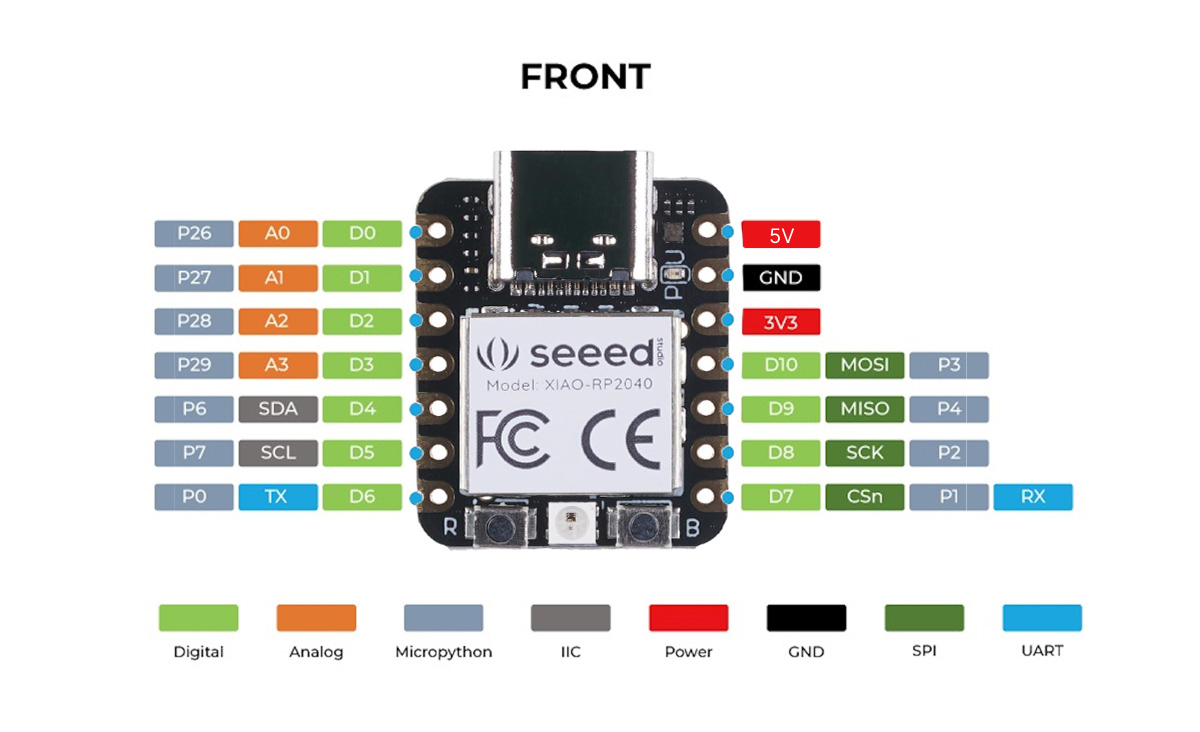
i.e P0, P1, P2, P4, P3
Try that
HTH
GL :slight_smile: PJ
:v:
should work great and fit inside…

2 Likes

OMG that worked!

Ty so much!!!

1 Like

dont forget to mark SOLUTION!

Hi there,
NICE!!!
Send another video…finished please. Because that and as Cg said, “mark solution” puts a bow on this one.
I’m certain others will appreciate finding the answer faster, especially bringing the receipt :money_mouth_face:(video)
Good Go.!

GL :slight_smile: PJ
:v:

btw, you got the sequencing Nailed really cool.

2 Likes

I’ll post a video once I have everything fitted into the fire engine.

1 Like

Oh and stupid question. How does one mark as solution? I’ve looked for a button, even tried editing the original post. (I feel like a complete noob now lol)

But I’ve bought 6 more of these boards, in case I get more people wanting me to wire these up :smile:

Actually a very good question… You have to be the original poster and theoredically their will be a check box beside the heart… but i cant find it for the life of me right now…lol

Here!

That solution check mark is not there for me. I guess it’s maybe because this is my first post?

1 Like

Right it’s all put together and working: https://youtu.be/KOZ2keugL78

I just have one more to do for this same client and re-do my own one with the RP2040, instead of the maker Uno. So I can have just the two power wires coming out of the engine.

Though I may have to make my own one better, as the Cork Fire brigade were parked out just around the corner from my shop and I saw that their new engine had 4 blue lights on the back with complimentary red lights that flashed opposite to the blue.

Thank you both!

1 Like

thanks for letting me know…! you never can tell what goes on now a days…

Totally awesome. man every kid is gonna want one :+1:
(and big kids too)
GL :slight_smile: PJ
:v:

“Im a big kid now…” as i pull up my pampers…

Watch this vid

Wow, with a chip that small, I would be able to do lights for a police car too. Ty.

1 Like