I’m using wildcats community app 4.4 (HW V2.70 Sys Ver 1.52) and have problems with calibration.
I did the calibration (with the different voltages for each of the 8 ranges) a couple of times for LOW and HIGH BATTERY and saved it , but the measuring still doesn’t work right. I also deleted all files, restarted the device and copied just my 720FCCAC.WPT back. Then I did a new calibration, with no success
I’m using a 5.00V reference voltage source for my measures. If I move Y-Position, the value always changes. See attachments.
Addition: Now it work’s better (smaller variance - just 0.10V). What I did: At the end of calibration process I selected “Exit AND RESTORE SYSTEM DEFAULTS”. One more calibration and it worked. Very peculiar…
Interesting, looking at the code, I believe I see what may have caused this. While implementing the
oversampling buffer modes, I overlooked the effect these would have if used during calibration.
While at this point this has not been verified, I’m reasonably certain this was the cause.
Also, I suspect resetting parameters to defaults may not have been what cleared the problem, is it
possible you may have at first calibrated the device while in one of the OS modes, and then
inadvertently shifted back to the regular modes? Don’t really see how resetting to defaults could
make any difference with this.
At any rate, whether this was in fact the cause of this problem or not, calibration will not work
properly while in OS buffer modes.
This should not happen, of course, and will fix this in upcoming updates. For the time being, users
should make sure to perform calibration only while in the regular (short or long) buffer modes.
Indeed, on the first attempts I was in oversampling mode. But when I deleted all files and put back the WPT-backup, I wasn’t anymore after startup. You see in my screenshots, that I already wasn’t at that time (buffer is not red anymore).
Ok, when I get some free time, will check into this. It’s possible though that the previous calibrations made with
OS mode might have messed up the data, even after recalibration due to variables overloading, etc. Returning to defaults just clears that data but does not reset anything else so this would point to the previous data as causing issues.
One thing I can say though, is that calibration while in OS mode is very likely to produce results like you were getting.
The buffer works in a totally different way in this mode, and the calibration routine expects something completely different
than what it is getting.
I’m not seeing that on mine that was analog calibrated prior to installing WC4.4. Gages for CHA and CHB don’t seem to work any different, regardless of the scan mode.
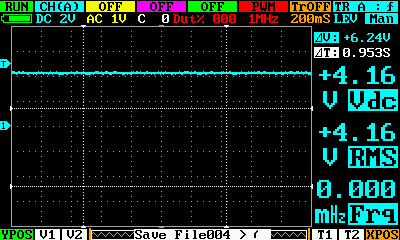
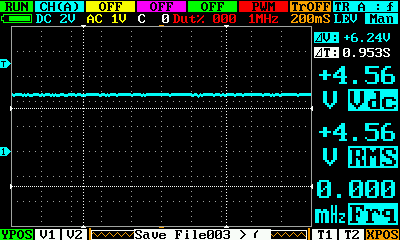
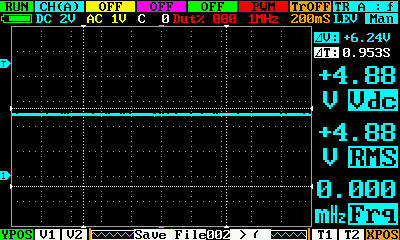
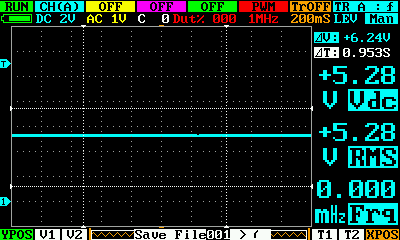
Using my 5.000 voltage reference, on 2V/div scale, I’m seeing 4.88v or 4.96v regardless of any YPOS setting. On 5V/div, I’m seeing 4.80v or 5.00v. I can jog the YPOS and see the gage reading change between the two readings of each scale.
That’s in RUN mode only. Course if I place scope in HOLD mode and move YPOS, I see analog gage readings all over the place, regardless of the analog channel input voltages.
I’ve never been really been pleased with the gage readout accuracy after calibration. I wouldn’t think the Vbt voltage would make that much difference.
The requirement that NON oversampling buffer modes be used is only WHILE PERFORMING CALIBRATION (holding down button 2 while the menu is on chA or chB).
Once calibrated, shifting to an oversampling mode should have little or no effect on meter accuracy, waveform amplitude and baseline positions while using the device.
When moving the YPOS you are actually varying the DC offset input (along with the waveform) TO the ADC. So as the signal shifts to the next step, it only registers at the halfway point, giving a +/- error of 1/2 step or a total of 1 step.
On the 2V/div setting, each step of the ADC is equal to 0.08 volts, or 2 volts divided by 25 steps/division. This is the limit of resolution and why you see shifts between these 2 values. On 5V/div, each step is equal to 0.2 volts.
For better accuracy, select a lower scale like 1 volt/div to expand the waveform, (shift YPOS down if necessary) and get 0.04 volt/div resolution.
The hold mode is designed ONLY to freeze a waveform and meter readings.
X position shifting to view the entire captured waveform, as well as measurements with cursors including measuring different parts of the waveform in cursor restrict mode CAN be performed in this mode, but changing timebase, vert volts/div or Y position while in hold mode will disrupt correct waveform display and meter function as the base for these will have been changed.
Vbt (battery) voltage can vary between 3.2 with a low battery and 4.5 volts with a charger connected, and makes a small but significant difference in DC offsets and waveform amplitude. This has been documented previously elsewhere as well in this forum. For an example, reset to defaults a device with a low battery charge, plug in a charger and watch the DC offsets change (in some ranges possibly more than others). Calibrating twice with 2 different battery levels allows the program to properly interpolate at a given battery level and compensate for this.
Careful, accurate calibration with a clean noise free DC source is essential to get the best accuracy. While this can be a tedious process, once completed, it does not need to ever be done again.
Keep in mind the limitation of an 8 bit ADC though. You can’t expect to accurately measure a waveform only 1 division in amplitude, but if properly calibrated, you will still get a useful reading. For best accuracy, use the lowest possible V/div range.
While even cheap DVM’s have much better meter accuracy at low frequencies, not many if any can for example read the RMS value of a complex 1Mhz or faster waveform. This is a tradeoff you get when going from a 16 or 12 bit ADC with a sampling rate of say 1Mhz to 8 bits and 72Mhz sampling.
Likewise, time and frequency measurements are limited by how many samples are being considered. Best accuracy here is had in full buffer mode, where as many samples as possible are available. When possible, the program will actually even look at how far into each sample a measurement is made, and also average readings over a period of time and take all this into consideration but there is no substitute for having more samples.